Chocolate

Chocolate Orange Cheesecake Brownie Cake

I’ve been meaning to blog this recipe for my Chocolate Orange Cheesecake Brownie Cake for a while so thought I’d better darn well do it before 2018 is out! Seriously, where has the time gone this year??

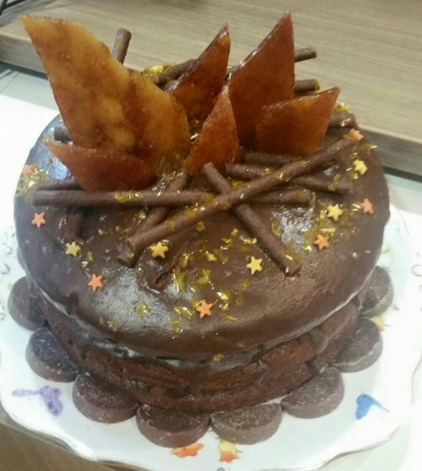
My good friend Mel has requested a chocolate orange cake for her last two birthdays (previous efforts include my chocolate orange bonfire cake) and this year was no exception. However, I was keen to move away from the usual sponge + frosting affair and try something different and, being time poor, my first thought was that you can’t really go wrong with brownies. I’d been wanting to give the magical sounding cheesecake hybrid variety a go for a while so thought this topping would be an equally delicious replacement for buttercream or ganache.

I ended up producing a kind of Frankenstein-style mash up of two recipes with various tweaks and the rich, gooey, creamy result worked really well as an alternative to a typical birthday cake. The bonus is that you effectively get two desserts in one while being super simple to make, especially if you don’t have the time to faff around with icing. Just a warning though – it’s much denser than a sponge so you’ll only need a small slice!

20181112_132619-1.jpg

INGREDIENTS – makes one cake of approx. 22cm/8.5 in diameter

For the brownie base:

  • 65g/2 oz plain flour
  • 175g/6 oz butter
  • 125g/4.5 oz caster sugar
  • 55g/2 oz brown sugar (either the dark or light variety, both work well)
  • 3 eggs
  • 1 Terry’s Chocolate Orange, chopped into small pieces
  • 1 tsp vanilla extract

For the cheesecake topping:

  • 150g/5 oz full-fat cream cheese
  • 60g/2 oz caster sugar
  • 1 egg
  • 1 tbsp orange juice
  • Approx. half a Terry’s Chocolate Orange
  • Orange sprinkles (optional)

METHOD

  1. Pre-heat the oven to 180 degrees C (or 160 fan) and line a round baking tin with parchment paper.
  2. Place the chocolate, sugars, vanilla and butter in a heatproof bowl and melt on the hob over a low heat or in the microwave in 30-second bursts until smooth.
  3. Allow to cool slightly then whisk in the eggs.
  4. Fold in the flour and pour into the prepared cake tin.
  5. In a separate bowl, beat the cream cheese, sugar, egg and orange juice together until smooth.
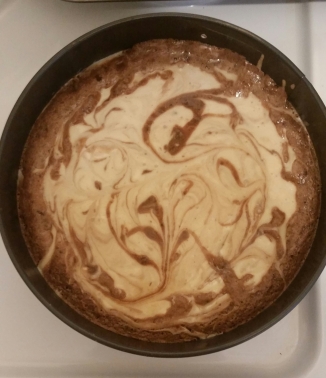
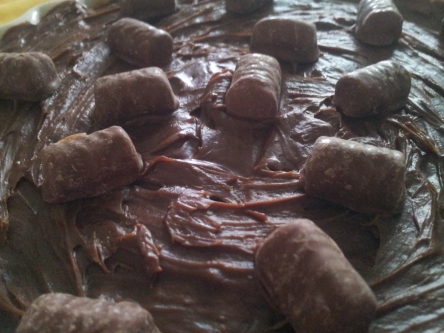
  6. Use a tablespoon to randomly dollop the cheesecake mixture on top of the brownie mixture, then use a skewer to make marble-effect swirls, as in the photo below.20181110_152213-1.jpg
  7. Place in the oven and bake for around 25-30 minutes, or until a crust forms on the edges of the brownie – remember, the inside should still be quite soft so don’t overbake!
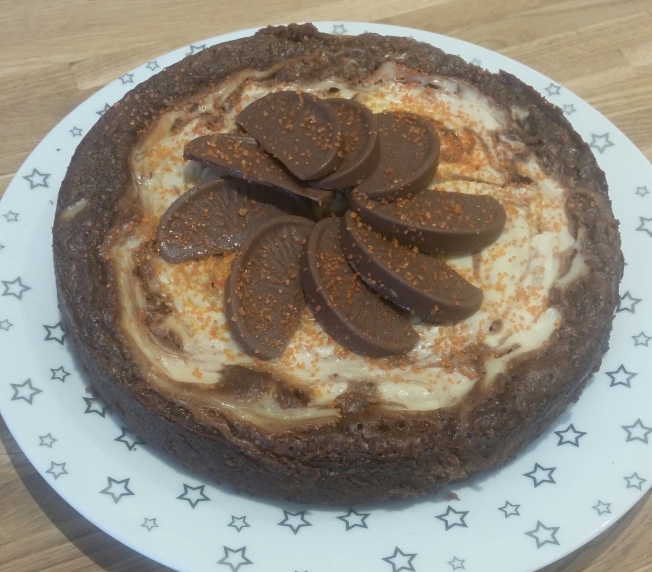
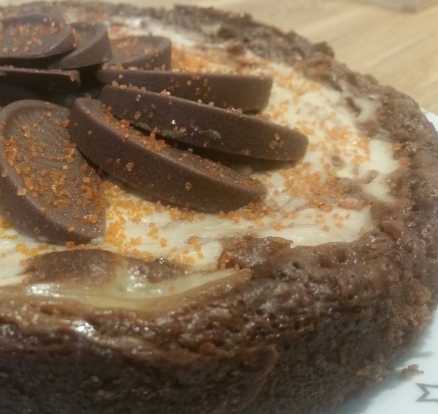
  8. Leave to cool on a wire rack before removing from the tin and arranging Chocolate Orange segments on top of the cake (enjoy scoffing the other half!) Scatter over some orange sprinkles as a finishing touch if you like.The cake will keep for a few days in an airtight container but make sure you keep it in the fridge.

20181112_132740-1

Categories: Chocolate | Tags: , , , , , , , , , , , , | Leave a comment

Chocolate Orange Bonfire Cake

I love being asked to make cakes for other people (providing no sugarpaste sculpture is involved!), especially to a theme or particular flavour. I get to rise to the challenge of making something decadent and special, but without the subsequent burden of a shedload of leftover cake which needs eating before it goes off, and inevitably leads to colossal stress and guilt over my already-expanding waistline.

It was my dear friend and work colleague Mel’s birthday on Monday this week and this year’s brief was ‘chocolate orange’. Throughout this month I’ve seen various photos of brilliant bonfire cakes – with the crowning decoration constructed from chocolates intertwined with sugar flames – and fancied giving one a go myself, so it was a no-brainer to combine the two ideas into this decadent Chocolate Orange Bonfire Cake.

I’m by no means a ‘showstopper’ kind of person when it comes to cake making as I simply don’t have the skills to execute masterpieces in buttercream and fondant that look like they belong in the Louvre (to be honest, I struggle just to use a piping bag and will avoid using one at all costs!) However, I think this is probably the best looking cake I’ve made to date and I’m really pleased with how it turned out. Despite being very simple to put together, it’s very striking and ideal for a celebration.

More importantly than pure aesthetics, this cake is absolutely delicious. The melted chocolate makes it wonderfully moist and satisfying and all my work colleagues commented on how good it was.

Personally, I think I actually prefer it without the icing; the sponge can really hold its own with its taste and texture and I don’t think the ganache is really necessary, despite its lovely silkiness. If you’re not making this for a celebration, feel free to omit it, unless you’re a real hardcore chocoholic!

Speaking of chocoholics, if this recipe appeals to you, why not try my spiced tea & chocolate cake with cinnamon ganache?

export-236716381-1
INGREDIENTS – makes 3 sponge layers of 20cm/8in diameter

For the cake:

  • 280g/10 oz self-raising flour
  • 115g/4 oz granulated or caster sugar
  • 115g/4 oz dark brown sugar
  • 280g/10 oz butter or margarine
  • 4 eggs
  • 2 heaped tbsp cocoa powder
  • 2 tbsp milk
  • 1 x Terry’s Chocolate Orange (157g) or equivalent weight of other orange chocolate
  • 0.5 tsp baking powder

For the orange ganache icing/decorations:

  • 1 x Terry’s Chocolate Orange (157g) or equivalent weight of other orange chocolate
  • 90g/3 oz butter or margarine
  • 20g/0.75 oz dark brown sugar
  • 65 ml/2 fl oz water
  • About 10-12 orange Matchmakers
  • 55g/2 oz granulated or caster sugar
  • Orange/yellow sugar stars + sprinkles (optional)
  • 1 sharing bag of Mini Chocolate Orange segments (optional)

METHOD

For the cake:

  1. Pre-heat the oven to 180 degrees C (or 160 fan) and line three round baking tins with parchment paper, or spritz with cake release spray.
  2. Whisk the butter/margarine and sugars together in a large mixing bowl until pale, then whisk in the eggs and milk.
  3. Break the Chocolate Orange up into small pieces and place in a heatproof bowl, then place in the microwave on a low heat in blasts of 1 minute until melted.
  4. Fold the melted chocolate, flour, cocoa powder and baking powder into the egg mixture until a batter of a soft dropping consistency has formed.
  5. Pour the mixture into the prepared cake tins, then pop in the oven and bake for around 20-25 minutes until a cocktail stick inserted into the sponge comes out clean.
  6. When baked, leave the sponges to cool on a wire rack before turning them out of the tins. At this stage they can be frozen for decorating at a later date if you wish.

For the orange ganache icing/decorations:

  1. Break the other Chocolate Orange into small pieces and set aside.
  2. Place the water, butter/margarine and brown sugar in a saucepan and melt together on a low heat.
  3. When the mixture begins to bubble, take the pan off the heat and add the chopped Chocolate Orange. Swirl the liquid over the pieces so that they melt evenly.
  4. When the chocolate has all melted, whisk the mixture until smooth and glossy, then transfer into a cool mixing bowl.
  5. Leave the frosting to set for at least one hour (place it in the fridge to speed up the process a bit) until it’s a spreadable consistency.
  6. When set, spread the frosting onto the cooled cake and place in the fridge for at least an hour.
  7. Pour the granulated/caster sugar into a small, heavy-bottomed pan over a medium heat on the hob and wait until it has turned golden brown with a liquid consistency – be patient and DO NOT STIR!
  8. Pour the liquid sugar onto non-stick parchment paper in one big sheet (be careful as it will be extremely hot), then allow to set until very hard and brittle.
  9. Arrange the Matchmakers in a criss-cross pattern across the top of the cake so that they resemble branches on a bonfire.
  10. Just before serving, snap the melted sugar sheet into flame shapes of different sizes and arrange as you see fit among the Matchmakers by pushing them upright into the sponge.
  11. Scatter the sugar stars and sprinkles over the top and arrange the Mini Chocolate Orange segments around the edge of the cake as a finishing touch, if using.

cxachawwqaalczh

Categories: Chocolate, Icing, Layer Cakes | Tags: , , , , , , , , , , , , , , , , , , , , , , | 3 Comments

Super Easy Nutella Popcorn Cupcakes

I have been so ridiculously busy the last few weeks that my poor blog has been rather neglected of late. The main reason for this is that I am currently in the midst of house hunting! After much renting and moving back and forth, I’ve decided it’s time to get my bum in gear and finally get on the property ladder now that I’m earning again.

It’s something I’ve wanted for a long time and I’m desperate to settle in one place. It’s quite exciting but also overwhelming and scary!

Anyway, both my other half and my best friend had birthdays within a week of each other this month. Neither wanted a big cake but I couldn’t not create anything for them, despite my current time-poor situation. So one exhausted Saturday afternoon I made these delicious Nutella Popcorn Cupcakes, which don’t involve any fancy ingredients and are a doddle to put together.

Nutella is a life-saver when you don’t have the time/energy to whip up icing following the effort of making the actual cake, and ready-made popcorn is an impressive but simple decoration. And, most importantly, they’re extremely tasty!

If you’re reeeeally short on time, you could use packet chocolate cake mix instead of doing the sponge from scratch – I certainly wouldn’t judge you!

And if you like super easy Nutella recipes, why not whip up a batch of delicious Nutella porridge bars?

IMG_1191

INGREDIENTS – makes approx. 15-18 cupcakes

For the cakes:

  • 225g/8 oz self-raising flour
  • 140g/5 oz caster or granulated sugar
  • 70g/2.5 oz brown sugar
  • 225g/8 oz butter or margarine
  • 4 eggs
  • 3 tbsp cocoa powder
  • 2 tsp vanilla extract
  • 1 tbsp strong coffee

For the icing/decoration (I have to confess that I didn’t measure these accurately!)

  • Roughly half a jar of Nutella or other chocolate & hazelnut spread
  • Roughly half a pack of ready-prepared toffee popcorn, e.g. Butterkist

METHOD

For the cakes:

  1. Pre-heat the oven to 180 degrees C (or 160 fan) and line a muffin tin with cupcake cases.
  2. Whisk the butter/margarine and sugars together in a large mixing bowl until pale then whisk in the eggs.
  3. Fold in the flour, cocoa powder, coffee and vanilla extract until a batter of a soft dropping consistency has formed.
  4. Pour the mixture into the cake cases until they’re each about three quarters full, then pop in the oven and bake for around 15-20 minutes until a cocktail stick inserted into the sponges comes out clean.
  5. When baked, leave the cakes to cool on a wire rack. At this stage the they can be frozen for decorating at a later date if you wish.

For the icing/decoration:

  1. When the cakes have cooled, dollop a generous amount of Nutella onto each one and smooth out using a palette knife.
  2. Top each cake with 5 pieces of popcorn.
Categories: Chocolate, cupcakes | Tags: , , , , , , , , , , , , , , , , , | 3 Comments

Spiced Tea & Chocolate Cake with Chocolate & Cinnamon Ganache Icing

I first came up with the idea of, and impulsively made, this Spiced Tea & Chocolate Cake with Chocolate & Cinnamon Ganache Icing for the first time over a year ago when I wanted to combine the winning combination of chocolate and good old-fashioned English tea in sponge form. The addition of cinnamon and mixed spice adds an extra layer of depth to the flavours and I’m really pleased with how the finished product turned out.

The flavours are slightly reminiscent of my Christmas favourite, chocolate gingerbread cake, but the texture is less dense and more akin to a traditional sponge, making it an ideal treat all year round.

I stupidly didn’t take any photos of my first attempt but, when asked to make a birthday cake for a pony-mad colleague, I decided to recreate it in deceptively simple but eye-catching horseshoe form. The equine motif is, of course, optional and the cake tastes just as delicious made in a regular round or square tin. It’s also very tasty in its naked form, minus the icing, but the cinnamon ganache adds an extra touch of indulgence.

I must give credit to the inspirational domestic goddess and my all-round food idol, Nigella Lawson, for the aforementioned icing – the original recipe is hers (part of her decadent Devil’s Food cake), and I simply added some cinnamon.

20160417_171011-1

INGREDIENTS – makes 1 bundt ring cake as in the picture, or 1 deep round 20cm/8in cake

For the cake:

  • 225g/8 oz butter or margarine
  • 115g/4 oz caster or granulated sugar
  • 115g/4 oz brown sugar
  • 225g/8 oz self-raising flour
  • 4 eggs
  • 2 heaped tbsp cocoa powder
  •  120ml/4 fl oz strong cold tea
  • 2 tsp cinnamon
  • 1 tsp mixed spice
  • 0.5 tsp baking powder

For the ganache icing/decorations:

  • 125g/4.5 oz dark chocolate, finely chopped
  • 90g/3 oz butter
  • 20g/0.75 oz dark brown sugar
  • 65 ml/2 fl oz water
  • 2 tsp cinnamon
  • 7 Caramac buttons (optional)
  • Silver shimmer spray (optional)
  • Palm-sized piece of marzipan (optional)
    + horse-shaped cookie cutter (optional)

METHOD

For the cake:

  1. Pre-heat the oven to 180 degrees C (or 160 fan) and line your cake tin of choice with parchment paper or spritz with cake release spray.
  2. Whisk the butter/margarine and sugars together in a large mixing bowl until pale, then whisk in the eggs.
  3. Fold in the flour, cocoa powder, tea, cinnamon, mixed spice and baking powder until a batter of a soft dropping consistency has formed.
  4. Pour the mixture into the prepared cake tin, then pop in the oven and bake for around 25-30 minutes until a cocktail stick inserted into the sponge comes out clean (it might need a bit longer if you’re using one round tin instead of a ring-shaped one).
  5. When baked, leave the cake to cool on a wire rack before turning it out of the tin. At this stage it can be frozen for decorating at a later date if you wish.
  6. If you’re making a horseshoe cake, cut out a section of the sponge ring (and eat later!)

For the ganache icing/decorations:

  1. Place the water, butter, brown sugar and cinnamon in a saucepan and melt together on a low heat.
  2. When the mixture begins to bubble, take the pan off the heat and add the finely chopped chocolate. Swirl the liquid over the pieces so that they melt evenly.
  3. When the chocolate has all melted, whisk the mixture until smooth and glossy, then transfer into a cool mixing bowl.
  4. Leave the frosting to set for at least one hour (place it in the fridge to speed up the process a bit) until it’s a spreadable consistency.
  5. When set, spread the frosting onto the cooled cake.
  6. If you’re making a horseshoe cake, arrange the Caramac buttons, evenly spaced, along the middle of the sponge and finish with a spritz of silver shimmer spray for a metallic sheen.
  7. To make the little yellow horse centrepiece as in the photo, roll out the chunk of marzipan until it’s about the thickness of a pound coin, then stamp it out using the horsey cookie cutter and place in the middle on the serving plate/board.


Categories: Chocolate, Icing | Tags: , , , , , , , , , , , , , , , , , , , , , , | Leave a comment

Boost Bar Biscuit Cake

They may not enjoy quite the same popularity as Mars bars, Maltesers or Cadbury Buttons, but I think Boost bars are such an underrated chocolate. Chewy caramel, a generous coating of Dairy Milk and super crunchy biscuit melded into one – what’s not to like?!

Boosts have been my mum’s all-time favourite chocolate bars for as long as I can remember, and so I wanted to use them as the inspiration for her birthday cake this year. She’s not the biggest fan of chocolate sponge cake and the idea of doing one sandwiched with caramel and topped with Boost pieces didn’t really grab me. I Googled ‘Boost bar cheesecake’ and, to my immense surprise, there were no results! Needless to say, this was all the motivation I needed to rectify this and attempt one myself, particularly given the enticing can of Carnation caramel already sat waiting in the pantry.

After thinking about it some more, I decided cream cheese didn’t really seem necessary and decided to stick with recreating each element of the chocolate bar to create a large, sliceable, homemade version. No frills, no faff and no baking but the end result was delicious and went down a storm!

I realised afterwards that, due to the soft consistency of the tinned caramel, this creation is actually perhaps more reminiscent of Munchies chocolates rather than their chewier Cadbury cousin. Either way, it tastes good, which is the main thing I think!

20160319_151302

INGREDIENTS

For the base:

  • 170g/6 oz digestive biscuits, crushed
  • 55g/2 oz butter or margarine, melted

For the filling:

  • 3/4 of a 397g can Carnation caramel
  • 250g/9 oz milk chocolate (preferably Cadbury’s Dairy Milk)
  • 55g/2 oz butter or margarine
  • 2 tbsp golden syrup
  • 1 x 10⁸g bag Boost Bites (or Munchies!), or 2 Boost bars, chopped into 2cm pieces

METHOD

For the base:

  1. Place the digestive biscuits in a hole-free carrier bag and bash into crumbs with a rolling pin, or place them in a food processor.
  2. Place the butter/margarine in a heatproof bowl and melt in the microwave until liquid, and then pour in the biscuit crumbs. Mix thoroughly to combine.
  3. Pour the mixture into a lightly greased flan dish and press down with your fingers or the back of a spoon until flat and firm. Place in the fridge to set for at least half an hour.

For the filling/topping:

  1. Remove the set biscuit base from the fridge and spread the caramel over it evenly with a spatula.
  2. Place the flan dish back in the fridge and allow to set for at least an hour, until the caramel has firmed up a bit. Remove from the fridge before making the chocolate topping.
  3. Place the chocolate in a heatproof bowl and melt in the microwave on low heat in blasts of 30 seconds-1 minute until completely smooth.
  4. Stir in the butter/margarine and syrup and pour the mixture over the caramel layer. Once the chocolate has cooled completely, arrange the Boost Bites on top, and then place back in the fridge for at least 25 minutes before serving.

20160319_151312

 
Categories: Chocolate, No-Bake | Tags: , , , , , , , , , , , , , | 4 Comments

Chocolate Oat Othello Biscuits

I have my late grandmother to thank for these lovely chocolate oat biscuits. Sadly, my grandad’s recently been moved into a care home and my parents are in the process of clearing out his house. Among the vast array of things unearthed, they found two big cardboard boxes full of recipe clippings from ancient magazines belonging to my gran, who passed away in 2008.

Looking through these little relics of cooking times past has been an interesting and touching experience. It might sound silly but rifling through them made me feel closer to her and remembering the way she hoarded anything and everything to stop it from going to waste made me smile. Although hanging on to gargantuan stacks of old envelopes and keeping used individual butter wrappers to use to grease cake tins is a little extreme, I admire the way that she and her frugal generation in general were so much more scrupulous about waste than we are nowadays. As a recycling enthusiast who hates to throw things away unnecessarily, it’s quite inspiring.

Anyway, to get on track to the main point of this post: among Granny Emily’s varied collection of magazine snippets was a recipe from the 1970s for so-called ‘Othello’ biscuits which caught my eye. They’re mostly just oats, butter, sugar and cocoa powder but I love oaty things and thought they sounded tasty so I was keen to give them a go.

The unusual name added to their allure until I then twigged that it is of course a racist nod to the titular character of the Shakespeare play of the same name due to their dark colour – this certainly wouldn’t be an acceptable name for cookies nowadays but things were a lot less politically correct back then! Anyhow, despite their dodgy nomenclature, I’m pleased to say that they’re scrumptious…and quite addictive.

However, considering we are not even halfway through January, I don’t want to ignore the talk in my previous post about trying out healthier recipes. While eating one of these biscuits hardly carries the same calorific consequences as a giant doorstop of cake, I still wanted to have a go at removing, or at least cutting down, the amount of fat and refined sugar used. Therefore, I tweaked the original recipe and came up with a lighter version that contains no refined sugar and only a small amount of fat. Admittedly, they are very slightly drier than their full fat counterparts but the cheeky drizzle of chocolate on the top compensates for this and gives them a delicious edge without adding too much in the way of naughtiness. I also threw in a bit of spice which I think really complements the flavour. They make an ideal snack as they’re quite filling; even I stopped after nomming just one and that’s usually unheard of for me!

This version can easily be made vegan and/or dairy free with a few simple substitutions, which I’ve suggested below.

20160110_162610Original batch pictured on the left and healthier version on the right 🙂

ORIGINAL OTHELLO BISCUITS (this is the original 1970s recipe but I’m unable to give credit as I don’t know which magazine it’s from, sorry!)

INGREDIENTS – makes approx. 10 biscuits

  • 4 oz porridge oats
  • 2 oz margarine
  • 3 oz brown sugar
  • 0.5 oz cocoa powder
  • 0.5 oz plain flour
  • 0.25 tsp baking powder
  • 1 dessertspoon cold water

METHOD

  1. Sift the flour, cocoa powder, and baking powder into a bowl, stir in the oats.
  2. Add the margarine and, using the fingertips only, rub it in until the fat is evenly distributed.
  3. Stir in the sugar then add the water and knead the ingredients to a firm dough.
  4. Here, the original recipe tells you to roll out the dough with a rolling pin and stamp out circles but to be honest it’s far too sticky to do this so I’d suggest pulling off ping pong sized balls of it and flattening them with wet palms before placing them on a rectangular baking tray lined with parchment paper.
  5. Bake the biscuits on the centre shelf of a fairly cool oven, gas mark 3 or 325 degrees F (160 degrees C), for about 15 minutes until they are firm to touch.
  6. Transfer them to a wire tray to cool and become crisp.

LOW FAT & REFINED SUGAR FREE OTHELLO BISCUITS

INGREDIENTS – makes approx. 20 biscuits

  • 225g/8 oz porridge oats
  • 2 tbsp almond (or peanut) butter
  • 2 tbsp olive spread (or soya spread to make them vegan/dairy free), softened
  • 5 tbsp honey (or maple/agave syrup to make them vegan)
  • 1 tsp mixed spice
  • 0.5 tsp ginger
  • 30g/1 oz cocoa powder
  • 30g/1 oz plain flour
  • 2 tbsp water
  • 0.5 tsp baking powder
  • 100g/3.5 oz dark chocolate (the higher the cocoa content, the better), chopped

METHOD

  1. Pre-heat the oven to 170 degrees C (or 150 fan) and line a large rectangular baking tray with parchment paper.
  2. Place all the ingredients apart from the chocolate into a large mixing bowl and mix together with a wooden spoon and then your fingers until a sticky dough forms. If it’s too dry, add a little more water and if it’s too sticky, add a bit more flour.
  3. Pull off ping pong sized balls of dough and flatten them with wet hands, then place onto the baking tray.
  4. Pop in the oven and bake for around 10-15 minutes or until they feel slightly firm to the touch (they’ll crisp up as they cool) and then leave too cool on a wire rack.
  5. When the biscuits have cooled, place the chocolate in a heatproof bowl and microwave on a medium heat in blasts of 1 minute until completely melted, then drizzle over the biscuits using a teaspoon.
  6. Allow to set before scoffing, preferably with a cuppa.
Categories: Biscuits/Cookies, Chocolate, Healthier, Raw/Vegan | Tags: , , , , , , , , , , , , , , , , , , , , | 1 Comment

Low Fat Christmas Pudding Brownies

I’ve recently been compiling a ring binder of print-outs of healthier recipes that I’ve found online so that I can easily look them up when I feel like cooking something that’s not too chock-full of calories, fat and sugar.

One Google result that caught my attention was the original chocolate version of this Low Fat Christmas Pudding Brownie recipe, which I came across online here. It included the genius idea of adding mushed prunes in place of butter or margarine to create a gorgeously moist but less fatty cake.

I don’t understand why prunes are so neglected as a fruit. I know they’re infamous for being used as a means of ‘keeping you regular’ and carry metaphorical connotations of wrinkles, shriveling and general lifelessness, but they’re so underrated as a food in their own right. I bought some for the first time in forever recently and had forgotten what a deliciously rich, almost caramelly, flavour they have.

Anyway, I digress (I swear I’m not being paid by some kind of Prune Advisory Board) – I’m in the grip of full-blown Christmas fever at the moment as the end of November rapidly approaches, so I decided to add a festive twist to the original recipe by incorporating some extra fruit and nuts and a dash of warming winter spice. When both my dad and I sampled them, our immediate thoughts were of Christmas pudding, hence the title!

I also reduced the amount of sugar used in the original version as it annoys me when recipes are labelled as ‘healthy’ due to low fat content but include an obscene amount of the sweet stuff. I wouldn’t say these taste identical to regular brownies but they’re utterly delicious – rich, moist and full of flavour – and I really don’t think people would know they were low fat and lower sugar if you didn’t tell them.

I also like the fact that they’re a healthier alternative that don’t require expensive and/or obscure ingredients. I love the new wave of inventive vegan/raw/generally all-round-saintly treats but coconut oil, agave syrup and near-industrial quantities of cashew nuts don’t come cheap.

The final cherry on the proverbial cake is that these brownies are dairy free so they’d be ideal for lactose-intolerant friends.

I’ll definitely be making them again very soon!

IMG_20171112_154822_162.jpg
INGREDIENTS – makes approx. 12

  • 55g/2 oz plain flour
  • 110g/4 oz pitted prunes
  • 130g/4.5 oz brown sugar
  • 6 tbsp cocoa
  • 3 tbsp cooking oil
  • 2 eggs
  • 55g/2 oz raisins
  • 55g/2 oz chopped mixed nuts (e.g. pecans, almonds, walnuts)
  • 1.5 tsp mixed spice
  • 1 tsp vanilla extract
  • 0.5 tsp baking powder
  • 2 tbsp water
  • 12 walnut or pecan halves, to decorate (optional)
  • Silver shimmer spray, to decorate (optional)

METHOD

  1. Pre-heat the oven to 180 degrees C (or 160 fan) and line a rectangular baking tin with parchment paper.
  2. Mix the flour, sugar, cocoa, mixed spice and baking powder together in a large mixing bowl.
  3. Roughly snip the prunes into pieces with scissors and place them in a separate heatproof bowl with the water, then microwave on a medium setting in two blasts of 1 minute until soft and mushy.
  4. Squish the prunes with a potato masher to form a paste and add to the dry ingredients.
  5. Stir in the cooking oil, eggs, raisins, chopped nuts and vanilla extract. Mix until well blended.
  6. Pour the batter into the prepared tin and pop in the oven for around 12-15 minutes until a cocktail stick inserted into the mix comes out mostly clean – err on the side of caution and make sure you don’t over bake them as the brownies will be dry and crumbly!
  7. When baked, leave to cool on a wire rack before cutting into 12 squares with a sharp knife.
  8. Push a walnut or pecan half into the top of each square and finish with a festive spritz of edible silver shimmer spray, if you fancy.20171112_153930-1
Categories: Chocolate, Festive, Healthier, Traybakes | Tags: , , , , , , , , , , , , , , , , , , | 3 Comments

Cookbook Challenge 2 – Nigella’s Devil’s Food Cake

I had another birthday cake request a few weeks ago, this time from my lovely Californian friend Lara. Her only brief was ‘CHOCOLATE’ so, in keeping with my resolution to try more actual cookbook recipes, I decided to have a go at Nigella Lawson’s sinful Devil’s Food cake that I remembered her baking on one of her TV shows.

Anyone that knows me knows that Nigella is one of my all-time favourite people in the world and, seeing as she’s the queen of decadent eating, I thought it was appropriate to use one of her recipes for a chocolatey, indulgent birthday treat.

I used white chocolate fingers to cover a strawberries and cream cake for my friend Danielle’s birthday last year and it turned out fantastically so I decided to go for a similar look for this one, but using dark chocolate Kit Kats instead. It looks quite fancy but it’s surprisingly easy to make and assemble – just make sure you allow extra time for the frosting to set to a spreading consistency.

I was worried the sponges wouldn’t rise properly when I was making them as the batter was so runny but they turned out beautifully. It’s gorgeously moist, dark and luscious, and a level up from a standard chocolate cake. You don’t need a big slice as it’s very rich due to the lashings of divine ganache frosting but it’s perfect for a special occasion. The birthday girl was over the moon and it was well worth the suspenseful tube journey transporting it from West Hampstead to Tower Hill!

20150801_220200-1

INGREDIENTS – makes 2 sponge layers of 20cm/8in in diameter

For the cake:

  • 225g/8 oz plain flour
  • 150g/5 oz caster sugar
  • 100g/3.5 oz brown sugar
  • 125g/4.5 oz butter
  • 50g/2 oz cocoa powder
  • 2 large eggs
  • 2 tsp vanilla extract
  • 250ml/8.5 fl oz boiling water
  • 0.5 tsp baking powder
  • 0.5 tsp bicarbonate of soda

For the frosting:

  • 30g/1 oz brown sugar
  • 175g/6 oz butter
  • 300g/10.5 oz dark chocolate, finely chopped
  • 125ml/4 fl oz water

For the decorations:

  • 19 (approx.) dark chocolate Kit Kats (I used the Sainsbury’s own brand ones as I think the criss-cross pattern on them is prettier than the Kit Kat logo!)
  • 400g/14 oz (approx.) strawberries (about one standard punnet)
  • 110g/4 oz (approx.) raspberries (about half a standard punnet)
  • Pinch of edible glitter (optional)
    + a ribbon long enough to tie around the cake

METHOD

For the cake:

  1. Pre-heat the oven to 180 degrees C (or 160 fan) and line two baking tins with parchment paper.
  2. Put the cocoa and brown sugar in a bowl and add the boiling water. Mix briefly and set aside.
  3. Whisk the butter and caster sugar together until pale.
  4. Place the flour, baking powder and bicarb into a separate bowl.
  5. Add the vanilla extract and one egg to the butter mixture and whisk, then add half of the flour mixture.
  6. Add the other egg to the butter mixture, followed by the rest of the flour mixture and continue whisking.
  7. Fold in the liquid cocoa mixture and mix until all the ingredients are combined.
  8. Pour the batter in equal quantities into the prepared cake tins, then place in the oven and bake for around 25-30 minutes until a cocktail stick inserted into the sponges comes out clean.
  9. When baked, leave the cakes to cool on a wire rack before turning out of the tins.

For the frosting:

  1. Place the water, butter and brown sugar in a saucepan and melt together on a low heat.
  2. When the mixture begins to bubble, take the pan off the heat and add the finely chopped chocolate. Swirl the liquid over the pieces so that they melt evenly.
  3. When the chocolate has all melted, whisk the mixture until smooth and glossy, then transfer into a cool mixing bowl.
  4. Leave the frosting to set for at least one hour (place it in the fridge to speed up the process a bit) until it’s a spreadable consistency.
  5. When set, spread some of the frosting onto one of the cooled sponges then sandwich the other sponge on top. Spread the rest of the frosting over the top and sides of the cake.

20150731_15544620150731_160533

For the decorations:

  1. Take the Kit Kats out of their wrappers and carefully place all around the edge of the cake, without any gaps, pushing them firmly into the frosting so that they stick.
  2. Tie the ribbon around the middle of the cake to secure the biscuits.
  3. Top with the strawberries and raspberries and add a sprinkling of edible glitter if you fancy. Et voila!

Cake & frosting recipe © Nigella Lawson

Categories: Chocolate, Layer Cakes | Tags: , , , , , , , , , , , , , , , , , , | 4 Comments

Cherry Bakewell & Cherry Chocolate Scones

Apologies for the lack of action on my blog recently – I’ve been back in my hometown doing some office temping at my old workplace for the last three weeks and left all my recipes back in my flat in London! I’ve also not been doing so much baking recently due to the sweltering weather (I’m not good with heat; I’m a bit of a summer grinch!)

Anyway, here’s a recipe for Cherry Bakewell and Cherry Chocolate Scones that I’ve been meaning to post for a while. I love scones as they’re so darn simple to make – nothing but flour, butter and milk in their most basic form – and they’re very versatile, so I decided to do a decadent twist on the traditional plain kind for Sunday Baking Club’s (@SundayBakeClub on Twitter) charity cherry theme a while back.

Both types came out really well and tasted delicious with a bit of butter, or just on their own (mountains of jam and clotted cream not required here unless you have an incredibly sweet tooth!) The chocolate ones had a sweet, sticky texture and the bakewell ones had a lovely marzipan-like flavour. Perfect to enjoy as part of an alfresco afternoon tea!
20150523_162427

INGREDIENTS – makes approx. 8-10

For the cherry bakewell scones:

  • 250g/9 oz self-raising flour
  • 55g/2 oz butter
  • 25g/1 oz caster/granulated sugar
  • 150ml/5 fl oz milk
  • 40g/1.5 oz glace cherries, chopped
  • 2 tsp almond essence
    To decorate:
  • 2 tsp almond essence
  • 1 tbsp icing sugar
  • 4-5 glace cherries, halved

For the cherry chocolate scones:

  • 250g/9 oz self-raising flour
  • 55g/2 oz butter
  • 25g/1 oz caster/granulated sugar
  • 150ml/5 fl oz milk
  • 2 tbsp cocoa powder
  • 40g/1.5 oz glace cherries, chopped
  • 40g/1.5 oz dark or milk chocolate, chopped
  • 0.5 tsp vanilla extract
    To decorate:
  • Handful of flaked almonds
  • 2 tsp icing sugar
  • Few drops of milk or water

METHOD

For the scones:

  1. Pre-heat the oven to 180 degrees C (or 160 fan) and line a large rectangular baking tray with parchment paper.
  2. Place the flour, sugar and chopped cherries (plus the cocoa powder and chopped chocolate if making the chocolate scones) in a large mixing bowl and make a well in the middle.
  3. Place the butter, milk and almond essence (if making the bakewell scones) or vanilla extract (if making the chocolate scones) in the well and roughly mix with a knife.
  4. Rub the liquid into the dry ingredients with your hands until a pliable dough forms. If the mixture is too sticky, add a little more flour and if it’s too crumbly, add a little more milk.
  5. Place the dough on a floured surface and roughly pat until it’s around 3cm/1in in thickness, then cut out scones with a large round or fluted cookie cutter. Squish the offcuts together and repeat until all the dough is used.
  6. Place the scones on the prepared baking tray and bake in the oven for around 15 minutes until they’re slightly brown on the bottom.
  7. Leave the scones to cool on a wire rack. They can be frozen at this stage if you wish.

For the cherry bakewell decorations:

  1. Mix the icing sugar and almond essence together thoroughly until a runny mixture forms.
  2. Drizzle in a criss-cross lattice pattern over the cooled scones then top each one with half a glace cherry.

For the cherry chocolate decorations:

  1. Mix the icing sugar and milk/water together thoroughly until a runny mixture forms.
  2. Place a small blob in the centre of the top of each scone using a teaspoon, then arrange 5 flaked almonds in the shape of flower petals using the icing as ‘glue’. Finish each flower with a tiny blob of icing in the centre.
Categories: Chocolate, Other Treats | Tags: , , , , , , , , , , , | 1 Comment

Tunnock’s Chocolate Teacake Cake

Originally posted 14/04/2015

Before Easter I was struck down with gastroentiritis and it was an utterly horrendous experience. Crippling stomach pains and the inability to eat anything but dry crackers and ginger nut biscuits for over a week meant I was fantasising about the day I could finally stuff my face with indulgent food again, and I swore I’d treat myself by making a big decadent cake when I was better.

Luckily, I recovered in time for the Easter weekend and decided to set myself the challenge of baking something chocolatey that didn’t involve Mini Eggs or Creme Eggs. Don’t get me wrong, I LOVE Mini Eggs and Creme Eggs but I thought it’d be fun to try something outside-the-box. The result was a creation inspired by one of my favourite treats, Tunnock’s chocolate teacakes, with their heavenly combination of fluffy marshmallow filling, strawberry jam, biscuit base and a crisp chocolate coating. The flavours and textures transfer really well into cake form and it was a lot of fun to make, especially the mountain of meringue frosting topped with a chocolate shell!

Freezing the marshmallow frosting for five minutes before pouring on the melted chocolate is a great tip I picked up from a recipe for hi-hat cupcakes and it really works! Make sure you don’t omit this step or you’ll end up with a runny, melty mess. As I mentioned in my Neapolitan Cake post, although beating egg white with icing sugar makes for a deliciously marshmallow-like frosting, it doesn’t last well and will begin to shrink after a couple of days. The cake will still be delicious but it won’t look as good!

INGREDIENTS – makes 2 sponge layers of 8in/20cm diameter

For the cake:

  • 225g/8 oz self-raising flour
  • 225g/8 oz caster/granulated sugar
  • 225g/8 oz butter/margarine
  • 4 eggs
  • 2 heaped tbsp cocoa powder
  • 2 tsp vanilla extract
For the frosting/filling/topping:
  • 2 egg whites
  • 4 tbsp icing sugar
  • 2 tsp vanilla extract
  • 2 tsp golden syrup
  • Half a tsp cream of tartar (optional but helps to stabilise the mixture)
  • 5 tbsp (approx.) strawberry jam
  • 100g/3.5 oz milk chocolate
  • 3-4 milk chocolate or plain digestive biscuits

METHOD

For the cake:

  1. Pre-heat the oven to 180 degrees C (or 160 fan) and line two round baking tins with parchment paper.
  2. Whisk the butter/margarine and sugar together in a large mixing bowl until pale then whisk in the eggs.
  3. Fold in the flour, cocoa powder and vanilla extract until a batter of a soft dropping consistency has formed.
  4. Pour the mixture into the prepared cake tins then pop in the oven and bake for around 15-20 minutes until a cocktail stick inserted into the sponges comes out clean.
  5. When baked, leave the cakes to cool on a wire rack before turning them out of the tins. At this stage the sponges can be frozen for decorating at a later date if you wish.
For the frosting, filling & topping:
  1. Spread the strawberry jam generously across the top of one of the cooled sponges.
  2. Separate the egg whites into a clean bowl and whisk with the vanilla extract, golden syrup and cream of tartar, while adding the icing sugar a few teaspoons at a time, until stiff peaks form – you should ideally do this for a minimum of 7-10 minutes.
  3. Spread about a third of the frosting on top of the jam-covered sponge using a palette knife then sandwich the other sponge on top.
  4. Spread the rest of the frosting on top of the cake to form a mountain – pile it up as high as possible – then place in the freezer for about 5 minutes until it’s fairly firm.
  5. While the cake is in the freezer, place the chocolate in a heatproof bowl and melt over a pan of hot water or in the microwave in blasts of 30 seconds until smooth.
  6. Remove the cake from the freezer and immediately pour the melted chocolate over the top of the frosting mountain so that it drizzles down the sides.
  7. Crush the digestive biscuits into chunks by hand and place on top of the chocolate covering then leave to set before serving. This cake is best stored in the fridge.
Categories: Chocolate, Layer Cakes | Tags: , , , , , , , , , , , , , , , | 1 Comment

Blog at WordPress.com.