Posts Tagged With: spice

Vanilla Chai Polar Bear Cupcakes

I have been doing oodles of baking over Christmas, as I’m sure many of you have, but all my creations have involved using existing recipes and I hadn’t ventured into conjuring up any of my own until these Vanilla Chai Polar Bear Cupcakes.

My efforts for edible gifts this year included meringue cookies, chocolate macaroons, dairy-free fruitcakes, iced lebkuchen and my own failsafe stollen biscotti – all delicious and fun to pack up cosily in little starry cellophane bags.

I also finally got round to attempting proper bread – with actual yeast! – after writing it down as a new year’s resolution the last two years, and made a no-knead tear & share garlic wreath. It was super simple to put together and my family and I enjoyed liberally dunking it into a big oozy baked Camembert cheese for Boxing Day lunch (after a nutritious breakfast of Quality Street, naturally).

Anyway, I have managed to come up with a new recipe to blog, just in the nick of time before 2017 draws to a close. And I have my culinary idol, the wonderful Nigella Lawson, to thank for the inspiration.

I made a batch of her delicious chai muffins from her book Simply Nigella a few weeks ago, which are one of my (many) favourite recipes of hers. One of the key ingredients is milk infused with the gorgeously aromatic contents of spicy chai teabags, and the result is like a warm hug in cake form. They’re filling, subtly sweet, and the perfect tummy pleaser on a dreary winter morning.

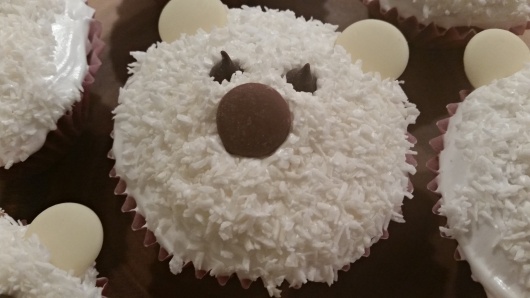
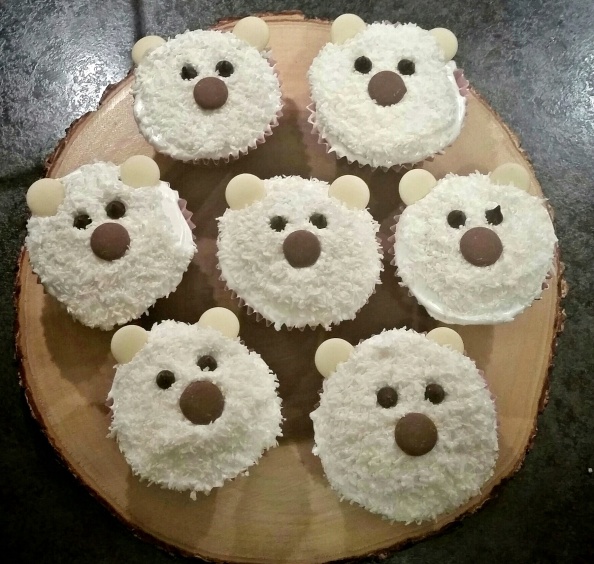
These gave me the idea of trying something similar in cupcake form: a soft, spiced sponge with a light vanilla frosting. A liberal sprinkling of desiccated coconut and a few chocolate buttons completed the transformation into polar bears, as I wanted something fun to serve for a girly night in with my two best friends. By happy coincidence, the combination of the marshmallowy meringue topping and coconut shreds is reminiscent of those divinely gooey chocolate snowball cakes you can get in the supermarket.

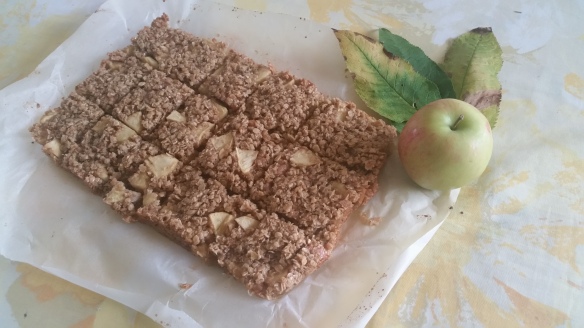
I am currently nibbling the plain cake offcuts as I type, which have been sat in a margarine tub for 24 hours, and, if anything, they taste even better than when they first came out of the oven! I therefore think I’ll give this sponge another go without the frosting and decorations, as it’s certainly capable of standing on its own two feet unadorned as a wonderfully moist and fragrant cake in its own right.

IMG_20171228_184143_901

INGREDIENTS – makes approx. 9-10 large cupcakes

For the cakes:

  • 155g/5.5 oz self-raising flour
  • 40g/1.5 oz ground almonds
  • 170g/6 oz butter or margarine
  • 70g/2.5 oz brown sugar
  • 85g/3 oz caster sugar
  • 3 eggs
  • 4 tbsp milk (or almond milk if you prefer)
  • 2 x vanilla chai teabags (I used Pukka brand ones)
  • 1 tsp ground cinnamon
  • 1 tsp vanilla extract

For the frosting/decorations:

  • 2 egg whites
  • 85g/3 oz caster sugar
  • Half a tsp cream of tartar
  • 1 tsp vanilla extract
  • Half a tsp ground cinnamon
  • 5 tbsp (approx.) desiccated coconut
  • 18-20 white chocolate buttons
  • 9-10 milk or dark chocolate buttons
  • 18-20 milk or dark chocolate chips

METHOD

For cakes:

  1. Tear open the chai teabags and tip the contents into a heatproof jug or saucepan, then pour over the milk and stir briefly.
  2. Heat the milk and tea together either in the microwave on a medium heat for about two minutes, or over a medium heat on the hob, until it is warm and fragrant but not boiling. Leave to cool slightly.
  3. Pre-heat the oven to 180 degrees C (or 160 fan) and line a muffin tin with cupcake cases.
  4. Whisk the butter/margarine and sugars together in a large mixing bowl until pale, then whisk in the eggs and tea-infused milk mixture.
  5. Fold in the flour, ground almonds, cinnamon and vanilla extract until a batter of a soft dropping consistency has formed.
  6. Pour the mixture into the cake cases until they’re each about two thirds full, then pop in the oven and bake for around 15-20 minutes until a cocktail stick inserted into the sponges comes out clean.
  7. When baked, leave the cakes to cool on a wire rack. At this stage the they can be frozen for decorating at a later date if you wish.
  8. When cool, use a serrated knife to saw off any domed tops from the cakes so you have a flat surface to add the decorations (don’t bin the offcuts – put them in a sealed container and munch them later!)

For the frosting/decorations:

NOTE: Only add the frosting a maximum of a couple of hours before serving as it doesn’t keep well.

  1. Place the desiccated coconut in a wide-rimmed bowl and set aside.
  2. Place the egg whites into a clean bowl and whisk until white peaks form.
  3. Add the cream of tartar, cinnamon and vanilla extract, then add the sugar gradually while continuing to whisk until you have a stiff, smooth mixture that holds its shape and stays put when you turn the bowl upsidedown.
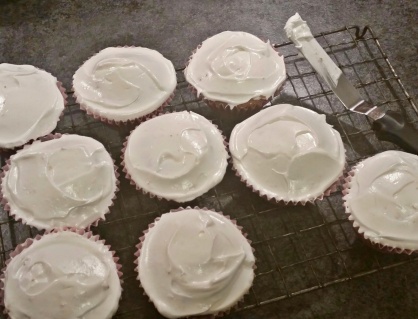
  4. Using a palette knife, generously and evenly spread the mixture over the top of each cupcake.

    20171228_175608-1

  5. Turn each cake upsidedown and dunk the tops in the desiccated coconut so they’re evenly coated.
  6. Add two white chocolate buttons, two chocolate chips and one milk/dark chocolate button to each cake to create a bear face, as in the photos.

    20171228_180536

Categories: cupcakes, Festive, Icing | Tags: , , , , , , , , , , , , , , , , , , , , , | Leave a comment

Pear Gingerbread Upsidedown Cake

Yay, Autumn is here again! And, of course, the dawn of this season means baking with luscious scrumped fruit, sticky syrup/treacle and oodles of heaven-scented winter spices. It just wouldn’t be Autumn otherwise. And this lovely Pear Gingerbread Upsidedown Cake utilises all three of this holy culinary trinity.

Isn’t it funny how you can bake a seemingly failsafe recipe that you’ve made countless times before and it can turn out a disaster, and you can write something off as an epic dog’s dinner of a cake fail only for it to turn out beautifully? Unfortunately, normally the former is the case for me, but this week I experienced a prime example of the latter.

I was making some banana and caramel cupcakes for my work’s Macmillan Coffee Morning and thought I’d make use of some scrumped pears while I had the oven on. I had a flick through some of my trusty recipe books and came across an enticing apricot upsidedown number in Cakes & Slices that didn’t seem to require too much effort, for which I could easily substitute the suggested fruit for my windfall pears.

Part-way through making it I realised I didn’t have enough butter and substituted some of it for milk, and I also replaced the syrup with treacle out of necessity in my haste to get the damn thing finished. I melted the wet ingredients together as instructed before folding in the dry, and the result looked terrible!

It was wet and lumpy, and the baking powder I added in the hope of giving it a better rise (in light of the lack of eggs) let off an ominous fizz. When I poured the dodgy-looking concoction over the pear slices I barely had enough to cover them. By this point, I was convinced that this monstrosity would have to go down in the ‘disaster’ file, but thought I may as well cook it.

However, I needn’t have worried as, to my surprise, it rose beautifully and tasted wonderful! The ratio of pear to sponge was just right, and the cake was deliciously moist without being overly sticky. I shared slices with various people and they all loved it.

I had some leftover caramel from my Macmillan Coffee Morning cupcakes which is why I drizzled some over the top, but it’s certainly not essential.

20170929_131625-1

INGREDIENTS – makes one sponge of approx. 22cm/8.5 ins diameter

  • 2 medium pears, peeled, cored and chopped into fairly thin, neat slices
  • 175g/6 oz butter
  • 140g/5 oz brown sugar + a little extra for sprinkling
  • 85g/3 oz treacle
  • 185g/6.5 oz self-raising flour
  • 2 tsp ground ginger
  • 1 tsp mixed spice
  • Half a tsp baking powder
  • Drizzle of maple or golden syrup
  • Drizzle of Carnation caramel (optional)

METHOD

  1. Pre-heat the oven to 180 degrees C (or 160 fan) and line a round cake tin with parchment paper.
  2. Sprinkle about half a tablespoon of brown sugar over the bottom of the tin, drizzle over some maple/golden syrup, then neatly arrange the pear slices in a circle on top.
  3. Place the butter, sugar and treacle in a heatproof bowl then melt together in the microwave on a medium heat in blasts of 1 minute.
  4. Stir well and then fold in the flour, ginger, mixed spice and baking powder – don’t worry that the batter looks lumpy and runny!
  5. Pour the batter evenly over the pears, then place the tin in the oven for about 25-30 minutes, or until a skewer inserted into the sponge comes out mostly clean.
  6. Remove the cake from the oven and place on a wire rack. When cool, turn the cake out so that the pears are at the top.
  7. Drizzle some Carnation caramel over the cake, if you like (if the caramel is too stiff, heat it for about 30 seconds in the microwave on LOW heat in a heatproof bowl and give it a good stir).
  8. Enjoy cold, or warm with some cream or ice cream. Yum!

20170929_131642-1

Categories: Layer Cakes | Tags: , , , , , , , , , , , , , , , , | Leave a comment

A Year in Cake – 2016

As I’m currently tucked up in bed with a rotten cold on New Year’s Eve, I thought I’d do another blog post like I did this time last year looking at my top bakes of 2016.

I won’t bore you with the details but this year has been the worst one for a long time for many reasons and has left me a bit emotionally battered to say the least. I’m hoping with all my strength that 2017 is an improvement and that the changes I’m desperate to make in my life will come about.

Still, baking is a part of my life come rain or shine and I’ve managed quite a few successful bakes this year, including several celebration cakes which I was really pleased with. My creations will never be up there in the showstopper stakes, but I think my presentation skills have improved and I’ve been a bit more daring with decoration.

One new thing I’ve tried this year is meringues. I’d always been a bit nervous to try them as I got the impression they’d be very temperamental and difficult to pull off, but happily I was wrong. My piping skills are still as dire as ever, but they were surprisingly easy to make and tasted absolutely delicious – crispy on the outside with a gooey marshmallow-like interior. And so SO much better than the brittle, chalky shop-bought ones. I was hoping to make a chocolate or cappuccino pavlova for NYE dessert and unfortunately being ill has put paid to that, but I’m keen to make something meringuey again soon! Like an idiot I forgot to include the fruits of my labour in the collage below so here’s a snap of my cute little ghost meringues from Halloween:

screenshot_2016-12-31-15-49-49-1

I’ve decided to make on culinary resolution this year, and I’m sure I’ve made it before. I would really like to have a go at making proper bread, i.e. using yeast (not soda bread!) I’m a very impatient cook which is what’s put me off trying this previously but the effort would be worth it in order to create a nice big tear-and-share centrepiece, either a delicious chocolatey monkey bread or a mouth-watering sundried tomato and cheese number. I also fancy having a go at brioche, which is my all-time favourite bread, with its indulgent melt-in-the-mouth buttery sweetness and cloud-like texture. Watch this space!

So anyway, here’s a wee compilation of my personal favourite bakes from 2016:

collage-2

  1. Chocolate Orange Bonfire Cake (recipe here)
  2. Spiced Tea & Chocolate Cake with Cinnamon Ganache Icing (recipe here)
  3. Banana, Peanut Butter & Caramac Loaf (recipe here)
  4. Honeycomb & Chocolate Flapjacks with Marzipan Bees (recipe here)
  5. Raisin Spice Christmas Cake with Fondant Sealies (base recipe from the 1000 Cakes & Bakes cookbook)
  6. Moomin Lebkuchen (base recipe from the Bake Off Christmas cookbook)
  7. Lady Baltimore Cake (recipe here)
  8. Ducky Custard Cream Cake (base recipe here)
  9. Cheese & Sundried Tomato Quiche (recipe here)

I’ll sign off now by wishing everyone in the Bakeosphere a very happy and healthy 2017! 🙂

Cloud9.1 x

Categories: Uncategorized | Tags: , , , , , , , , , , , , , , , , , , , , , , , , , , , , , , , , , , , , , | 2 Comments

Toffee Apple Flapjacks

Hurray, Autumn is upon us again! As corny as it sounds, is there anything more heart-warmingly lovely than taking a quiet pink-cheeked walk in the September/October sunshine amidst a crisp breeze while taking in all the gorgeously coloured leaves, fallen apples and shiny conkers underfoot? It’s at this time of year that I’m glad I can walk to work, and recently I haven’t been able to resist stopping to take photos on the way as my scenic route looks particularly stunning of an autumnal morning.

img_20160928_184225

Most importantly, Autumn marks the arrival of one of my favourite things – scrumping season! My mum and I did our usual ritual of venturing out to the nearby fields on the first Saturday in September and came back with a glorious bounty of apples, blackberries and plums. The majority of the berries and some of the apples were used to make vast quantities of my beloved blackberry, apple & cinnamon jam, but it wouldn’t be right to not keep a few aside for some baking.

The scrumped apples have made a delicious addition to various recipes that I’ve tried, including Waitrose’s spiced apple & walnut blondies and my go-to Weetabix loaf. However, I think my favourite 2016 Autumn apple creation has to be these Toffee Apple Flapjacks. They’re squidgy, sweet and sharp, and remind me of a cross between a flapjack and a crumble – perfect for a chilly evening. They’re also yummy served warm with custard.

For another wonderfully autumnal treat where apples are the star, why not check out my Autumn Bliss cake?

20161008_150432

INGREDIENTS – makes 15 flapjacks

  • 130g/4.5 oz butter or margarine
  • 170g/6 oz brown sugar
  • 3 tbsp maple syrup
  • 255g/9 oz oats
  • 2 eating apples, peeled, cored and chopped into chunks about the size of a 10p piece
  • 60g/2 oz mini toffee/fudge pieces (I used Aldi’s mini salted caramel fudge pieces), or larger toffees/fudges chopped into small pieces
  • 1 tsp cinnamon

20161008_132122

METHOD

  1. Pre-heat the oven to 180 degrees C (or 160 fan) and line a rectangular baking tray with parchment paper.
  2. Put the butter/margarine, sugar and maple syrup in a heatproof bowl and melt together in the microwave in blasts of 1 minute until smooth, stirring at each interval. Alternatively, melt together in a pan on the hob over a low heat, stirring regularly.
  3. Stir the oats, apple chunks, toffee/fudge pieces and cinnamon into the liquid mixture until thoroughly coated.20161008_132436.jpg
  4. Pour the mixture into the prepared baking tray and place in the oven for around 15-20 minutes, or until slightly golden at the sides.
  5. Leave the flapjacks to cool on a wire rack and then slice into squares with a sharp knife.
Categories: flapjacks, Traybakes | Tags: , , , , , , , , , , , , , , , , , , | Leave a comment

Spiced Tea & Chocolate Cake with Chocolate & Cinnamon Ganache Icing

I first came up with the idea of, and impulsively made, this Spiced Tea & Chocolate Cake with Chocolate & Cinnamon Ganache Icing for the first time over a year ago when I wanted to combine the winning combination of chocolate and good old-fashioned English tea in sponge form. The addition of cinnamon and mixed spice adds an extra layer of depth to the flavours and I’m really pleased with how the finished product turned out.

The flavours are slightly reminiscent of my Christmas favourite, chocolate gingerbread cake, but the texture is less dense and more akin to a traditional sponge, making it an ideal treat all year round.

I stupidly didn’t take any photos of my first attempt but, when asked to make a birthday cake for a pony-mad colleague, I decided to recreate it in deceptively simple but eye-catching horseshoe form. The equine motif is, of course, optional and the cake tastes just as delicious made in a regular round or square tin. It’s also very tasty in its naked form, minus the icing, but the cinnamon ganache adds an extra touch of indulgence.

I must give credit to the inspirational domestic goddess and my all-round food idol, Nigella Lawson, for the aforementioned icing – the original recipe is hers (part of her decadent Devil’s Food cake), and I simply added some cinnamon.

20160417_171011-1

INGREDIENTS – makes 1 bundt ring cake as in the picture, or 1 deep round 20cm/8in cake

For the cake:

  • 225g/8 oz butter or margarine
  • 115g/4 oz caster or granulated sugar
  • 115g/4 oz brown sugar
  • 225g/8 oz self-raising flour
  • 4 eggs
  • 2 heaped tbsp cocoa powder
  •  120ml/4 fl oz strong cold tea
  • 2 tsp cinnamon
  • 1 tsp mixed spice
  • 0.5 tsp baking powder

For the ganache icing/decorations:

  • 125g/4.5 oz dark chocolate, finely chopped
  • 90g/3 oz butter
  • 20g/0.75 oz dark brown sugar
  • 65 ml/2 fl oz water
  • 2 tsp cinnamon
  • 7 Caramac buttons (optional)
  • Silver shimmer spray (optional)
  • Palm-sized piece of marzipan (optional)
    + horse-shaped cookie cutter (optional)

METHOD

For the cake:

  1. Pre-heat the oven to 180 degrees C (or 160 fan) and line your cake tin of choice with parchment paper or spritz with cake release spray.
  2. Whisk the butter/margarine and sugars together in a large mixing bowl until pale, then whisk in the eggs.
  3. Fold in the flour, cocoa powder, tea, cinnamon, mixed spice and baking powder until a batter of a soft dropping consistency has formed.
  4. Pour the mixture into the prepared cake tin, then pop in the oven and bake for around 25-30 minutes until a cocktail stick inserted into the sponge comes out clean (it might need a bit longer if you’re using one round tin instead of a ring-shaped one).
  5. When baked, leave the cake to cool on a wire rack before turning it out of the tin. At this stage it can be frozen for decorating at a later date if you wish.
  6. If you’re making a horseshoe cake, cut out a section of the sponge ring (and eat later!)

For the ganache icing/decorations:

  1. Place the water, butter, brown sugar and cinnamon in a saucepan and melt together on a low heat.
  2. When the mixture begins to bubble, take the pan off the heat and add the finely chopped chocolate. Swirl the liquid over the pieces so that they melt evenly.
  3. When the chocolate has all melted, whisk the mixture until smooth and glossy, then transfer into a cool mixing bowl.
  4. Leave the frosting to set for at least one hour (place it in the fridge to speed up the process a bit) until it’s a spreadable consistency.
  5. When set, spread the frosting onto the cooled cake.
  6. If you’re making a horseshoe cake, arrange the Caramac buttons, evenly spaced, along the middle of the sponge and finish with a spritz of silver shimmer spray for a metallic sheen.
  7. To make the little yellow horse centrepiece as in the photo, roll out the chunk of marzipan until it’s about the thickness of a pound coin, then stamp it out using the horsey cookie cutter and place in the middle on the serving plate/board.


Categories: Chocolate, Icing | Tags: , , , , , , , , , , , , , , , , , , , , , , | Leave a comment

Low Fat Christmas Pudding Brownies

I’ve recently been compiling a ring binder of print-outs of healthier recipes that I’ve found online so that I can easily look them up when I feel like cooking something that’s not too chock-full of calories, fat and sugar.

One Google result that caught my attention was the original chocolate version of this Low Fat Christmas Pudding Brownie recipe, which I came across online here. It included the genius idea of adding mushed prunes in place of butter or margarine to create a gorgeously moist but less fatty cake.

I don’t understand why prunes are so neglected as a fruit. I know they’re infamous for being used as a means of ‘keeping you regular’ and carry metaphorical connotations of wrinkles, shriveling and general lifelessness, but they’re so underrated as a food in their own right. I bought some for the first time in forever recently and had forgotten what a deliciously rich, almost caramelly, flavour they have.

Anyway, I digress (I swear I’m not being paid by some kind of Prune Advisory Board) – I’m in the grip of full-blown Christmas fever at the moment as the end of November rapidly approaches, so I decided to add a festive twist to the original recipe by incorporating some extra fruit and nuts and a dash of warming winter spice. When both my dad and I sampled them, our immediate thoughts were of Christmas pudding, hence the title!

I also reduced the amount of sugar used in the original version as it annoys me when recipes are labelled as ‘healthy’ due to low fat content but include an obscene amount of the sweet stuff. I wouldn’t say these taste identical to regular brownies but they’re utterly delicious – rich, moist and full of flavour – and I really don’t think people would know they were low fat and lower sugar if you didn’t tell them.

I also like the fact that they’re a healthier alternative that don’t require expensive and/or obscure ingredients. I love the new wave of inventive vegan/raw/generally all-round-saintly treats but coconut oil, agave syrup and near-industrial quantities of cashew nuts don’t come cheap.

The final cherry on the proverbial cake is that these brownies are dairy free so they’d be ideal for lactose-intolerant friends.

I’ll definitely be making them again very soon!

IMG_20171112_154822_162.jpg
INGREDIENTS – makes approx. 12

  • 55g/2 oz plain flour
  • 110g/4 oz pitted prunes
  • 130g/4.5 oz brown sugar
  • 6 tbsp cocoa
  • 3 tbsp cooking oil
  • 2 eggs
  • 55g/2 oz raisins
  • 55g/2 oz chopped mixed nuts (e.g. pecans, almonds, walnuts)
  • 1.5 tsp mixed spice
  • 1 tsp vanilla extract
  • 0.5 tsp baking powder
  • 2 tbsp water
  • 12 walnut or pecan halves, to decorate (optional)
  • Silver shimmer spray, to decorate (optional)

METHOD

  1. Pre-heat the oven to 180 degrees C (or 160 fan) and line a rectangular baking tin with parchment paper.
  2. Mix the flour, sugar, cocoa, mixed spice and baking powder together in a large mixing bowl.
  3. Roughly snip the prunes into pieces with scissors and place them in a separate heatproof bowl with the water, then microwave on a medium setting in two blasts of 1 minute until soft and mushy.
  4. Squish the prunes with a potato masher to form a paste and add to the dry ingredients.
  5. Stir in the cooking oil, eggs, raisins, chopped nuts and vanilla extract. Mix until well blended.
  6. Pour the batter into the prepared tin and pop in the oven for around 12-15 minutes until a cocktail stick inserted into the mix comes out mostly clean – err on the side of caution and make sure you don’t over bake them as the brownies will be dry and crumbly!
  7. When baked, leave to cool on a wire rack before cutting into 12 squares with a sharp knife.
  8. Push a walnut or pecan half into the top of each square and finish with a festive spritz of edible silver shimmer spray, if you fancy.20171112_153930-1
Categories: Chocolate, Festive, Healthier, Traybakes | Tags: , , , , , , , , , , , , , , , , , , | 3 Comments

Autumn Bliss Cake

Autumn is here! Season of mist and mellow fruitfulness! I absolutely love this time of year: beautiful golden falling leaves, Halloween, fireworks, mulled cider, comforting soups and hot chocolate, warm spicy scents and a crisp chill in the morning air. The nights draw in and the cloying, sticky summer heat becomes a fading memory.

One of my favourite things to do at this time of year is to go scrumping in the fields near my house. As I mentioned in my previous post, I got a fantastic haul of blackberries this year which have been incorporated into endless culinary creations, but, for me, nothing says autumn quite like fallen apples fresh from the branch. I’ve used the ones I’ve collected for various bakes and desserts but this cake is by far my favourite. I think it’s a true celebration of the season, with the slightly sour apples marrying gorgeously with the sweetness of another autumnal kitchen staple, cinnamon, and topped off with some lovely golden brown walnuts and pecans.

Although there are a few steps to it, this recipe is very simple and the result is stunning. You could use bought jam in place of the spiced apple filling I made here to save time but making it yourself is so easy and really does taste like Autumn Bliss! Why not make up some extra and put it into jars to have as a tasty treat on your toast? Cinnamon granola would also work well on top of the cake if you don’t have any cinnamon biscuits.

CQ9pBZhWUAAu98M

INGREDIENTS – makes 2 sponge layers of 8in/20cm diameter

For the cake:

  • 225g/8 oz self-raising flour
  • 115g/4 oz brown sugar
  • 90g/3 oz caster/granulated sugar
  • 225g/8 oz butter/margarine
  • 4 eggs
  • 3 tsp cinnamon
  • 1 tsp vanilla extract

For the filling/topping:

  • 4-5 (approx.) green apples, e.g. Granny Smith (or scrumped ones!)
  • 4 tbsp demerara/brown sugar
  • 1 tsp mixed spice
  • 2 tsp cinnamon
  • 2 tsp vanilla extract
  • 1 tbsp lemon juice
  •  100ml/3 fl oz apple juice (or apple cider if you want to add a boozy twist!)
  •  50ml/1.5 fl oz water
  • 5-7 (approx.) cinnamon biscuits
  • Handful of walnuts
  • Handful of pecans
  • Edible gold shimmer spray (optional but looks fab)

METHOD

For the cake:

  1. Pre-heat the oven to 180 degrees C (or 160 fan) and line two round baking tins with parchment paper.
  2. Whisk the butter/margarine and sugars together in a large mixing bowl until pale, then whisk in the eggs.
  3. Fold in the flour, cinnamon and vanilla extract until a batter of a soft dropping consistency has formed.
  4. Pour the mixture into the prepared cake tins, then pop in the oven and bake for around 15-20 minutes until a cocktail stick inserted into the sponges comes out clean.
  5. When baked, transfer the cakes (still in the tins – don’t remove them until they’re cool!) onto a wire rack and get started on the jammy apple filling…

For the filling/topping:

  1. Peel and core the apples (and remove any brown, manky looking bits if you’re using scrumped ones), then chop them into small chunks no bigger than a 50p piece.
  2. Place the chunks in a large pan along with the water, apple juice, lemon juice, sugar, vanilla extract, cinnamon and mixed spice and bring to the boil.
  3. Turn the heat down a little and allow to simmer, stirring occasionally, until the apple pieces can be easily squished with a wooden spoon. If the mixture is too tart, add a bit more sugar to taste.
  4. Bring to the boil a second time, then turn down the heat as before and allow to simmer for a further 5-10 minutes, again stirring occasionally.
  5. Turn off the heat completely and allow to cool.
  6. Scoop out about two thirds of the mixture along with all of the visible apple chunks and spread it onto the top of one of the cooled sponges with a palette knife, then sandwich the second sponge on top. Scrape out the remaining smooth apple mixture and spread it onto the top layer.
  7. Crush the cinnamon biscuits with your hands until they resemble breadcrumbs, then sprinkle over the top of the cake. Add the nuts and finish off with a few spritzes of edible gold shimmer spray for a truly autumnal effect. Ta-dah!
Categories: Layer Cakes | Tags: , , , , , , , , , , , , , , , , | 4 Comments

Chocolate Gingerbread Cake

Originally posted 20/12/2014

WARNING: this stuff is highly addictive!! Seriously, I made a batch of this Chocolate Gingerbread Cake with the aim of taking half into university to share with my classmates but it somehow all disappeared in a number of freak scoffing accidents before I had the chance…

The recipe below is adapted from one found in an old winter issue of Good Food magazine – I thought the original batter lacked a chocolatey flavour and didn’t really taste much different from normal gingerbread cake so I added cocoa to the mix which resulted in the perfect marriage of chocolate and spice. I also cut down the amount of treacle and syrup used as I felt the previous quantities were a bit excessive.

This cake is definitely my new festive favourite as it’s so deliciously moist, smells incredible and is super simple to make. It also keeps really well and, if anything, tastes better after a couple of days (if you can make it last that long…)

I finished this batch off with some sprinkly chocolate rings from Aldi.

INGREDIENTS – makes approx. 12 large squares

  • 255g/9 oz self-raising flour
  • 155g/5.5 oz butter/margarine
  • 115g/4 oz dark brown sugar
  • 115g/4 oz black treacle
  • 115g/4 oz golden syrup
  • 115g/4 oz milk or dark chocolate
  • 2 tbsp cocoa powder
  • 1 tsp ground ginger
  • 2 tsp ground cinnamon
  • 1 tsp mixed spice
  • 150 ml/5 fl oz milk

METHOD

  1. Pre-heat the oven to 180 degrees C and line a rectangular cake tin with baking parchment.
  2. Place the butter/margarine, sugar, treacle, syrup and spices into a heatproof bowl and melt in the microwave until smooth or melt in a pan over the hob.
  3. Roughly chop the chocolate into small pieces and place in another heatproof bowl then melt in the microwave in blasts of 30 seconds-1 minute or over a pan of hot water.
  4. Stir the melted chocolate into the butter mixture then fold in the flour, cocoa powder and milk.
  5. Pour the mixture into the cake tin then bake for 20-30 minutes until a skewer inserted into the cake comes out clean.
  6. Transfer (with the baking parchment) onto a wire rack to cool then cut into squares with a sharp knife. Top with festive decorations of your choice if you wish.
Categories: Chocolate, Festive, Traybakes | Tags: , , , , , , , , , , , , | 2 Comments

Create a free website or blog at WordPress.com.