Posts Tagged With: birthday

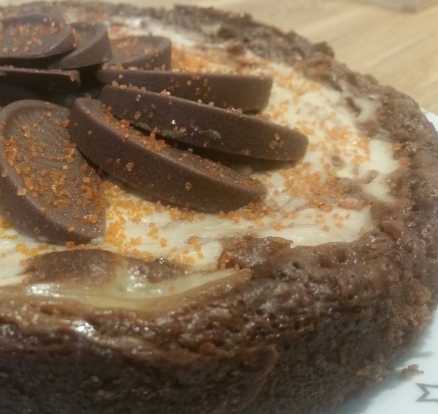
Chocolate Orange Cheesecake Brownie Cake

I’ve been meaning to blog this recipe for my Chocolate Orange Cheesecake Brownie Cake for a while so thought I’d better darn well do it before 2018 is out! Seriously, where has the time gone this year??

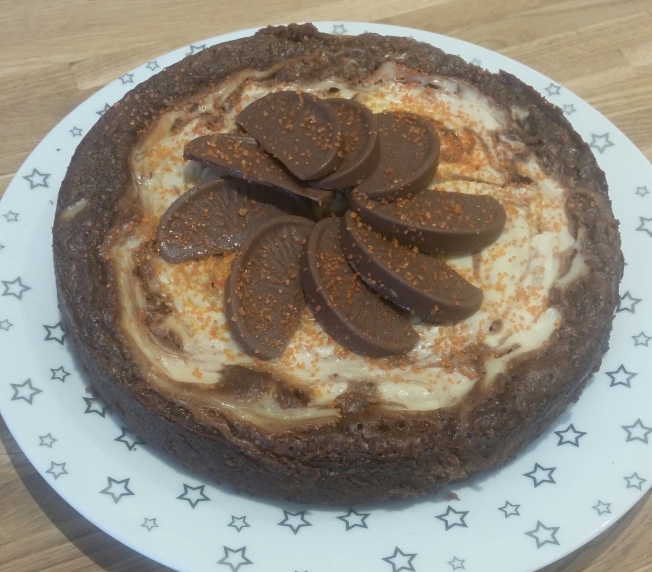
My good friend Mel has requested a chocolate orange cake for her last two birthdays (previous efforts include my chocolate orange bonfire cake) and this year was no exception. However, I was keen to move away from the usual sponge + frosting affair and try something different and, being time poor, my first thought was that you can’t really go wrong with brownies. I’d been wanting to give the magical sounding cheesecake hybrid variety a go for a while so thought this topping would be an equally delicious replacement for buttercream or ganache.

I ended up producing a kind of Frankenstein-style mash up of two recipes with various tweaks and the rich, gooey, creamy result worked really well as an alternative to a typical birthday cake. The bonus is that you effectively get two desserts in one while being super simple to make, especially if you don’t have the time to faff around with icing. Just a warning though – it’s much denser than a sponge so you’ll only need a small slice!
20181112_132619-1.jpg

INGREDIENTS – makes one cake of approx. 22cm/8.5 in diameter

For the brownie base:

  • 65g/2 oz plain flour
  • 175g/6 oz butter
  • 125g/4.5 oz caster sugar
  • 55g/2 oz brown sugar (either the dark or light variety, both work well)
  • 3 eggs
  • 1 Terry’s Chocolate Orange, chopped into small pieces
  • 1 tsp vanilla extract

For the cheesecake topping:

  • 150g/5 oz full-fat cream cheese
  • 60g/2 oz caster sugar
  • 1 egg
  • 1 tbsp orange juice
  • Approx. half a Terry’s Chocolate Orange
  • Orange sprinkles (optional)

METHOD

  1. Pre-heat the oven to 180 degrees C (or 160 fan) and line a round baking tin with parchment paper.
  2. Place the chocolate, sugars, vanilla and butter in a heatproof bowl and melt on the hob over a low heat or in the microwave in 30-second bursts until smooth.
  3. Allow to cool slightly then whisk in the eggs.
  4. Fold in the flour and pour into the prepared cake tin.
  5. In a separate bowl, beat the cream cheese, sugar, egg and orange juice together until smooth.
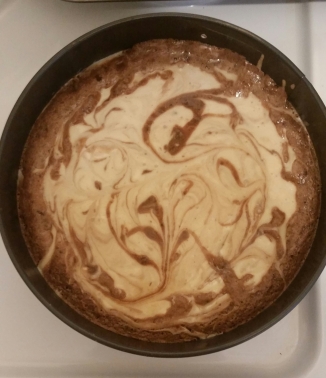
  6. Use a tablespoon to randomly dollop the cheesecake mixture on top of the brownie mixture, then use a skewer to make marble-effect swirls, as in the photo below.20181110_152213-1.jpg
  7. Place in the oven and bake for around 25-30 minutes, or until a crust forms on the edges of the brownie – remember, the inside should still be quite soft so don’t overbake!
  8. Leave to cool on a wire rack before removing from the tin and arranging Chocolate Orange segments on top of the cake (enjoy scoffing the other half!) Scatter over some orange sprinkles as a finishing touch if you like.The cake will keep for a few days in an airtight container but make sure you keep it in the fridge.
20181112_132740-1

Categories: Chocolate | Tags: , , , , , , , , , , , , | Leave a comment

Cookies & Cream Cake

I’m back! Last month I finally moved into the lovely maisonette in Milton Keynes that I put an offer on back in February which has been extremely exciting, but also means I’ve been a) super busy with house things and b) without broadband for an achingly long period! Anyway, I’m now all set up and able to access the World Wide Web once again, so I thought it was about time I posted the recipe for this luscious Cookies & Cream Cake. So, without further ado, here we go…

A large number of my friends and family have birthdays in the summer, and the 22nd June saw my dear step-grandad, John, turn the grand old age of 90! I’ve made him a cake the last few years and wanted this one to be particularly special due to it being a milestone occasion.

I got the idea for this cake from the wonderful Hummingbird Bakery cookbook, Home Sweet Home, but adapted it in a few ways, most notably using Dream Topping in place of the buttercream.

I fancied trying something different and I have to admit I have a bit of a weakness for this particular type of faux cream myself, despite the dodgy 1970s dinner party connotations it seems to be lumbered with! It works perfectly in this cake and the overall taste reminded me of that oh-so-American activity of dipping cookies in milk.

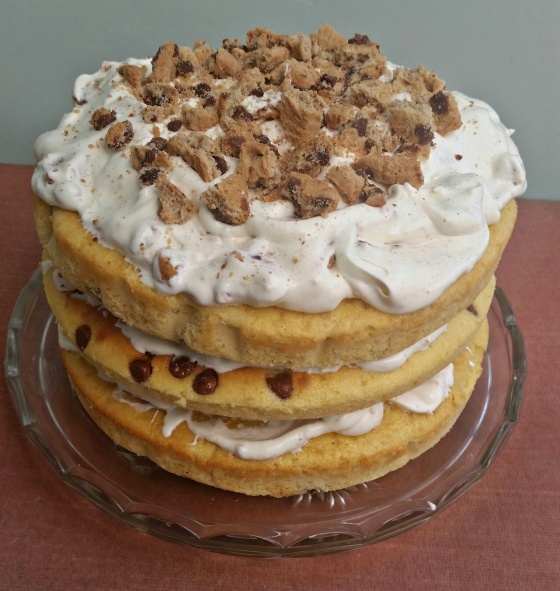
I would definitely make this wondrous beast again. It’s ridiculously easy to create but the result is a feast for the eyes and, hence, ideal for a celebration, as well as being appealing to all age groups. I mean, whether you’re nine or ninety, who could resist a homemade triple-layer chocolate chip cake adorned with a mountain of cookie bits?!

IMG_20170618_113843_449

INGREDIENTS – makes 3 shallow sponge layers of approx. 20cm/8 in diameter

For the cake:

  • 280g/10 oz self-raising flour
  • 280g/10 oz butter
  • 255g/9 oz caster sugar
  • 5 eggs
  • 2 tsp vanilla extract
  • 50g/2 oz milk or dark chocolate chips

For the filling/topping:

  • 1 x standard sachet Dream Topping, prepared with milk according to pack instructions
  • 1 tsp vanilla extract
  • 1 packet shop-bought chocolate chip cookies (from the biscuit aisle of the supermarket; not the chewy bakery ones), e.g. Maryland

METHOD

For the cake:

  • Pre-heat the oven to 180 degrees C (or 160 fan) and line three round baking tins with parchment paper.
  • Whisk the butter and sugar together in a large mixing bowl until pale, then whisk in the eggs.
  • Fold in the flour and vanilla extract until a batter of a soft dropping consistency has formed.
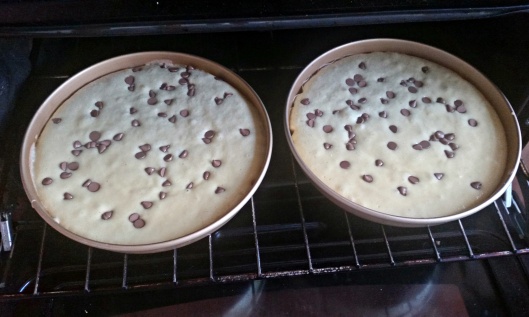
  • Pour the mixture into the prepared cake tins, then scatter the chocolate chips over the top.

20170614_184637

  • Pop the tins into the oven and bake for around 15-20 minutes until a cocktail stick inserted into the sponges comes out clean.
  • When baked, transfer the cakes onto a wire rack and remove from the tins when cool. At this stage, the sponges can be frozen for decorating at a later date if you wish.

For the filling/topping:

Note: This part should be done just before serving the cake, otherwise the cookies will go soft.

  1. Mix up the Dream Topping according to the packet’s instructions, and stir in the vanilla extract. Divide equally into two bowls.
  2. Bash the cookies up in a zip-lock bag using a rolling pin. Do this quite roughly – you want chunks rather than crumbs.
  3. Stir half of the crushed cookies into one bowl of the Dream Topping and then spread half of the mixture onto one of the cooled sponge layers. Sandwich another layer on top and repeat.
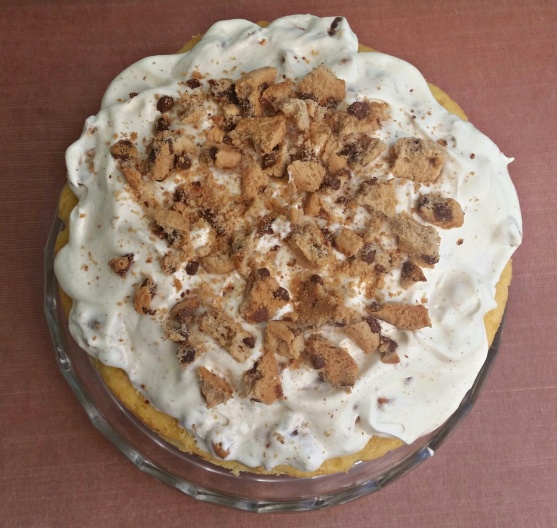
  4. Place the final sponge layer on top of the other two and spread with the other bowl of smooth Dream Topping. Scatter the remaining crushed cookies on top of the cake and serve.

20170618_112843-1

Categories: Icing, Layer Cakes | Tags: , , , , , , , , , , , , , | Leave a comment

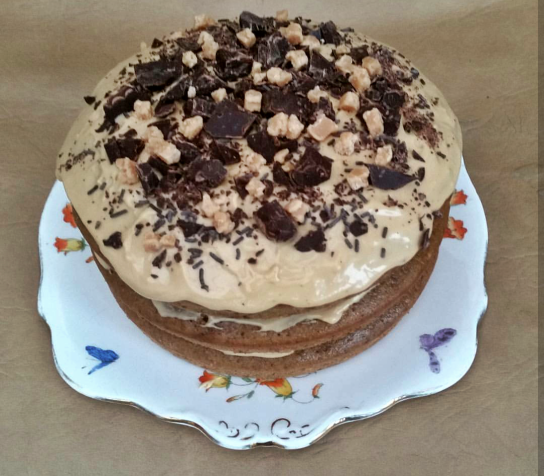
Caramel Coffee Cake

I should probably start by saying that one of my pet hates is promotional blog posts that fawn over products that have been sent to the blogger in return for free advertising so apologies if this is a bit hypocritical, but I must say that this particular type of coffee really made this Caramel Coffee Cake special. And I promise I’ve not been given any incentive to promote it!

The product in question is Beanies caramel flavour instant coffee. My mum bought a jar of it from Aldi a few weeks ago and I was captivated by the absolutely heavenly aroma wafting from the cup as it brewed.

beanies-coffee-creamy-caramel-flavour-instant-coffee-50g-37317-p

Now, I actually cannot stand the taste of coffee, but bizarrely I love it in cake form and knew I had to try and bake with this angelic smelling stuff! And a 50th birthday for a java-loving colleague at work was the perfect excuse to try.

The recipe is extremely simple – pretty much just a slightly adapted Victoria sponge and standard buttercream – but the caramel coffee really takes the flavour to another level of deliciousness.

Screenshot_2017-06-04-11-51-06-1

INGREDIENTS – makes 3 shallow or 2 deep sponge layers of 20cm/8 in diameter

For the cake:

  • 225g/8 oz self-raising flour
  • 140g/5 oz caster/granulated sugar
  • 55g/2 oz brown sugar
  • 225g/8 oz butter/margarine
  • 4 eggs
  • 1 tbsp Beanies caramel coffee granules dissolved in 1.5 tbsp boiling water

For the buttercream icing/topping:

  • 55g/2 oz butter
  • 140g/5 oz icing sugar
  • 0.5 tbsp Beanies caramel coffee granules dissolved in 1 tbsp boiling water
  • Handful of mini salted caramel fudge pieces, or other fudge/toffee type sweets chopped into small pieces
  • 50g/1.5 oz dark chocolate, chopped into small pieces

METHOD

For the cake:

  1. Pre-heat the oven to 180 degrees C (or 160 fan) and line two or three round baking tins with parchment paper.
  2. Whisk the butter/margarine and sugars together in a large mixing bowl until pale, then whisk in the eggs.
  3. Fold in the flour and coffee until a batter of a soft dropping consistency has formed.
  4. Pour the mixture into the prepared cake tins, then pop in the oven and bake for around 15-20 minutes until a cocktail stick inserted into the sponges comes out clean.
  5. When baked, transfer the cakes onto a wire rack and remove from the tins when cool. At this stage, the sponges can be frozen for decorating at a later date if you wish.

For the buttercream/topping:

  1. Place the butter and coffee in a bowl and gradually beat in the icing sugar until smooth and spreadable (if it’s too runny, add a bit more icing sugar until you have the desired consistency).
  2. Spread half of the buttercream on top of one of the cooled sponges (or one third if using three layers), then place the other sponge on top and spread with the remaining buttercream (or divide it between the remaining two sponges if using three layers).
  3. Sprinkle the chopped dark chocolate and fudge pieces over the cake before serving.
Categories: Icing, Layer Cakes | Tags: , , , , , , , , , , , , , , , | Leave a comment

Chocolate Orange Bonfire Cake

I love being asked to make cakes for other people (providing no sugarpaste sculpture is involved!), especially to a theme or particular flavour. I get to rise to the challenge of making something decadent and special, but without the subsequent burden of a shedload of leftover cake which needs eating before it goes off, and inevitably leads to colossal stress and guilt over my already-expanding waistline.

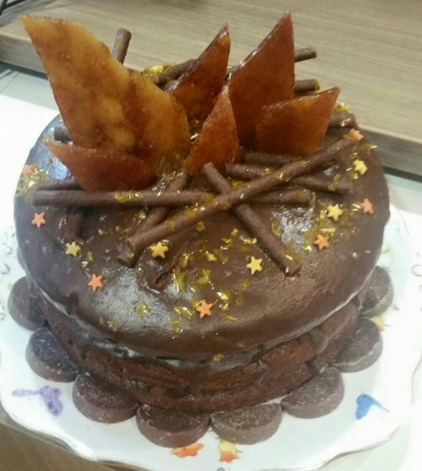
It was my dear friend and work colleague Mel’s birthday on Monday this week and this year’s brief was ‘chocolate orange’. Throughout this month I’ve seen various photos of brilliant bonfire cakes – with the crowning decoration constructed from chocolates intertwined with sugar flames – and fancied giving one a go myself, so it was a no-brainer to combine the two ideas into this decadent Chocolate Orange Bonfire Cake.

I’m by no means a ‘showstopper’ kind of person when it comes to cake making as I simply don’t have the skills to execute masterpieces in buttercream and fondant that look like they belong in the Louvre (to be honest, I struggle just to use a piping bag and will avoid using one at all costs!) However, I think this is probably the best looking cake I’ve made to date and I’m really pleased with how it turned out. Despite being very simple to put together, it’s very striking and ideal for a celebration.

More importantly than pure aesthetics, this cake is absolutely delicious. The melted chocolate makes it wonderfully moist and satisfying and all my work colleagues commented on how good it was.

Personally, I think I actually prefer it without the icing; the sponge can really hold its own with its taste and texture and I don’t think the ganache is really necessary, despite its lovely silkiness. If you’re not making this for a celebration, feel free to omit it, unless you’re a real hardcore chocoholic!

Speaking of chocoholics, if this recipe appeals to you, why not try my spiced tea & chocolate cake with cinnamon ganache?

export-236716381-1
INGREDIENTS – makes 3 sponge layers of 20cm/8in diameter

For the cake:

  • 280g/10 oz self-raising flour
  • 115g/4 oz granulated or caster sugar
  • 115g/4 oz dark brown sugar
  • 280g/10 oz butter or margarine
  • 4 eggs
  • 2 heaped tbsp cocoa powder
  • 2 tbsp milk
  • 1 x Terry’s Chocolate Orange (157g) or equivalent weight of other orange chocolate
  • 0.5 tsp baking powder

For the orange ganache icing/decorations:

  • 1 x Terry’s Chocolate Orange (157g) or equivalent weight of other orange chocolate
  • 90g/3 oz butter or margarine
  • 20g/0.75 oz dark brown sugar
  • 65 ml/2 fl oz water
  • About 10-12 orange Matchmakers
  • 55g/2 oz granulated or caster sugar
  • Orange/yellow sugar stars + sprinkles (optional)
  • 1 sharing bag of Mini Chocolate Orange segments (optional)

METHOD

For the cake:

  1. Pre-heat the oven to 180 degrees C (or 160 fan) and line three round baking tins with parchment paper, or spritz with cake release spray.
  2. Whisk the butter/margarine and sugars together in a large mixing bowl until pale, then whisk in the eggs and milk.
  3. Break the Chocolate Orange up into small pieces and place in a heatproof bowl, then place in the microwave on a low heat in blasts of 1 minute until melted.
  4. Fold the melted chocolate, flour, cocoa powder and baking powder into the egg mixture until a batter of a soft dropping consistency has formed.
  5. Pour the mixture into the prepared cake tins, then pop in the oven and bake for around 20-25 minutes until a cocktail stick inserted into the sponge comes out clean.
  6. When baked, leave the sponges to cool on a wire rack before turning them out of the tins. At this stage they can be frozen for decorating at a later date if you wish.

For the orange ganache icing/decorations:

  1. Break the other Chocolate Orange into small pieces and set aside.
  2. Place the water, butter/margarine and brown sugar in a saucepan and melt together on a low heat.
  3. When the mixture begins to bubble, take the pan off the heat and add the chopped Chocolate Orange. Swirl the liquid over the pieces so that they melt evenly.
  4. When the chocolate has all melted, whisk the mixture until smooth and glossy, then transfer into a cool mixing bowl.
  5. Leave the frosting to set for at least one hour (place it in the fridge to speed up the process a bit) until it’s a spreadable consistency.
  6. When set, spread the frosting onto the cooled cake and place in the fridge for at least an hour.
  7. Pour the granulated/caster sugar into a small, heavy-bottomed pan over a medium heat on the hob and wait until it has turned golden brown with a liquid consistency – be patient and DO NOT STIR!
  8. Pour the liquid sugar onto non-stick parchment paper in one big sheet (be careful as it will be extremely hot), then allow to set until very hard and brittle.
  9. Arrange the Matchmakers in a criss-cross pattern across the top of the cake so that they resemble branches on a bonfire.
  10. Just before serving, snap the melted sugar sheet into flame shapes of different sizes and arrange as you see fit among the Matchmakers by pushing them upright into the sponge.
  11. Scatter the sugar stars and sprinkles over the top and arrange the Mini Chocolate Orange segments around the edge of the cake as a finishing touch, if using.

cxachawwqaalczh

Categories: Chocolate, Icing, Layer Cakes | Tags: , , , , , , , , , , , , , , , , , , , , , , | 3 Comments

Lady Baltimore Cake

One of the few downsides of being a prolific baker (apart from an ever-expanding waistline) is when you really want to try something new, that’s also not too complicated, but you end up skimming over the same old well-loved recipes. Chocolate cake, Victoria sponge, lemon drizzle, brownies; they’re all undeniably delicious but sometimes I find myself craving something a bit different that’s still simple to whip up.

This is particularly true when it comes to birthday cakes. I’ve made my lovely step-grandad’s celebratory sponge for the last three years and wanted to make a cake that he and the rest of the family had never tried before, but one that equally didn’t involve hours of painstaking fiddling and stressing.

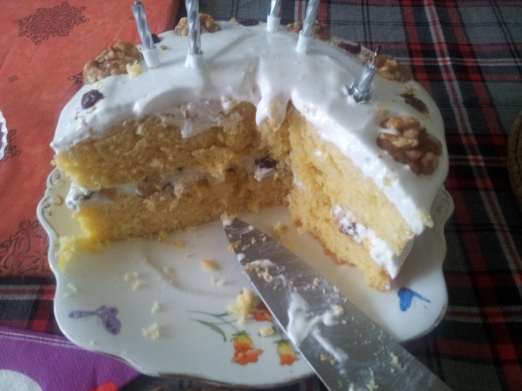
I was flicking through my latest cookbook bargain, The Best-Ever Book of Cakes by Ann Nicol (bought for £2 from The Works and brimming with an array of fantastic recipes) for inspiration, and the Lady Baltimore cake caught my eye. I’d never heard of such a thing before, let alone baked one, but it looked delicious with its snowy white and unapologetically bumpy frosting.

Admittedly, I altered the recipe a bit with a couple of substitutions, but the result was absolutely heavenly. The crunch of the walnuts mixed with the sharpness of the raisins and cranberries, all contrasting with the sweet and marshmallowy meringue frosting, is divine. I would never have thought to mix lumpy things like fruit and nuts into an icing but it really works!

Oh, and if you’re a fan of dreamy, cloud-like meringue frosting, why not have a go at my Tunnock’s chocolate teacake cake?

20160618_145234

INGREDIENTS – makes 2 sponge layers of 20cm/8in diameter

For the cake:

  • 250ml/8 fl oz vegetable oil
  • 225g/8 oz caster sugar
  • 280g/10 oz self-raising flour
  • 4 eggs
  • 1 tsp baking powder
  • Grated rind of 1 small lemon (or orange)
  • 125ml/4 fl oz lemon (or orange) juice

For the frosting/filling:

  • 2 egg whites
  • 115g/4 oz icing sugar
  • 2 tsp vanilla extract
  • Half a tsp cream of tartar (optional but helps stabilise the frosting)
  • 50g/2 oz mixed nuts, pecans or walnuts, chopped
  • 85g//3 oz raisins
  • 40g/1.5 oz cranberries

METHOD

For the cake:

  1. Pre-heat the oven to 180 degrees C (or 160 fan) and line two round baking tins with parchment paper.
  2. Whisk the vegetable oil, sugar and eggs together in a large mixing bowl.
  3. Stir in the lemon rind and juice.
  4. Gently fold in the flour and baking powder, until a batter of a soft dropping consistency has formed.
  5. Pour the mixture into the prepared cake tins, then pop in the oven and bake for around 25-30 minutes until a cocktail stick inserted into the sponges comes out clean.
  6. When baked, transfer the cakes onto a wire rack and leave to cool.

For the frosting/filling:

  1. Set aside 8 whole walnuts and 8 cranberries.
  2. Separate the egg whites into a clean bowl and whisk with the vanilla extract and cream of tartar, while adding the icing sugar a few teaspoons at a time, until stiff peaks form – you should ideally do this for a minimum of 7-10 minutes.
  3. Spread half of the mixture on top of one of the cooled sponges with a palette knife.
  4. Gently stir in the chopped nuts, raisins and cranberries into the remaining frosting and spread the mixture on top of the other sponge.
  5. Sandwich the sponge topped with plain frosting on top of the one with the fruit and nut frosting, then arrange the extra 8 walnuts and cranberries on top of the cake in a neat circle.

20160618_184651

Categories: Icing, Layer Cakes | Tags: , , , , , , , , , , , , , , , , , | Leave a comment

Spiced Tea & Chocolate Cake with Chocolate & Cinnamon Ganache Icing

I first came up with the idea of, and impulsively made, this Spiced Tea & Chocolate Cake with Chocolate & Cinnamon Ganache Icing for the first time over a year ago when I wanted to combine the winning combination of chocolate and good old-fashioned English tea in sponge form. The addition of cinnamon and mixed spice adds an extra layer of depth to the flavours and I’m really pleased with how the finished product turned out.

The flavours are slightly reminiscent of my Christmas favourite, chocolate gingerbread cake, but the texture is less dense and more akin to a traditional sponge, making it an ideal treat all year round.

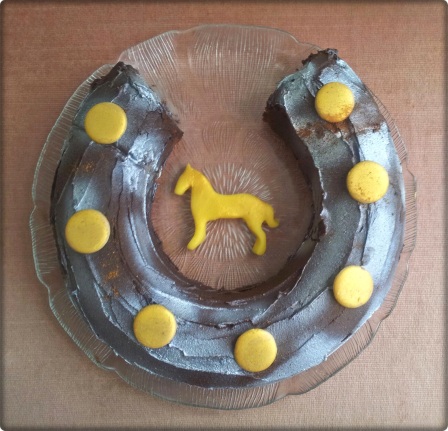
I stupidly didn’t take any photos of my first attempt but, when asked to make a birthday cake for a pony-mad colleague, I decided to recreate it in deceptively simple but eye-catching horseshoe form. The equine motif is, of course, optional and the cake tastes just as delicious made in a regular round or square tin. It’s also very tasty in its naked form, minus the icing, but the cinnamon ganache adds an extra touch of indulgence.

I must give credit to the inspirational domestic goddess and my all-round food idol, Nigella Lawson, for the aforementioned icing – the original recipe is hers (part of her decadent Devil’s Food cake), and I simply added some cinnamon.

20160417_171011-1

INGREDIENTS – makes 1 bundt ring cake as in the picture, or 1 deep round 20cm/8in cake

For the cake:

  • 225g/8 oz butter or margarine
  • 115g/4 oz caster or granulated sugar
  • 115g/4 oz brown sugar
  • 225g/8 oz self-raising flour
  • 4 eggs
  • 2 heaped tbsp cocoa powder
  •  120ml/4 fl oz strong cold tea
  • 2 tsp cinnamon
  • 1 tsp mixed spice
  • 0.5 tsp baking powder

For the ganache icing/decorations:

  • 125g/4.5 oz dark chocolate, finely chopped
  • 90g/3 oz butter
  • 20g/0.75 oz dark brown sugar
  • 65 ml/2 fl oz water
  • 2 tsp cinnamon
  • 7 Caramac buttons (optional)
  • Silver shimmer spray (optional)
  • Palm-sized piece of marzipan (optional)
    + horse-shaped cookie cutter (optional)

METHOD

For the cake:

  1. Pre-heat the oven to 180 degrees C (or 160 fan) and line your cake tin of choice with parchment paper or spritz with cake release spray.
  2. Whisk the butter/margarine and sugars together in a large mixing bowl until pale, then whisk in the eggs.
  3. Fold in the flour, cocoa powder, tea, cinnamon, mixed spice and baking powder until a batter of a soft dropping consistency has formed.
  4. Pour the mixture into the prepared cake tin, then pop in the oven and bake for around 25-30 minutes until a cocktail stick inserted into the sponge comes out clean (it might need a bit longer if you’re using one round tin instead of a ring-shaped one).
  5. When baked, leave the cake to cool on a wire rack before turning it out of the tin. At this stage it can be frozen for decorating at a later date if you wish.
  6. If you’re making a horseshoe cake, cut out a section of the sponge ring (and eat later!)

For the ganache icing/decorations:

  1. Place the water, butter, brown sugar and cinnamon in a saucepan and melt together on a low heat.
  2. When the mixture begins to bubble, take the pan off the heat and add the finely chopped chocolate. Swirl the liquid over the pieces so that they melt evenly.
  3. When the chocolate has all melted, whisk the mixture until smooth and glossy, then transfer into a cool mixing bowl.
  4. Leave the frosting to set for at least one hour (place it in the fridge to speed up the process a bit) until it’s a spreadable consistency.
  5. When set, spread the frosting onto the cooled cake.
  6. If you’re making a horseshoe cake, arrange the Caramac buttons, evenly spaced, along the middle of the sponge and finish with a spritz of silver shimmer spray for a metallic sheen.
  7. To make the little yellow horse centrepiece as in the photo, roll out the chunk of marzipan until it’s about the thickness of a pound coin, then stamp it out using the horsey cookie cutter and place in the middle on the serving plate/board.


Categories: Chocolate, Icing | Tags: , , , , , , , , , , , , , , , , , , , , , , | Leave a comment

Boost Bar Biscuit Cake

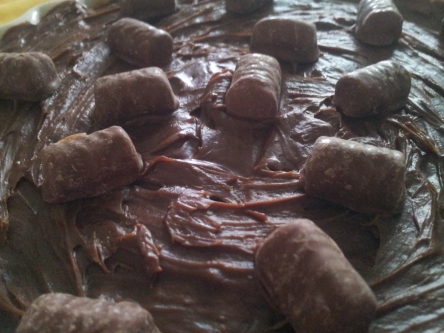
They may not enjoy quite the same popularity as Mars bars, Maltesers or Cadbury Buttons, but I think Boost bars are such an underrated chocolate. Chewy caramel, a generous coating of Dairy Milk and super crunchy biscuit melded into one – what’s not to like?!

Boosts have been my mum’s all-time favourite chocolate bars for as long as I can remember, and so I wanted to use them as the inspiration for her birthday cake this year. She’s not the biggest fan of chocolate sponge cake and the idea of doing one sandwiched with caramel and topped with Boost pieces didn’t really grab me. I Googled ‘Boost bar cheesecake’ and, to my immense surprise, there were no results! Needless to say, this was all the motivation I needed to rectify this and attempt one myself, particularly given the enticing can of Carnation caramel already sat waiting in the pantry.

After thinking about it some more, I decided cream cheese didn’t really seem necessary and decided to stick with recreating each element of the chocolate bar to create a large, sliceable, homemade version. No frills, no faff and no baking but the end result was delicious and went down a storm!

I realised afterwards that, due to the soft consistency of the tinned caramel, this creation is actually perhaps more reminiscent of Munchies chocolates rather than their chewier Cadbury cousin. Either way, it tastes good, which is the main thing I think!

20160319_151302

INGREDIENTS

For the base:

  • 170g/6 oz digestive biscuits, crushed
  • 55g/2 oz butter or margarine, melted

For the filling:

  • 3/4 of a 397g can Carnation caramel
  • 250g/9 oz milk chocolate (preferably Cadbury’s Dairy Milk)
  • 55g/2 oz butter or margarine
  • 2 tbsp golden syrup
  • 1 x 10⁸g bag Boost Bites (or Munchies!), or 2 Boost bars, chopped into 2cm pieces

METHOD

For the base:

  1. Place the digestive biscuits in a hole-free carrier bag and bash into crumbs with a rolling pin, or place them in a food processor.
  2. Place the butter/margarine in a heatproof bowl and melt in the microwave until liquid, and then pour in the biscuit crumbs. Mix thoroughly to combine.
  3. Pour the mixture into a lightly greased flan dish and press down with your fingers or the back of a spoon until flat and firm. Place in the fridge to set for at least half an hour.

For the filling/topping:

  1. Remove the set biscuit base from the fridge and spread the caramel over it evenly with a spatula.
  2. Place the flan dish back in the fridge and allow to set for at least an hour, until the caramel has firmed up a bit. Remove from the fridge before making the chocolate topping.
  3. Place the chocolate in a heatproof bowl and melt in the microwave on low heat in blasts of 30 seconds-1 minute until completely smooth.
  4. Stir in the butter/margarine and syrup and pour the mixture over the caramel layer. Once the chocolate has cooled completely, arrange the Boost Bites on top, and then place back in the fridge for at least 25 minutes before serving.

20160319_151312

 
Categories: Chocolate, No-Bake | Tags: , , , , , , , , , , , , , | 4 Comments

Cheese & Sundried Tomato Quiche

I used to HATE quiche. I couldn’t fathom why on earth grown-ups thought a slice of stone-cold, flaccid, eggy tart – like a lifeless pizza substitute – was a viable choice for the buffet table at any family gathering or event. Mind you, I used to hate eggs in general and couldn’t stomach so much as an omelette, so I probably wasn’t in a position to judge.

As with many other types of food, I’ve grown to like eggs (apart from hard-boiled, blurgh) as I’ve evolved from a fussy child/teenager into a proper, fully-fledged ‘adult’ (on the outside anyway) with a more accommodating palate. While the pre-packaged, slightly deflated-looking quiches you find in the supermarket still don’t appeal to me, I really fancied having a go at my own version, with homemade pastry and served warm from the oven. How hard could it be? Well, not at all as it happens!

I’m all for buying pre-made pastry, and even just the thought of attempting my own puff or filo makes me want to go for a lie down, but making shortcrust from scratch is ridiculously easy. Obviously, if you’d rather use the bought stuff to save time that’s absolutely fine and will work just as well, but I’d recommend giving it a go yourself if you can.

My mum requested a veggie quiche for the buffet tea we had on her birthday, and the flavours here are gorgeous, but you could add anything you like really. Bacon, mushrooms or chorizo would also work well in place of the sundried tomatoes. I like this quiche best served warm, fresh out the oven, but it’s also delicious cold.

20160306_162630-1

INGREDIENTS

For the pastry:

  • 225g/8 oz plain flour
  • 115g/4 oz butter or margarine + a little extra for greasing
  • Splash of milk

For the filling:

  • 3 eggs
  • 150g/5 oz cheddar cheese, grated
  • 80g/3 oz sundried tomatoes, thoroughly drained from their oil and snipped into small pieces no bigger than a 5p piece
  • 300ml/10 fl oz milk
  • 1 tbsp plain flour

METHOD

For the pastry:

  1. Place the flour in a large mixing bowl and then rub in the butter/margarine using your fingers until crumbs form.
  2. Add a splash of milk and bring together to form a ball of dough. If it’s too sticky, add a little more flour and if it’s too dry and crumbly, add a splash more milk.
  3. Wrap the pastry in clingfilm and chill in the fridge for a minimum of 20 minutes.
  4. Pre-heat the oven to 200 degrees C (or 180 fan) and lightly grease a flan dish with butter/margarine.
  5. Roll the pastry out with a rolling pin on a floured surface until it’s about the thickness of a pound coin and place over the prepared flan dish, gently pushing it into the grooves.
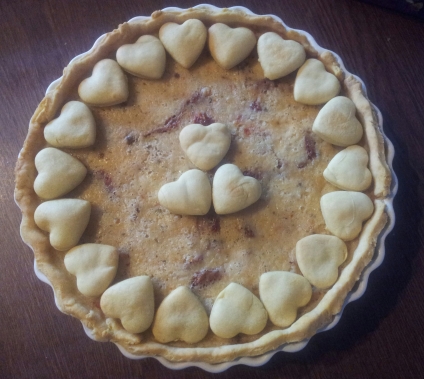
  6. Trim off the excess pastry with a knife and squidge back into a ball, then roll it out again and cut out the heart shapes with a cookie cutter (or just keep the excess pastry for another time if you’d rather). Place the hearts on a rectangular baking tray lined with parchment paper.
  7. Pop the pastry case and hearts in the oven and bake for around 15 minutes until the pastry is dry and slightly browned. Turn the temperature down to 160 degrees C (or 140 fan).
  8. Place the flan dish and pastry hearts on a wire rack and allow to cool before making the filling.

For the filling:

  1. Beat the eggs together in a mixing bowl, and then stir in the cheese, milk, flour and sundried tomatoes.
  2. Pour the mixture into the cooled pastry case in the flan dish.
  3. Put the dish back in the oven and bake for a further 25-30 minutes until a cocktail stick inserted into the centre of the quiche comes out clean.
  4. Place the quiche on the wire rack and allow to cool slightly, then arrange the pastry hearts on top. Enjoy hot or cold!
Categories: Savoury | Tags: , , , , , , , , , , , , , , , | Leave a comment

Caramacjacks (Caramac Flapjacks)

I’ve been a bit quiet on the blogging front lately as I’ve not been doing as much baking as usual, and the few bits I have done have been either from cookbooks or things I’ve made a million times before that I’ve already posted on here. As I’ve mentioned before, I’ve also been trying to eat a bit more healthily and cut down on refined sugar but, admittedly, my desk drawer at work that’s groaning under the strain of the office biscuit/chocolate/jaffa cake stash is hindering my efforts somewhat…

Another reason in part for my lack of culinary activity is due to my recent rekindling of my passion for painting, something I hadn’t done in years until the other week. I’m so glad I’ve got back into it though as I’m enjoying it hugely, and I’m never happy if I’m not working on some kind of creative project.

Anyhow, back to the subject in hand – Caramac flapjacks! Or, as I have christened them, ‘Caramacjacks’. Weirdly enough, I’d never actually made flapjacks before but my friend at work had a birthday approaching and I decided to have a go at them as she’s not hugely keen on cake (I know, shocking!) and I wanted to make something that I could stick candles in. Like me, she’s a big chocolate fan, and there were two multipacks of the enticing sweet, golden ingots in question lingering in my pantry, so the result was a no-brainer.

P.S. If you’re crazy for Caramac, why not check out my cupcake recipe?

20160301_185541

INGREDIENTS – makes approx. 16 small flapjacks (or one big one!)

For the flapjacks:

  • 330g/11.5 oz oats
  • 150g/6 oz butter or margarine
  • 150g/6 oz brown sugar
  • 100g/4 oz golden syrup
  • 100g/4 oz caramel chocolate buttons or white chocolate buttons, chopped

For the topping:

  • 5 x standard Caramac bars
  • 1 tbsp butter or margarine
  • 75g/3 oz dark chocolate

METHOD

For the flapjacks:

  1. Pre-heat the oven to 180 degrees C (or 160 gas) and line a square or rectangular baking tin with parchment paper.
  2. Melt the butter/margarine, sugar and syrup together, either using a saucepan on the hob or by placing them in a heatproof bowl and heating in the microwave in 1-minute blasts.
  3. Stir in the oats and chopped caramel/white chocolate buttons.
  4. Scoop the mixture into the prepared baking tin and pop in the oven for around 20 minutes, or until lightly golden.
  5. Transfer onto a wire rack and allow to cool before adding the topping.

For the topping:

  1. Chop the Caramac bars into very small pieces and transfer into a heatproof bowl, then microwave on a LOW heat in 30-second blasts until completely melted (don’t be tempted to put it in for longer periods or turn the heat up or it will seize and turn disgusting!)
  2. Stir the butter/margarine into the melted Caramac and pour onto the cooled flapjack. Spread the topping into an even layer using a palette knife. Don’t worry if the consistency of the mixture isn’t very smooth.
  3. Chop the dark chocolate into small pieces and place in a new heatproof bowl, then microwave in blasts of 30 seconds to 1 minute until completely melted (dark chocolate tends to be more forgiving than the more synthetic Caramac).
  4. The Caramac topping should have set by now but, if not, wait until it has. Then, using a teaspoon, drizzle the melted chocolate across the flapjack in a criss-cross pattern and allow to set.
  5. Cut into 16 small bars with a sharp knife – or go mad and leave it as one giant flapjack!
Categories: flapjacks, Traybakes | Tags: , , , , , , , , , , , | 2 Comments

Cookbook Challenge 2 – Nigella’s Devil’s Food Cake

I had another birthday cake request a few weeks ago, this time from my lovely Californian friend Lara. Her only brief was ‘CHOCOLATE’ so, in keeping with my resolution to try more actual cookbook recipes, I decided to have a go at Nigella Lawson’s sinful Devil’s Food cake that I remembered her baking on one of her TV shows.

Anyone that knows me knows that Nigella is one of my all-time favourite people in the world and, seeing as she’s the queen of decadent eating, I thought it was appropriate to use one of her recipes for a chocolatey, indulgent birthday treat.

I used white chocolate fingers to cover a strawberries and cream cake for my friend Danielle’s birthday last year and it turned out fantastically so I decided to go for a similar look for this one, but using dark chocolate Kit Kats instead. It looks quite fancy but it’s surprisingly easy to make and assemble – just make sure you allow extra time for the frosting to set to a spreading consistency.

I was worried the sponges wouldn’t rise properly when I was making them as the batter was so runny but they turned out beautifully. It’s gorgeously moist, dark and luscious, and a level up from a standard chocolate cake. You don’t need a big slice as it’s very rich due to the lashings of divine ganache frosting but it’s perfect for a special occasion. The birthday girl was over the moon and it was well worth the suspenseful tube journey transporting it from West Hampstead to Tower Hill!

20150801_220200-1

INGREDIENTS – makes 2 sponge layers of 20cm/8in in diameter

For the cake:

  • 225g/8 oz plain flour
  • 150g/5 oz caster sugar
  • 100g/3.5 oz brown sugar
  • 125g/4.5 oz butter
  • 50g/2 oz cocoa powder
  • 2 large eggs
  • 2 tsp vanilla extract
  • 250ml/8.5 fl oz boiling water
  • 0.5 tsp baking powder
  • 0.5 tsp bicarbonate of soda

For the frosting:

  • 30g/1 oz brown sugar
  • 175g/6 oz butter
  • 300g/10.5 oz dark chocolate, finely chopped
  • 125ml/4 fl oz water

For the decorations:

  • 19 (approx.) dark chocolate Kit Kats (I used the Sainsbury’s own brand ones as I think the criss-cross pattern on them is prettier than the Kit Kat logo!)
  • 400g/14 oz (approx.) strawberries (about one standard punnet)
  • 110g/4 oz (approx.) raspberries (about half a standard punnet)
  • Pinch of edible glitter (optional)
    + a ribbon long enough to tie around the cake

METHOD

For the cake:

  1. Pre-heat the oven to 180 degrees C (or 160 fan) and line two baking tins with parchment paper.
  2. Put the cocoa and brown sugar in a bowl and add the boiling water. Mix briefly and set aside.
  3. Whisk the butter and caster sugar together until pale.
  4. Place the flour, baking powder and bicarb into a separate bowl.
  5. Add the vanilla extract and one egg to the butter mixture and whisk, then add half of the flour mixture.
  6. Add the other egg to the butter mixture, followed by the rest of the flour mixture and continue whisking.
  7. Fold in the liquid cocoa mixture and mix until all the ingredients are combined.
  8. Pour the batter in equal quantities into the prepared cake tins, then place in the oven and bake for around 25-30 minutes until a cocktail stick inserted into the sponges comes out clean.
  9. When baked, leave the cakes to cool on a wire rack before turning out of the tins.

For the frosting:

  1. Place the water, butter and brown sugar in a saucepan and melt together on a low heat.
  2. When the mixture begins to bubble, take the pan off the heat and add the finely chopped chocolate. Swirl the liquid over the pieces so that they melt evenly.
  3. When the chocolate has all melted, whisk the mixture until smooth and glossy, then transfer into a cool mixing bowl.
  4. Leave the frosting to set for at least one hour (place it in the fridge to speed up the process a bit) until it’s a spreadable consistency.
  5. When set, spread some of the frosting onto one of the cooled sponges then sandwich the other sponge on top. Spread the rest of the frosting over the top and sides of the cake.

20150731_15544620150731_160533

For the decorations:

  1. Take the Kit Kats out of their wrappers and carefully place all around the edge of the cake, without any gaps, pushing them firmly into the frosting so that they stick.
  2. Tie the ribbon around the middle of the cake to secure the biscuits.
  3. Top with the strawberries and raspberries and add a sprinkling of edible glitter if you fancy. Et voila!

Cake & frosting recipe © Nigella Lawson

Categories: Chocolate, Layer Cakes | Tags: , , , , , , , , , , , , , , , , , , | 4 Comments

Blog at WordPress.com.