Posts Tagged With: sugar

Pineapple & White Chocolate Pavlova

Following the success of my first ever homemade meringues back in October last year, I’ve been keen to have a go at a full-blown pavlova. A sweet, snowy mountain adorned with smooth white cream and colourful fresh fruit, I’ve always thought pavlovas make a spectacular dessert, as well as being a nice lighter alternative to cake.

I thought if my attempt turned out like the delicious marshmallowy-on-the-inside-crisp-on-the-outside individual little clouds I made previously I’d be happy, but I was worried that this monster version would be more temperamental, and cook unevenly or shatter into sad little bits of chalk dust when baked. Luckily, I needn’t have had such concerns as it came out beautifully.

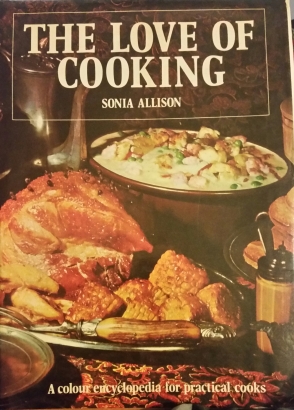
Although the topping combination was my idea, I can’t take credit for the meringue base here. My kitchen-whizz mum suggested I use her failsafe pavlova recipe from her trusty old copy of The Love of Cooking by Sonia Allison (from 1972!), and it proves that the oldies are certainly goodies as it worked perfectly. It’s definitely going to be be my go-to recipe in future!

20170311_203249-1

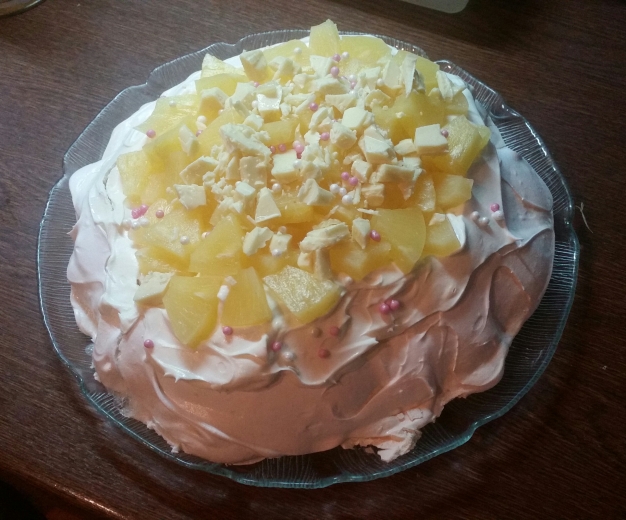
Now here I must confess that I’m not a massive fan of berries, which are a staple of the quintessential pavlova. I love anything strawberry, raspberry or blueberry flavoured, but I just don’t enjoy the texture of the fruits themselves. However, I needed something that would cut through the sweetness of both the meringue and white chocolate, so I decided to use refreshingly sharp pineapple instead and I think it worked really well.

The finished article went down an absolute storm with my family, and I’ve definitely been bitten by the homemade meringue bug, so I’ll certainly be making more pavs in the future!

20170218_180430-1

INGREDIENTS – serves approx. 6 people

For the meringue base:

  • 4 egg whites
  • 225g/8 oz caster sugar
  • Quarter tsp cream of tartar
  • 2 tsp cornflour
  • 1 tsp vinegar (any kind will do)

For the topping:

  • 1 x 36g sachet Dream Topping + milk as needed by the packet instructions (or 250ml/0.5 pint double cream)
  • 1 x 432g can pineapple chunks or slices in juice, drained
  • 50g/1.5 oz white chocolate, chopped into chunks
  • A sprinkling of white and pink edible pearls (optional)

METHOD

For the meringue base:

  1. Pre-heat the oven to 130 degrees C (or 110 fan) and line a large flat baking tray with parchment paper.
  2. Place the egg whites in a very clean mixing bowl and whisk with the cream of tartar until white and frothy.
  3. Continue to whisk while adding the sugar a few tablespoons at a time until stiff, glossy peaks form – this will take a good few minutes (you should be able to hold the bowl of mixture over your head without it spilling out!)IMG_rd1c9n
  4. Gently fold in the cornflour and vinegar with a spatula (and don’t panic at the odd acidic smell like I did – this will disappear once it’s cooked, I promise!)
  5. Dollop the mixture in a rough circle on the baking parchment, ensuring it’s in a thick layer so you can’t see the paper through it at any point.
  6. Place in the oven and bake for around 1-1.5 hours, until a crisp shell has formed and the meringue is very slightly golden on the top but mostly white.
  7. When cooked, remove from the oven and leave to cool.

For the topping:

  1. Prepare the Dream Topping (or cream) according to the packet’s instructions – it should be quite thick and not runny – and then pile it on top of the meringue base.
  2. If using pineapple slices, cut them into small chunks and scatter on top of the Dream Topping, followed by the white chocolate chunks.
  3. Finish with a sprinkling of a few pretty pink and white pearls if you fancy, and serve immediately.
Categories: Other Treats | Tags: , , , , , , , , , , , , , , , , , | Leave a comment

Chocolate Orange Bonfire Cake

I love being asked to make cakes for other people (providing no sugarpaste sculpture is involved!), especially to a theme or particular flavour. I get to rise to the challenge of making something decadent and special, but without the subsequent burden of a shedload of leftover cake which needs eating before it goes off, and inevitably leads to colossal stress and guilt over my already-expanding waistline.

It was my dear friend and work colleague Mel’s birthday on Monday this week and this year’s brief was ‘chocolate orange’. Throughout this month I’ve seen various photos of brilliant bonfire cakes – with the crowning decoration constructed from chocolates intertwined with sugar flames – and fancied giving one a go myself, so it was a no-brainer to combine the two ideas into this decadent Chocolate Orange Bonfire Cake.

I’m by no means a ‘showstopper’ kind of person when it comes to cake making as I simply don’t have the skills to execute masterpieces in buttercream and fondant that look like they belong in the Louvre (to be honest, I struggle just to use a piping bag and will avoid using one at all costs!) However, I think this is probably the best looking cake I’ve made to date and I’m really pleased with how it turned out. Despite being very simple to put together, it’s very striking and ideal for a celebration.

More importantly than pure aesthetics, this cake is absolutely delicious. The melted chocolate makes it wonderfully moist and satisfying and all my work colleagues commented on how good it was.

Personally, I think I actually prefer it without the icing; the sponge can really hold its own with its taste and texture and I don’t think the ganache is really necessary, despite its lovely silkiness. If you’re not making this for a celebration, feel free to omit it, unless you’re a real hardcore chocoholic!

Speaking of chocoholics, if this recipe appeals to you, why not try my spiced tea & chocolate cake with cinnamon ganache?

export-236716381-1
INGREDIENTS – makes 3 sponge layers of 20cm/8in diameter

For the cake:

  • 280g/10 oz self-raising flour
  • 115g/4 oz granulated or caster sugar
  • 115g/4 oz dark brown sugar
  • 280g/10 oz butter or margarine
  • 4 eggs
  • 2 heaped tbsp cocoa powder
  • 2 tbsp milk
  • 1 x Terry’s Chocolate Orange (157g) or equivalent weight of other orange chocolate
  • 0.5 tsp baking powder

For the orange ganache icing/decorations:

  • 1 x Terry’s Chocolate Orange (157g) or equivalent weight of other orange chocolate
  • 90g/3 oz butter or margarine
  • 20g/0.75 oz dark brown sugar
  • 65 ml/2 fl oz water
  • About 10-12 orange Matchmakers
  • 55g/2 oz granulated or caster sugar
  • Orange/yellow sugar stars + sprinkles (optional)
  • 1 sharing bag of Mini Chocolate Orange segments (optional)

METHOD

For the cake:

  1. Pre-heat the oven to 180 degrees C (or 160 fan) and line three round baking tins with parchment paper, or spritz with cake release spray.
  2. Whisk the butter/margarine and sugars together in a large mixing bowl until pale, then whisk in the eggs and milk.
  3. Break the Chocolate Orange up into small pieces and place in a heatproof bowl, then place in the microwave on a low heat in blasts of 1 minute until melted.
  4. Fold the melted chocolate, flour, cocoa powder and baking powder into the egg mixture until a batter of a soft dropping consistency has formed.
  5. Pour the mixture into the prepared cake tins, then pop in the oven and bake for around 20-25 minutes until a cocktail stick inserted into the sponge comes out clean.
  6. When baked, leave the sponges to cool on a wire rack before turning them out of the tins. At this stage they can be frozen for decorating at a later date if you wish.

For the orange ganache icing/decorations:

  1. Break the other Chocolate Orange into small pieces and set aside.
  2. Place the water, butter/margarine and brown sugar in a saucepan and melt together on a low heat.
  3. When the mixture begins to bubble, take the pan off the heat and add the chopped Chocolate Orange. Swirl the liquid over the pieces so that they melt evenly.
  4. When the chocolate has all melted, whisk the mixture until smooth and glossy, then transfer into a cool mixing bowl.
  5. Leave the frosting to set for at least one hour (place it in the fridge to speed up the process a bit) until it’s a spreadable consistency.
  6. When set, spread the frosting onto the cooled cake and place in the fridge for at least an hour.
  7. Pour the granulated/caster sugar into a small, heavy-bottomed pan over a medium heat on the hob and wait until it has turned golden brown with a liquid consistency – be patient and DO NOT STIR!
  8. Pour the liquid sugar onto non-stick parchment paper in one big sheet (be careful as it will be extremely hot), then allow to set until very hard and brittle.
  9. Arrange the Matchmakers in a criss-cross pattern across the top of the cake so that they resemble branches on a bonfire.
  10. Just before serving, snap the melted sugar sheet into flame shapes of different sizes and arrange as you see fit among the Matchmakers by pushing them upright into the sponge.
  11. Scatter the sugar stars and sprinkles over the top and arrange the Mini Chocolate Orange segments around the edge of the cake as a finishing touch, if using.

cxachawwqaalczh

Categories: Chocolate, Icing, Layer Cakes | Tags: , , , , , , , , , , , , , , , , , , , , , , | 3 Comments

Lemon Crunch Cupcakes

Originally posted 10/05/2015

Isn’t it funny how sometimes the most hurried and improvised of culinary creations turn out the most delicious? These yummy little Lemon Crunch Cupcakes are the definition of ‘winging it’ – they came about almost by accident but I’m glad they did as I’ll definitely be making them again, especially now spring is here!

I fancied making some cupcakes that were quick and straightforward but a bit different from ones I’d made recently, and I remembered I had a couple of lemons in the freezer (yes, you can freeze lemons! The insides go quite mushy but they still keep their flavour and juicyness), so I thought I’d have a go at lemon drizzle cakes. I then found that a) my grater was too blunt to grate the lemon zest for the sponge and b) I didn’t have any icing sugar. I improvised by adding the juice to the batter instead, convinced that its acidity would stop the cakes from rising or just generally make them taste funny, but they came out beautifully with a subtle zing 🙂

Unable to make icing, I simply created a slapdash mixture of granulated sugar and the rest of the lemon juice and plonked it on the tops of the cupcakes around 5 minutes before they were due to come out of the oven.

The result was a lovely sweet but citrussy crunchy topping which is very reminiscent of the traditional pancake topping! You can use as much or as little topping as you like depending on how sweet you want the cakes, but you don’t need a great deal to get the texture and flavour.

INGREDIENTS – makes approx. 10-12 small cupcakes

For the cakes:

  • 125g/4.5 oz self-raising flour
  • 115g/4 oz caster/granulated sugar
  • 115g/4 oz butter/margarine
  • 2 eggs
  • Juice of half a lemon
  • Pinch of baking powder

For the topping:

  • 1 tbsp granulated sugar
  • Juice of half a lemon

METHOD

  1. Pre-heat the oven to 180 degrees C (or 160 fan) and line a baking tray with 12 paper cases.
  2. Whisk the butter/margarine together in a large mixing bowl until pale then whisk in the eggs.
  3. Fold in the flour, lemon juice and baking powder until a batter of a soft dropping consistency has formed.
  4. Drop the mixture into the cake cases using a teaspoon until they’re each about three quarters full.
  5. Pop in the oven and then prepare the topping by mixing the sugar and remaining lemon juice together roughly in a bowl.
  6. After around 8-10 minutes, remove the cakes from the oven and spread the sugar and lemon juice mixture over the tops – this is quite fiddly as it’s so sticky but I found the easiest way to do it was using my fingers.
  7. Place the cakes back in the oven and bake for a further 5 minutes until a cocktail stick inserted into the sponge comes out clean.
  8. When baked, place on a wire rack and leave to cool before enjoying.

20150509_183024-1-1I love how the topping looks like a crisp winter frost!

Categories: cupcakes | Tags: , , , , , , , , | Leave a comment

Cheat’s Creme Brulee Cupcakes

Originally posted 18/05/2013

I adore creme brulee so I leapt at the chance of transforming this silky, creamy dessert into a cupcake. However, after much Googling and continuously seeing the words ‘separate egg yolks’ and ‘blow torch’ I immediately decided they were too much effort. Because I’m lazy like that.

I then stumbled across an American recipe where the cupcakes were filled with vanilla flavour ‘pudding’ which sounded like minimal faff but, sadly, what the Americans refer to as ‘pudding’ (a kind of creamy dessert usually served in individual pots if I remember rightly from watching Scrubs…) is not widely available here in the UK. Luckily I discovered the perfect substitute in the form of vanilla flavour Alpro soya dessert! This can be bought as a pack of four individual pots from most major supermarkets and can usually be found among the gluten/dairy-free products (they’re also available in dark chocolate, milk chocolate and toffee which are all yummy too, just FYI).

I decided to take the plunge and attempt some cooked sugar decorations for an authentically crisp but refreshingly blowtorch-free creme brulee-esque topping. Rounded off with a simple vanilla buttercream icing, these little beauties went down a treat, with many ‘ooh’s of admiration 🙂 And they’re so ridiculously easy to make!

You’ll only need to use a small amount of the soya dessert for the cakes but any that’s left over is delicious poured over sponge puddings, brownies, other warm desserts etc as a tasty alternative to custard (or of course you could just eat it straight out the pot if you haven’t fallen into a sugar coma brought on by sampling icing like me…)

INGREDIENTS – makes approx. 10-12

For the cakes:

  • 115g/4 oz self-raising flour
  • 115g/4 oz caster/granulated sugar
  • 115g/4 oz margarine/butter
  • 2 eggs
  • 0.5 tsp baking powder
  • 2 tsp vanilla extract

For the filling/icing/sugar decorations:

  • 12 tsp (approx.) vanilla flavour Alpro soya dessert
  • 225g/8 oz icing sugar
  • 115g/4 oz butter (unsalted if preferred)
  • 1 tsp vanilla extract
  • 55g/2 oz caster sugar

METHOD

For the cakes:

  1. Pre-heat the oven to 180 degrees C (or 160 fan) and line a baking tray with 12 paper cake cases.
  2. Whisk the margarine/butter and sugar together in a large mixing bowl until pale then whisk in the eggs.
  3. Fold in the flour, baking powder and vanilla extract until batter of a soft dropping consistency has formed.
  4. Drop the mixture into the paper cases using a teaspoon until they’re each about three quarters full.
  5. Pop in the oven and bake for about 12-15 minutes until a cocktail stick inserted into the sponge comes out clean.
  6. When baked, place on a wire rack and leave to cool. At this stage the cakes can be frozen for decorating at a later date if you wish.

For the filling, icing & sugar decorations:

  1. When they have cooled, use a teaspoon or small sharp knife to carefully cut out a hole (about 2cm in diameter and 1.5cm in depth) in the top of each cupcake, being careful not to cut too deep into the sponge. Don’t discard the sponge bits you’ve cut out!
  2. Put about a teaspoon of the vanilla soya dessert into each hole and gently push the sponge part that was cut out back into each one.
  3. Add the caster sugar to a small pan over LOW heat until it has turned brown and melted to a thick, sticky consistency – DO NOT STIR! Be patient and don’t be tempted to turn up the heat to speed up the process as it will burn horribly, trust me!
  4. When all the granules have disappeared, scoop the melted sugar out of the pan using a spatula and spread onto baking parchment or the opened-out clean inside of a cereal packet (sounds odd but works really well for this kind of thing, and it’s always good to recycle!) Do this quickly as the sugar will begin to set rapidly.
  5. While you’re waiting for the sugar to cool and set, place the butter and vanilla extract into a bowl and whisk while gradually adding the icing sugar until a thick, fluffy mixture has formed.
  6. Spoon the icing into a piping bag with a nozzle of your choice attached (I used a large circle one) and squeeze onto the top of each cake, or simply spread the icing on using a palette knife.
  7. Break up your sheet of cooked sugar into randomly sized shards and place some on top of each cake just before serving. Any leftover shards can be stored in an airtight container for about a week or so.
Categories: cupcakes | Tags: , , , , , , , , , , , , , , | Leave a comment

Create a free website or blog at WordPress.com.