Posts Tagged With: autumn

Pear Gingerbread Upsidedown Cake

Yay, Autumn is here again! And, of course, the dawn of this season means baking with luscious scrumped fruit, sticky syrup/treacle and oodles of heaven-scented winter spices. It just wouldn’t be Autumn otherwise. And this lovely Pear Gingerbread Upsidedown Cake utilises all three of this holy culinary trinity.

Isn’t it funny how you can bake a seemingly failsafe recipe that you’ve made countless times before and it can turn out a disaster, and you can write something off as an epic dog’s dinner of a cake fail only for it to turn out beautifully? Unfortunately, normally the former is the case for me, but this week I experienced a prime example of the latter.

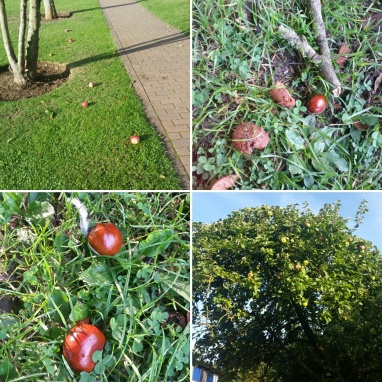
I was making some banana and caramel cupcakes for my work’s Macmillan Coffee Morning and thought I’d make use of some scrumped pears while I had the oven on. I had a flick through some of my trusty recipe books and came across an enticing apricot upsidedown number in Cakes & Slices that didn’t seem to require too much effort, for which I could easily substitute the suggested fruit for my windfall pears.

Part-way through making it I realised I didn’t have enough butter and substituted some of it for milk, and I also replaced the syrup with treacle out of necessity in my haste to get the damn thing finished. I melted the wet ingredients together as instructed before folding in the dry, and the result looked terrible!

It was wet and lumpy, and the baking powder I added in the hope of giving it a better rise (in light of the lack of eggs) let off an ominous fizz. When I poured the dodgy-looking concoction over the pear slices I barely had enough to cover them. By this point, I was convinced that this monstrosity would have to go down in the ‘disaster’ file, but thought I may as well cook it.

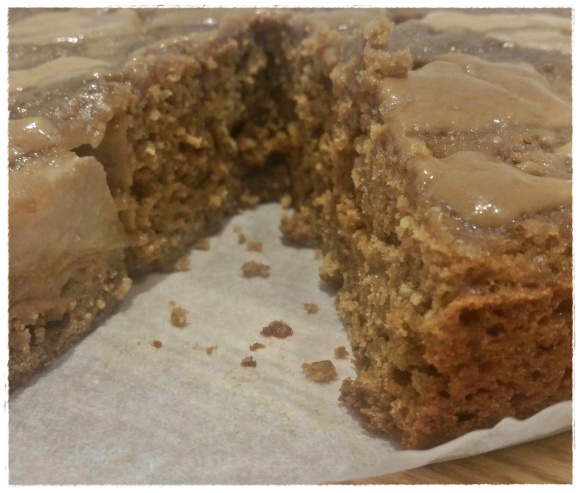
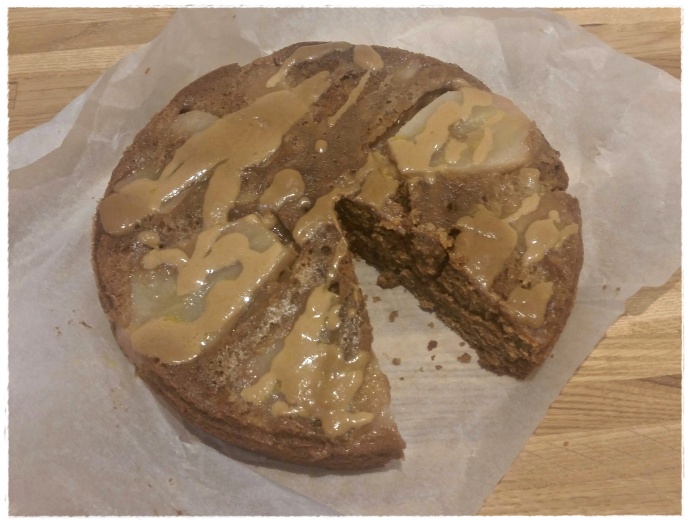
However, I needn’t have worried as, to my surprise, it rose beautifully and tasted wonderful! The ratio of pear to sponge was just right, and the cake was deliciously moist without being overly sticky. I shared slices with various people and they all loved it.

I had some leftover caramel from my Macmillan Coffee Morning cupcakes which is why I drizzled some over the top, but it’s certainly not essential.

20170929_131625-1

INGREDIENTS – makes one sponge of approx. 22cm/8.5 ins diameter

  • 2 medium pears, peeled, cored and chopped into fairly thin, neat slices
  • 175g/6 oz butter
  • 140g/5 oz brown sugar + a little extra for sprinkling
  • 85g/3 oz treacle
  • 185g/6.5 oz self-raising flour
  • 2 tsp ground ginger
  • 1 tsp mixed spice
  • Half a tsp baking powder
  • Drizzle of maple or golden syrup
  • Drizzle of Carnation caramel (optional)

METHOD

  1. Pre-heat the oven to 180 degrees C (or 160 fan) and line a round cake tin with parchment paper.
  2. Sprinkle about half a tablespoon of brown sugar over the bottom of the tin, drizzle over some maple/golden syrup, then neatly arrange the pear slices in a circle on top.
  3. Place the butter, sugar and treacle in a heatproof bowl then melt together in the microwave on a medium heat in blasts of 1 minute.
  4. Stir well and then fold in the flour, ginger, mixed spice and baking powder – don’t worry that the batter looks lumpy and runny!
  5. Pour the batter evenly over the pears, then place the tin in the oven for about 25-30 minutes, or until a skewer inserted into the sponge comes out mostly clean.
  6. Remove the cake from the oven and place on a wire rack. When cool, turn the cake out so that the pears are at the top.
  7. Drizzle some Carnation caramel over the cake, if you like (if the caramel is too stiff, heat it for about 30 seconds in the microwave on LOW heat in a heatproof bowl and give it a good stir).
  8. Enjoy cold, or warm with some cream or ice cream. Yum!

20170929_131642-1

Categories: Layer Cakes | Tags: , , , , , , , , , , , , , , , , | Leave a comment

Chocolate Orange Bonfire Cake

I love being asked to make cakes for other people (providing no sugarpaste sculpture is involved!), especially to a theme or particular flavour. I get to rise to the challenge of making something decadent and special, but without the subsequent burden of a shedload of leftover cake which needs eating before it goes off, and inevitably leads to colossal stress and guilt over my already-expanding waistline.

It was my dear friend and work colleague Mel’s birthday on Monday this week and this year’s brief was ‘chocolate orange’. Throughout this month I’ve seen various photos of brilliant bonfire cakes – with the crowning decoration constructed from chocolates intertwined with sugar flames – and fancied giving one a go myself, so it was a no-brainer to combine the two ideas into this decadent Chocolate Orange Bonfire Cake.

I’m by no means a ‘showstopper’ kind of person when it comes to cake making as I simply don’t have the skills to execute masterpieces in buttercream and fondant that look like they belong in the Louvre (to be honest, I struggle just to use a piping bag and will avoid using one at all costs!) However, I think this is probably the best looking cake I’ve made to date and I’m really pleased with how it turned out. Despite being very simple to put together, it’s very striking and ideal for a celebration.

More importantly than pure aesthetics, this cake is absolutely delicious. The melted chocolate makes it wonderfully moist and satisfying and all my work colleagues commented on how good it was.

Personally, I think I actually prefer it without the icing; the sponge can really hold its own with its taste and texture and I don’t think the ganache is really necessary, despite its lovely silkiness. If you’re not making this for a celebration, feel free to omit it, unless you’re a real hardcore chocoholic!

Speaking of chocoholics, if this recipe appeals to you, why not try my spiced tea & chocolate cake with cinnamon ganache?

export-236716381-1
INGREDIENTS – makes 3 sponge layers of 20cm/8in diameter

For the cake:

  • 280g/10 oz self-raising flour
  • 115g/4 oz granulated or caster sugar
  • 115g/4 oz dark brown sugar
  • 280g/10 oz butter or margarine
  • 4 eggs
  • 2 heaped tbsp cocoa powder
  • 2 tbsp milk
  • 1 x Terry’s Chocolate Orange (157g) or equivalent weight of other orange chocolate
  • 0.5 tsp baking powder

For the orange ganache icing/decorations:

  • 1 x Terry’s Chocolate Orange (157g) or equivalent weight of other orange chocolate
  • 90g/3 oz butter or margarine
  • 20g/0.75 oz dark brown sugar
  • 65 ml/2 fl oz water
  • About 10-12 orange Matchmakers
  • 55g/2 oz granulated or caster sugar
  • Orange/yellow sugar stars + sprinkles (optional)
  • 1 sharing bag of Mini Chocolate Orange segments (optional)

METHOD

For the cake:

  1. Pre-heat the oven to 180 degrees C (or 160 fan) and line three round baking tins with parchment paper, or spritz with cake release spray.
  2. Whisk the butter/margarine and sugars together in a large mixing bowl until pale, then whisk in the eggs and milk.
  3. Break the Chocolate Orange up into small pieces and place in a heatproof bowl, then place in the microwave on a low heat in blasts of 1 minute until melted.
  4. Fold the melted chocolate, flour, cocoa powder and baking powder into the egg mixture until a batter of a soft dropping consistency has formed.
  5. Pour the mixture into the prepared cake tins, then pop in the oven and bake for around 20-25 minutes until a cocktail stick inserted into the sponge comes out clean.
  6. When baked, leave the sponges to cool on a wire rack before turning them out of the tins. At this stage they can be frozen for decorating at a later date if you wish.

For the orange ganache icing/decorations:

  1. Break the other Chocolate Orange into small pieces and set aside.
  2. Place the water, butter/margarine and brown sugar in a saucepan and melt together on a low heat.
  3. When the mixture begins to bubble, take the pan off the heat and add the chopped Chocolate Orange. Swirl the liquid over the pieces so that they melt evenly.
  4. When the chocolate has all melted, whisk the mixture until smooth and glossy, then transfer into a cool mixing bowl.
  5. Leave the frosting to set for at least one hour (place it in the fridge to speed up the process a bit) until it’s a spreadable consistency.
  6. When set, spread the frosting onto the cooled cake and place in the fridge for at least an hour.
  7. Pour the granulated/caster sugar into a small, heavy-bottomed pan over a medium heat on the hob and wait until it has turned golden brown with a liquid consistency – be patient and DO NOT STIR!
  8. Pour the liquid sugar onto non-stick parchment paper in one big sheet (be careful as it will be extremely hot), then allow to set until very hard and brittle.
  9. Arrange the Matchmakers in a criss-cross pattern across the top of the cake so that they resemble branches on a bonfire.
  10. Just before serving, snap the melted sugar sheet into flame shapes of different sizes and arrange as you see fit among the Matchmakers by pushing them upright into the sponge.
  11. Scatter the sugar stars and sprinkles over the top and arrange the Mini Chocolate Orange segments around the edge of the cake as a finishing touch, if using.

cxachawwqaalczh

Categories: Chocolate, Icing, Layer Cakes | Tags: , , , , , , , , , , , , , , , , , , , , , , | 3 Comments

Toffee Apple Flapjacks

Hurray, Autumn is upon us again! As corny as it sounds, is there anything more heart-warmingly lovely than taking a quiet pink-cheeked walk in the September/October sunshine amidst a crisp breeze while taking in all the gorgeously coloured leaves, fallen apples and shiny conkers underfoot? It’s at this time of year that I’m glad I can walk to work, and recently I haven’t been able to resist stopping to take photos on the way as my scenic route looks particularly stunning of an autumnal morning.

img_20160928_184225

Most importantly, Autumn marks the arrival of one of my favourite things – scrumping season! My mum and I did our usual ritual of venturing out to the nearby fields on the first Saturday in September and came back with a glorious bounty of apples, blackberries and plums. The majority of the berries and some of the apples were used to make vast quantities of my beloved blackberry, apple & cinnamon jam, but it wouldn’t be right to not keep a few aside for some baking.

The scrumped apples have made a delicious addition to various recipes that I’ve tried, including Waitrose’s spiced apple & walnut blondies and my go-to Weetabix loaf. However, I think my favourite 2016 Autumn apple creation has to be these Toffee Apple Flapjacks. They’re squidgy, sweet and sharp, and remind me of a cross between a flapjack and a crumble – perfect for a chilly evening. They’re also yummy served warm with custard.

For another wonderfully autumnal treat where apples are the star, why not check out my Autumn Bliss cake?

20161008_150432

INGREDIENTS – makes 15 flapjacks

  • 130g/4.5 oz butter or margarine
  • 170g/6 oz brown sugar
  • 3 tbsp maple syrup
  • 255g/9 oz oats
  • 2 eating apples, peeled, cored and chopped into chunks about the size of a 10p piece
  • 60g/2 oz mini toffee/fudge pieces (I used Aldi’s mini salted caramel fudge pieces), or larger toffees/fudges chopped into small pieces
  • 1 tsp cinnamon

20161008_132122

METHOD

  1. Pre-heat the oven to 180 degrees C (or 160 fan) and line a rectangular baking tray with parchment paper.
  2. Put the butter/margarine, sugar and maple syrup in a heatproof bowl and melt together in the microwave in blasts of 1 minute until smooth, stirring at each interval. Alternatively, melt together in a pan on the hob over a low heat, stirring regularly.
  3. Stir the oats, apple chunks, toffee/fudge pieces and cinnamon into the liquid mixture until thoroughly coated.20161008_132436.jpg
  4. Pour the mixture into the prepared baking tray and place in the oven for around 15-20 minutes, or until slightly golden at the sides.
  5. Leave the flapjacks to cool on a wire rack and then slice into squares with a sharp knife.
Categories: flapjacks, Traybakes | Tags: , , , , , , , , , , , , , , , , , , | Leave a comment

Autumn Bliss Cake

Autumn is here! Season of mist and mellow fruitfulness! I absolutely love this time of year: beautiful golden falling leaves, Halloween, fireworks, mulled cider, comforting soups and hot chocolate, warm spicy scents and a crisp chill in the morning air. The nights draw in and the cloying, sticky summer heat becomes a fading memory.

One of my favourite things to do at this time of year is to go scrumping in the fields near my house. As I mentioned in my previous post, I got a fantastic haul of blackberries this year which have been incorporated into endless culinary creations, but, for me, nothing says autumn quite like fallen apples fresh from the branch. I’ve used the ones I’ve collected for various bakes and desserts but this cake is by far my favourite. I think it’s a true celebration of the season, with the slightly sour apples marrying gorgeously with the sweetness of another autumnal kitchen staple, cinnamon, and topped off with some lovely golden brown walnuts and pecans.

Although there are a few steps to it, this recipe is very simple and the result is stunning. You could use bought jam in place of the spiced apple filling I made here to save time but making it yourself is so easy and really does taste like Autumn Bliss! Why not make up some extra and put it into jars to have as a tasty treat on your toast? Cinnamon granola would also work well on top of the cake if you don’t have any cinnamon biscuits.

CQ9pBZhWUAAu98M

INGREDIENTS – makes 2 sponge layers of 8in/20cm diameter

For the cake:

  • 225g/8 oz self-raising flour
  • 115g/4 oz brown sugar
  • 90g/3 oz caster/granulated sugar
  • 225g/8 oz butter/margarine
  • 4 eggs
  • 3 tsp cinnamon
  • 1 tsp vanilla extract

For the filling/topping:

  • 4-5 (approx.) green apples, e.g. Granny Smith (or scrumped ones!)
  • 4 tbsp demerara/brown sugar
  • 1 tsp mixed spice
  • 2 tsp cinnamon
  • 2 tsp vanilla extract
  • 1 tbsp lemon juice
  •  100ml/3 fl oz apple juice (or apple cider if you want to add a boozy twist!)
  •  50ml/1.5 fl oz water
  • 5-7 (approx.) cinnamon biscuits
  • Handful of walnuts
  • Handful of pecans
  • Edible gold shimmer spray (optional but looks fab)

METHOD

For the cake:

  1. Pre-heat the oven to 180 degrees C (or 160 fan) and line two round baking tins with parchment paper.
  2. Whisk the butter/margarine and sugars together in a large mixing bowl until pale, then whisk in the eggs.
  3. Fold in the flour, cinnamon and vanilla extract until a batter of a soft dropping consistency has formed.
  4. Pour the mixture into the prepared cake tins, then pop in the oven and bake for around 15-20 minutes until a cocktail stick inserted into the sponges comes out clean.
  5. When baked, transfer the cakes (still in the tins – don’t remove them until they’re cool!) onto a wire rack and get started on the jammy apple filling…

For the filling/topping:

  1. Peel and core the apples (and remove any brown, manky looking bits if you’re using scrumped ones), then chop them into small chunks no bigger than a 50p piece.
  2. Place the chunks in a large pan along with the water, apple juice, lemon juice, sugar, vanilla extract, cinnamon and mixed spice and bring to the boil.
  3. Turn the heat down a little and allow to simmer, stirring occasionally, until the apple pieces can be easily squished with a wooden spoon. If the mixture is too tart, add a bit more sugar to taste.
  4. Bring to the boil a second time, then turn down the heat as before and allow to simmer for a further 5-10 minutes, again stirring occasionally.
  5. Turn off the heat completely and allow to cool.
  6. Scoop out about two thirds of the mixture along with all of the visible apple chunks and spread it onto the top of one of the cooled sponges with a palette knife, then sandwich the second sponge on top. Scrape out the remaining smooth apple mixture and spread it onto the top layer.
  7. Crush the cinnamon biscuits with your hands until they resemble breadcrumbs, then sprinkle over the top of the cake. Add the nuts and finish off with a few spritzes of edible gold shimmer spray for a truly autumnal effect. Ta-dah!
Categories: Layer Cakes | Tags: , , , , , , , , , , , , , , , , | 4 Comments

Cookbook Challenge 3 – Trine Hahnemann’s Scandinavian Marzipan Tarts

I was given Trine Hahnemann’s beautiful book, Scandinavian Baking, for Christmas last year and have been meaning to have a go at some of the recipes from it for a while. I have a soft spot for all things Scandi (Norway and Iceland are top of my bucket list of places to visit!) and love the sound of a lot of their traditional bakes, both sweet and savoury. I have to admit that I have made an alteration to this recipe and substituted the original lingonberries after ending up with a fabulous haul of blackberries following a productive foraging session in the fields near my house. Scrumping is one of my favourite things to do when autumn arrives so I thought it fitting to use the fruits of my labour and add a British twist 🙂 The berries’ tartness and the sweet, nutty marzipan are a match made in heaven.

I tend to stick with cakes or biscuits when baking so these lovely simple tarts were a perfect way to try something a bit different. I’d never made my own pastry before but it was so easy I’ll definitely be doing it again! This bake would also work wonderfully as one large tart for sharing, or with other kinds of sharp fruit. Trine’s recipe said to use individual fluted tins but a standard muffin tray works fine.

20150911_164744

I topped my tarts with a few flaked almonds as a final flourish.

INGREDIENTS – makes 16 tarts

For the pastry:

  • 170g plain flour
  • 60g icing sugar
  • 115g butter, chilled
  • Half an egg, lightly beaten
  • Pinch of salt

For the filling:

  • 300g marzipan
  • 2 eggs, lightly beaten
  • 100g butter, softened
  • 150g lingonberries (or blackberries)

METHOD

  1. Sift the flour, icing sugar and salt into a bowl and rub in the butter with your fingers until the mixture resembles crumbs.
  2. Add the egg and stir until the pastry comes together in a ball.
  3. Wrap in clingfilm and leave in the fridge for 30 minutes.
  4. Pre-heat the oven to 200 degrees C and grease 16 mini fluted cake tins or 2 muffin trays with butter.
  5. Roll the chilled dough out on a floured surface until 5-8mm thick then cut out rounds with a 9cm cookie cutter.
  6. Place the rounds in the prepared tins or muffin tray and grate the marzipan.
  7. Mix the grated marzipan, eggs and butter into a smooth paste and use to fill the pastry cases, then add the berries (about 3-4 per tart if you’re using blackberries).
  8. Bake for 20-25 minutes until the bottoms of the pastry cases are slightly brown then remove from the tins and leave to cool on a wire rack.
Categories: Other Treats | Tags: , , , , , , , , , , , , , , , | 1 Comment

Chocolate Gingerbread Cake

Originally posted 20/12/2014

WARNING: this stuff is highly addictive!! Seriously, I made a batch of this Chocolate Gingerbread Cake with the aim of taking half into university to share with my classmates but it somehow all disappeared in a number of freak scoffing accidents before I had the chance…

The recipe below is adapted from one found in an old winter issue of Good Food magazine – I thought the original batter lacked a chocolatey flavour and didn’t really taste much different from normal gingerbread cake so I added cocoa to the mix which resulted in the perfect marriage of chocolate and spice. I also cut down the amount of treacle and syrup used as I felt the previous quantities were a bit excessive.

This cake is definitely my new festive favourite as it’s so deliciously moist, smells incredible and is super simple to make. It also keeps really well and, if anything, tastes better after a couple of days (if you can make it last that long…)

I finished this batch off with some sprinkly chocolate rings from Aldi.

INGREDIENTS – makes approx. 12 large squares

  • 255g/9 oz self-raising flour
  • 155g/5.5 oz butter/margarine
  • 115g/4 oz dark brown sugar
  • 115g/4 oz black treacle
  • 115g/4 oz golden syrup
  • 115g/4 oz milk or dark chocolate
  • 2 tbsp cocoa powder
  • 1 tsp ground ginger
  • 2 tsp ground cinnamon
  • 1 tsp mixed spice
  • 150 ml/5 fl oz milk

METHOD

  1. Pre-heat the oven to 180 degrees C and line a rectangular cake tin with baking parchment.
  2. Place the butter/margarine, sugar, treacle, syrup and spices into a heatproof bowl and melt in the microwave until smooth or melt in a pan over the hob.
  3. Roughly chop the chocolate into small pieces and place in another heatproof bowl then melt in the microwave in blasts of 30 seconds-1 minute or over a pan of hot water.
  4. Stir the melted chocolate into the butter mixture then fold in the flour, cocoa powder and milk.
  5. Pour the mixture into the cake tin then bake for 20-30 minutes until a skewer inserted into the cake comes out clean.
  6. Transfer (with the baking parchment) onto a wire rack to cool then cut into squares with a sharp knife. Top with festive decorations of your choice if you wish.
Categories: Chocolate, Festive, Traybakes | Tags: , , , , , , , , , , , , | 2 Comments

Create a free website or blog at WordPress.com.