Posts Tagged With: caramel

Stroopwafel Cake

Well, I have certainly been on somewhat of a hiatus from my little blog of late, and with good reason!

I’ve lost count of the number of times I’ve posted blog entries on here where I say I’m on a health kick and trying to lose weight and, to be honest, each time the diet and exercise plans have ended up fizzling out despite my best intentions…

However, I’m pleased to say that this year I’m actually sticking to it and seeing results! I’ve been losing the weight fairly gradually as I can’t deal with depriving myself, but so far I’ve lost just 1.5 lbs shy of a stone since my 30th birthday in late January 🙂 I’m tracking my calorie intake using the incredibly useful MyFitnessPal app and have upped my exercise in the form of long power walks around the many beauty spots near where I live, yoga and small group training sessions at the gym, which I’m enjoying a lot more than I thought possible!

This method has really motivated me to keep up the good work as the extra exercise allows me to indulge in naughty things in moderation while keeping under my daily calorie goal, so I never really feel deprived. The extra energy and strength I’m building up is awesome too!

Anyway, the one downside of this lifestyle change is that my baking efforts have been minimal since the new year. If I’m being honest, I don’t really miss eating cake that much (I’ve learned that chocolate is the one thing I really can’t do without!), but this week I’m off work and was getting cake making pangs, so I thought it was about time I dusted off my whisk.

Inspiration for this recipe came a couple of years ago when I went on a wonderful holiday to the Netherlands, home of the delicious stroopwafel. For anyone who doesn’t know, a stroopwafel is a chewy caramel-filled circular waffle that’s just big enough to sit happily on the top of your cup of tea, where the warm rising steam renders its centre even more delightfully gooey (although they’re also just as scrumptious minus the mug sauna). These goodies are a Dutch creation but you can buy them quite easily in the UK (they sell them in Sainsbury’s, Tiger and B&M among other places…)

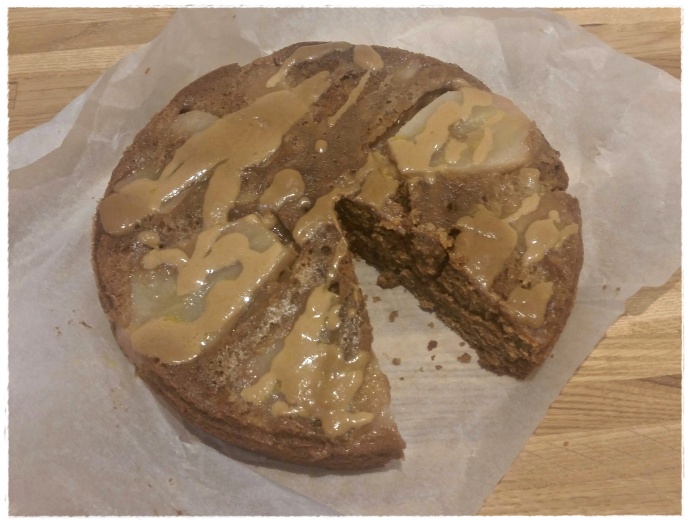
One of the many edible souvenirs that I brought back with me was a packet stroopwafel cake mix, and it tasted so good it made me want to have a go at making my own version. It’s taken me a while to get round to it but the results were worth the wait – the melting pools of caramel and chewy, crunchy top are to die for.
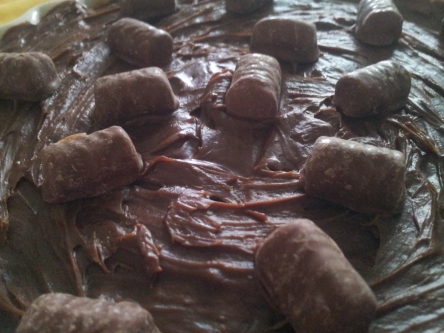
20190201_135514-1[9819]

INGREDIENTS – makes 1 standard size loaf cake

  • 170g/6 oz self-raising flour
  • 140g/5 oz caster sugar
  • 30g/1 oz dark brown sugar
  • 3 eggs
  • 170g/6 oz butter
  • 1 tbsp vanilla extract
  • 4 stroopwafels, chopped into pieces no smaller than a pound coin (would recommend using scissors for this)
  • Edible gold stars, to decorate (optional)

METHOD

  1. Pre-heat the oven to 170 degrees C (or 150 fan) and line a loaf tin with parchment paper.
  2. Add the butter and sugars to a large mixing bowl and beat until pale, then whisk in the eggs.
  3. Fold in the flour, vanilla extract and half of the stroopwafel pieces, then transfer the mixture into the loaf tin.
  4. Place in the oven and bake for 20 minutes. Remove and scatter the remaining stroopwafel pieces over the top of the cake, then return to the oven for a further 10-15 minutes, or until a cocktail stick inserted into the sponge comes out clean.
  5. Transfer to a wire rack to cool before removing the cake from the tin. Finish with a scattering of edible gold stars if you like.
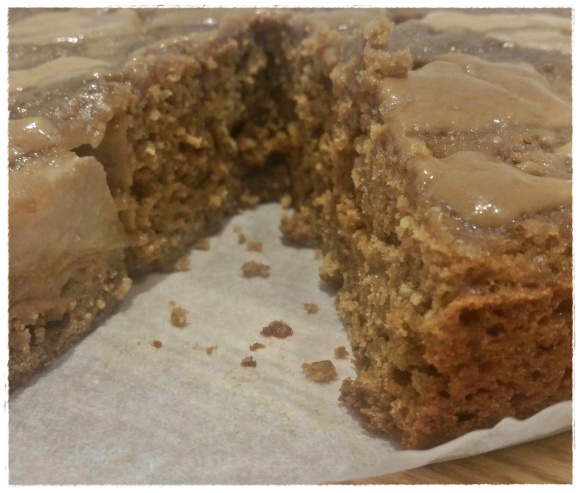
    Why not try a slice served warm with some cream or ice cream?

20190202_145102-1[9814]

Chewy, gooey, caramelly…what better reason to go Dutch?!


Categories: Loaf Cakes | Tags: , , , , , , , , , , , , , , , , | 2 Comments

Pear Gingerbread Upsidedown Cake

Yay, Autumn is here again! And, of course, the dawn of this season means baking with luscious scrumped fruit, sticky syrup/treacle and oodles of heaven-scented winter spices. It just wouldn’t be Autumn otherwise. And this lovely Pear Gingerbread Upsidedown Cake utilises all three of this holy culinary trinity.

Isn’t it funny how you can bake a seemingly failsafe recipe that you’ve made countless times before and it can turn out a disaster, and you can write something off as an epic dog’s dinner of a cake fail only for it to turn out beautifully? Unfortunately, normally the former is the case for me, but this week I experienced a prime example of the latter.

I was making some banana and caramel cupcakes for my work’s Macmillan Coffee Morning and thought I’d make use of some scrumped pears while I had the oven on. I had a flick through some of my trusty recipe books and came across an enticing apricot upsidedown number in Cakes & Slices that didn’t seem to require too much effort, for which I could easily substitute the suggested fruit for my windfall pears.

Part-way through making it I realised I didn’t have enough butter and substituted some of it for milk, and I also replaced the syrup with treacle out of necessity in my haste to get the damn thing finished. I melted the wet ingredients together as instructed before folding in the dry, and the result looked terrible!

It was wet and lumpy, and the baking powder I added in the hope of giving it a better rise (in light of the lack of eggs) let off an ominous fizz. When I poured the dodgy-looking concoction over the pear slices I barely had enough to cover them. By this point, I was convinced that this monstrosity would have to go down in the ‘disaster’ file, but thought I may as well cook it.

However, I needn’t have worried as, to my surprise, it rose beautifully and tasted wonderful! The ratio of pear to sponge was just right, and the cake was deliciously moist without being overly sticky. I shared slices with various people and they all loved it.

I had some leftover caramel from my Macmillan Coffee Morning cupcakes which is why I drizzled some over the top, but it’s certainly not essential.

20170929_131625-1

INGREDIENTS – makes one sponge of approx. 22cm/8.5 ins diameter

  • 2 medium pears, peeled, cored and chopped into fairly thin, neat slices
  • 175g/6 oz butter
  • 140g/5 oz brown sugar + a little extra for sprinkling
  • 85g/3 oz treacle
  • 185g/6.5 oz self-raising flour
  • 2 tsp ground ginger
  • 1 tsp mixed spice
  • Half a tsp baking powder
  • Drizzle of maple or golden syrup
  • Drizzle of Carnation caramel (optional)

METHOD

  1. Pre-heat the oven to 180 degrees C (or 160 fan) and line a round cake tin with parchment paper.
  2. Sprinkle about half a tablespoon of brown sugar over the bottom of the tin, drizzle over some maple/golden syrup, then neatly arrange the pear slices in a circle on top.
  3. Place the butter, sugar and treacle in a heatproof bowl then melt together in the microwave on a medium heat in blasts of 1 minute.
  4. Stir well and then fold in the flour, ginger, mixed spice and baking powder – don’t worry that the batter looks lumpy and runny!
  5. Pour the batter evenly over the pears, then place the tin in the oven for about 25-30 minutes, or until a skewer inserted into the sponge comes out mostly clean.
  6. Remove the cake from the oven and place on a wire rack. When cool, turn the cake out so that the pears are at the top.
  7. Drizzle some Carnation caramel over the cake, if you like (if the caramel is too stiff, heat it for about 30 seconds in the microwave on LOW heat in a heatproof bowl and give it a good stir).
  8. Enjoy cold, or warm with some cream or ice cream. Yum!

20170929_131642-1

Categories: Layer Cakes | Tags: , , , , , , , , , , , , , , , , | Leave a comment

Caramel Coffee Cake

I should probably start by saying that one of my pet hates is promotional blog posts that fawn over products that have been sent to the blogger in return for free advertising so apologies if this is a bit hypocritical, but I must say that this particular type of coffee really made this Caramel Coffee Cake special. And I promise I’ve not been given any incentive to promote it!

The product in question is Beanies caramel flavour instant coffee. My mum bought a jar of it from Aldi a few weeks ago and I was captivated by the absolutely heavenly aroma wafting from the cup as it brewed.

beanies-coffee-creamy-caramel-flavour-instant-coffee-50g-37317-p

Now, I actually cannot stand the taste of coffee, but bizarrely I love it in cake form and knew I had to try and bake with this angelic smelling stuff! And a 50th birthday for a java-loving colleague at work was the perfect excuse to try.

The recipe is extremely simple – pretty much just a slightly adapted Victoria sponge and standard buttercream – but the caramel coffee really takes the flavour to another level of deliciousness.

Screenshot_2017-06-04-11-51-06-1

INGREDIENTS – makes 3 shallow or 2 deep sponge layers of 20cm/8 in diameter

For the cake:

  • 225g/8 oz self-raising flour
  • 140g/5 oz caster/granulated sugar
  • 55g/2 oz brown sugar
  • 225g/8 oz butter/margarine
  • 4 eggs
  • 1 tbsp Beanies caramel coffee granules dissolved in 1.5 tbsp boiling water

For the buttercream icing/topping:

  • 55g/2 oz butter
  • 140g/5 oz icing sugar
  • 0.5 tbsp Beanies caramel coffee granules dissolved in 1 tbsp boiling water
  • Handful of mini salted caramel fudge pieces, or other fudge/toffee type sweets chopped into small pieces
  • 50g/1.5 oz dark chocolate, chopped into small pieces

METHOD

For the cake:

  1. Pre-heat the oven to 180 degrees C (or 160 fan) and line two or three round baking tins with parchment paper.
  2. Whisk the butter/margarine and sugars together in a large mixing bowl until pale, then whisk in the eggs.
  3. Fold in the flour and coffee until a batter of a soft dropping consistency has formed.
  4. Pour the mixture into the prepared cake tins, then pop in the oven and bake for around 15-20 minutes until a cocktail stick inserted into the sponges comes out clean.
  5. When baked, transfer the cakes onto a wire rack and remove from the tins when cool. At this stage, the sponges can be frozen for decorating at a later date if you wish.

For the buttercream/topping:

  1. Place the butter and coffee in a bowl and gradually beat in the icing sugar until smooth and spreadable (if it’s too runny, add a bit more icing sugar until you have the desired consistency).
  2. Spread half of the buttercream on top of one of the cooled sponges (or one third if using three layers), then place the other sponge on top and spread with the remaining buttercream (or divide it between the remaining two sponges if using three layers).
  3. Sprinkle the chopped dark chocolate and fudge pieces over the cake before serving.
Categories: Icing, Layer Cakes | Tags: , , , , , , , , , , , , , , , | Leave a comment

Boost Bar Biscuit Cake

They may not enjoy quite the same popularity as Mars bars, Maltesers or Cadbury Buttons, but I think Boost bars are such an underrated chocolate. Chewy caramel, a generous coating of Dairy Milk and super crunchy biscuit melded into one – what’s not to like?!

Boosts have been my mum’s all-time favourite chocolate bars for as long as I can remember, and so I wanted to use them as the inspiration for her birthday cake this year. She’s not the biggest fan of chocolate sponge cake and the idea of doing one sandwiched with caramel and topped with Boost pieces didn’t really grab me. I Googled ‘Boost bar cheesecake’ and, to my immense surprise, there were no results! Needless to say, this was all the motivation I needed to rectify this and attempt one myself, particularly given the enticing can of Carnation caramel already sat waiting in the pantry.

After thinking about it some more, I decided cream cheese didn’t really seem necessary and decided to stick with recreating each element of the chocolate bar to create a large, sliceable, homemade version. No frills, no faff and no baking but the end result was delicious and went down a storm!

I realised afterwards that, due to the soft consistency of the tinned caramel, this creation is actually perhaps more reminiscent of Munchies chocolates rather than their chewier Cadbury cousin. Either way, it tastes good, which is the main thing I think!

20160319_151302

INGREDIENTS

For the base:

  • 170g/6 oz digestive biscuits, crushed
  • 55g/2 oz butter or margarine, melted

For the filling:

  • 3/4 of a 397g can Carnation caramel
  • 250g/9 oz milk chocolate (preferably Cadbury’s Dairy Milk)
  • 55g/2 oz butter or margarine
  • 2 tbsp golden syrup
  • 1 x 10⁸g bag Boost Bites (or Munchies!), or 2 Boost bars, chopped into 2cm pieces

METHOD

For the base:

  1. Place the digestive biscuits in a hole-free carrier bag and bash into crumbs with a rolling pin, or place them in a food processor.
  2. Place the butter/margarine in a heatproof bowl and melt in the microwave until liquid, and then pour in the biscuit crumbs. Mix thoroughly to combine.
  3. Pour the mixture into a lightly greased flan dish and press down with your fingers or the back of a spoon until flat and firm. Place in the fridge to set for at least half an hour.

For the filling/topping:

  1. Remove the set biscuit base from the fridge and spread the caramel over it evenly with a spatula.
  2. Place the flan dish back in the fridge and allow to set for at least an hour, until the caramel has firmed up a bit. Remove from the fridge before making the chocolate topping.
  3. Place the chocolate in a heatproof bowl and melt in the microwave on low heat in blasts of 30 seconds-1 minute until completely smooth.
  4. Stir in the butter/margarine and syrup and pour the mixture over the caramel layer. Once the chocolate has cooled completely, arrange the Boost Bites on top, and then place back in the fridge for at least 25 minutes before serving.

20160319_151312

 
Categories: Chocolate, No-Bake | Tags: , , , , , , , , , , , , , | 4 Comments

Caramacjacks (Caramac Flapjacks)

I’ve been a bit quiet on the blogging front lately as I’ve not been doing as much baking as usual, and the few bits I have done have been either from cookbooks or things I’ve made a million times before that I’ve already posted on here. As I’ve mentioned before, I’ve also been trying to eat a bit more healthily and cut down on refined sugar but, admittedly, my desk drawer at work that’s groaning under the strain of the office biscuit/chocolate/jaffa cake stash is hindering my efforts somewhat…

Another reason in part for my lack of culinary activity is due to my recent rekindling of my passion for painting, something I hadn’t done in years until the other week. I’m so glad I’ve got back into it though as I’m enjoying it hugely, and I’m never happy if I’m not working on some kind of creative project.

Anyhow, back to the subject in hand – Caramac flapjacks! Or, as I have christened them, ‘Caramacjacks’. Weirdly enough, I’d never actually made flapjacks before but my friend at work had a birthday approaching and I decided to have a go at them as she’s not hugely keen on cake (I know, shocking!) and I wanted to make something that I could stick candles in. Like me, she’s a big chocolate fan, and there were two multipacks of the enticing sweet, golden ingots in question lingering in my pantry, so the result was a no-brainer.

P.S. If you’re crazy for Caramac, why not check out my cupcake recipe?

20160301_185541

INGREDIENTS – makes approx. 16 small flapjacks (or one big one!)

For the flapjacks:

  • 330g/11.5 oz oats
  • 150g/6 oz butter or margarine
  • 150g/6 oz brown sugar
  • 100g/4 oz golden syrup
  • 100g/4 oz caramel chocolate buttons or white chocolate buttons, chopped

For the topping:

  • 5 x standard Caramac bars
  • 1 tbsp butter or margarine
  • 75g/3 oz dark chocolate

METHOD

For the flapjacks:

  1. Pre-heat the oven to 180 degrees C (or 160 gas) and line a square or rectangular baking tin with parchment paper.
  2. Melt the butter/margarine, sugar and syrup together, either using a saucepan on the hob or by placing them in a heatproof bowl and heating in the microwave in 1-minute blasts.
  3. Stir in the oats and chopped caramel/white chocolate buttons.
  4. Scoop the mixture into the prepared baking tin and pop in the oven for around 20 minutes, or until lightly golden.
  5. Transfer onto a wire rack and allow to cool before adding the topping.

For the topping:

  1. Chop the Caramac bars into very small pieces and transfer into a heatproof bowl, then microwave on a LOW heat in 30-second blasts until completely melted (don’t be tempted to put it in for longer periods or turn the heat up or it will seize and turn disgusting!)
  2. Stir the butter/margarine into the melted Caramac and pour onto the cooled flapjack. Spread the topping into an even layer using a palette knife. Don’t worry if the consistency of the mixture isn’t very smooth.
  3. Chop the dark chocolate into small pieces and place in a new heatproof bowl, then microwave in blasts of 30 seconds to 1 minute until completely melted (dark chocolate tends to be more forgiving than the more synthetic Caramac).
  4. The Caramac topping should have set by now but, if not, wait until it has. Then, using a teaspoon, drizzle the melted chocolate across the flapjack in a criss-cross pattern and allow to set.
  5. Cut into 16 small bars with a sharp knife – or go mad and leave it as one giant flapjack!
Categories: flapjacks, Traybakes | Tags: , , , , , , , , , , , | 2 Comments

Belgian Speculoos Cupcakes

Originally posted 28/02/2014

In October last year I went for a lovely long weekend in Bruges with one of my best friends and, in between stuffing our faces with the heavenly chocolate and fruit beer, we found ourselves sampling delicious golden caramel-flavoured ‘Speculoos’ spread every morning with breakfast in the hotel. This is a peanut butter style spread that’s made from ‘Speculoos’ biscuits which, we later found out from the distinctive red and white packaging, can be bought here in the UK under the name ‘Lotus Caramelized Biscuits’. Just recently, the spread has also become available to buy in the supermarkets over here so it went without saying that I needed to cake-ify it somehow! And here’s the meltingly moreish result, topped off with Belgian chocolate chips for the ultimate Bruges experience 🙂

INGREDIENTS – makes approx. 12-15

For the cakes:

  • 170g/6 oz self-raising flour
  • 115g/4 oz brown sugar
  • 55g/2 oz caster/granulated sugar
  • 170g/6 oz butter/margarine
  • 3 eggs
  • 1 tsp vanilla extract
  • 0.5 tsp baking powder
  • 1 tsp Lakeland buttery caramel flavouring (optional but stunningly delicious and aromatic!)

For the icing (apologies if measurements are a bit off here, made it up as I went along):

  • 3 tbsp butter (unsalted if preferred)
  • 4 tbsp Lotus Caramelized Biscuit spread
  • 4 tbsp icing sugar
  • 1 tsp vanilla extract
  • 3 tsp milk
  • Few drops of Lakeland buttery caramel flavouring (again, optional but scrummy!)
  • Handful of Belgian chocolate chips

METHOD

For the cakes:

  1. Pre-heat the oven to 180 degrees C (or 160 fan) and line two baking trays with 18 paper cases.
  2. Whisk the margarine/butter and both lots of sugar together in a mixing bowl then whisk in the eggs.
  3. Fold in the flour, baking powder, vanilla extract and caramel flavouring until a batter of a soft dropping consistency has formed.
  4. Drop the mixture into the paper cases using a teaspoon until they’re each about three quarters full.
  5. Pop in the oven and bake for about 12-15 minutes until a cocktail stick inserted into the sponge comes out clean.
  6. When baked, place on a wire rack and leave to cool. At this stage the cakes can be frozen for decorating at a later stage if you wish.

For the icing:

  1. Whisk the butter, Lotus spread, vanilla extract, caramel flavouring and icing sugar together in a bowl until well combined, while gradually adding the milk to loosen the mixture until it’s of a spreadable consistency. If it’s too thick, add more milk and if it’s too runny, add more icing sugar.
  2. Spread onto the cakes using a palette knife or pipe on using the nozzle of your choice.
  3. Top each cake with a few Belgian chocolate chips.
Categories: cupcakes | Tags: , , , , , , , , , , , , , , , , | Leave a comment

Golden Caramac Cupcakes

Originally posted 30/06/2013

Seriously, who doesn’t love Caramac?? I’m so glad you can still buy these deliciously retro and unique golden caramel flavoured chocolate bars in most shops. This recipe is so easy but great if you want something a bit different from normal chocolate cupcakes, and the mere smell will have people salivating in anticipation!

Adding half dark brown sugar to the batter is a simple twist on a regular cupcake but the result is a divinely butterscotchy flavour which really compliments the Caramac frosting. The creation of these babies coincided with Bargain Baking Find of the Year, courtesy of my mum: she picked up a can of Dr Oetker’s amazing Golden Shimmer Spray for 49p instead of a whopping £3.99 just because the main cap was missing! I don’t think I could justify paying full whack for it but the metallic sheen it creates is just fantastic and perfect for this recipe, although the cakes are just as delicious without it.

INGREDIENTS – makes approx. 10-12 small cupcakes

For the cakes:

  • 115g/4 oz self-raising flour
  • 55g/2 oz caster/granulated sugar
  • 55g/2 oz dark brown sugar (sifted if preferred)
  • 115g/4 oz margarine/butter
  • 2 eggs
  • 1 tsp vanilla extract
  • Quarter tsp baking powder

For the icing:

  • 115g/4 oz butter (unsalted if preferred)
  • 225g/8 oz icing sugar
  • 3 30g Caramac bars
  • Dr Oetker Gold Shimmer Spray (optional)

METHOD

For the cakes:

  1. Pre-heat the oven to 180 degrees C (or 160 fan) and line a baking tray with 12 paper cases.
  2. Whisk the margarine/butter and both lots of sugar together in a mixing bowl then whisk in the eggs.
  3. Fold in the flour, baking powder and vanilla extract until a batter of a soft dropping consistency has formed.
  4. Drop the mixture into the paper cases using a teaspoon until they’re each about three quarters full.
  5. Pop in the oven and bake for about 12-15 minutes until a cocktail stick inserted into the sponge comes out clean.
  6. When baked, place on a wire rack and leave to cool. At this stage the cakes can be frozen for decorating at a later stage if you wish.

For the icing:

  1. Break one of the Caramac bars up into a heatproof bowl and place over a saucepan of simmering water without letting the bottom of the bowl touch the water, or heat on short bursts of LOW heat in the microwave, until completely melted.
  2. Add the butter and whisk while gradually adding the icing sugar until a thick, fluffy mixture has formed. If it’s too runny, add some more icing sugar.
  3. Spread onto the cakes using a palette knife, or pipe on using the nozzle of your choice, then spray with the gold Shimmer Spray (I found this works best when keeping the can about 10ins away from the cake).
  4. Carefully break or cut the remaining two Caramac bars into 12 rectangular sections and push one onto the top of each cake as a neat finishing touch.
Categories: cupcakes | Tags: , , , , , , , , , , , , , | 1 Comment

Blog at WordPress.com.