PBJ Flapjacks

Ah, PBJ. In flapjack form. I feel I’ve reached new culinary heights.

Peanut butter and jam (or should I say ‘jelly’?), that much-loved American pairing, arguably the Pot Noodle of the sandwich world. Quick, unsophisticated and little nutritional value, but hits the spot every time.

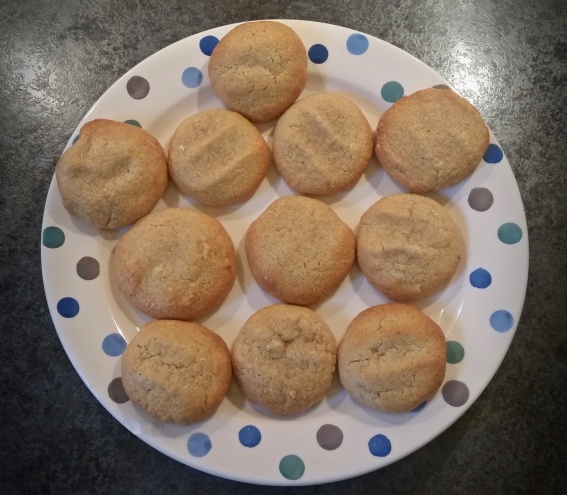
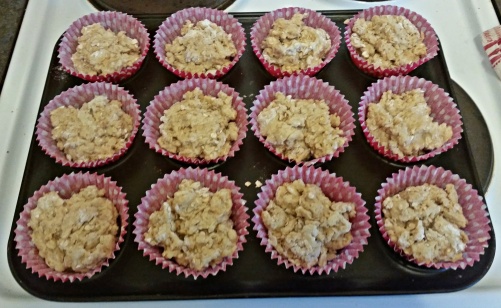
I’ve recently discovered the joys of homemade PBJ granola and I would argue that it tastes 100 times better than eating it slathered on slices of bread. I eat it with milk, in yogurt, snaffled in handfuls from the tub…I can’t get enough of the stuff. And the recipe translated wonderfully into similarly oat-based flapjack form when I needed a quick bake for my craft group.

I had also somehow ended up with three open jars of jam in my cupboards so this was a good excuse to use some up. In the end it was a real bish, bash, bosh job – you can literally use any kind of nut butter or jam you have to hand – and I think I’d go as far as to say I like these as much as the granola, if not more.

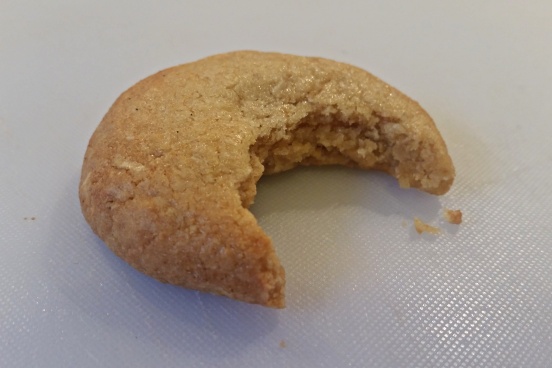
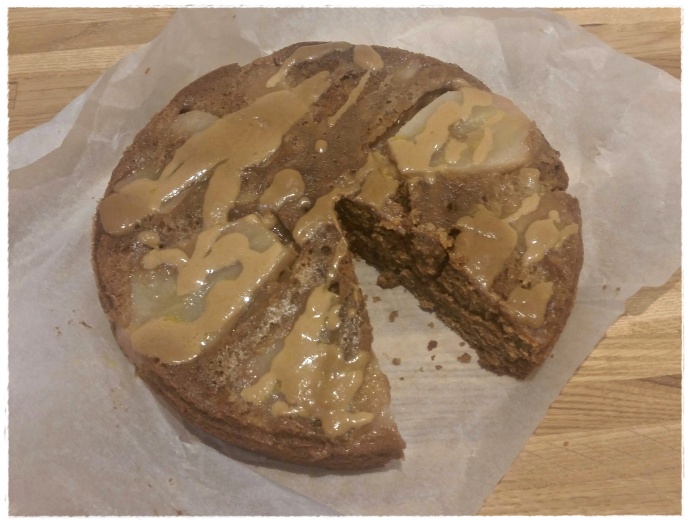
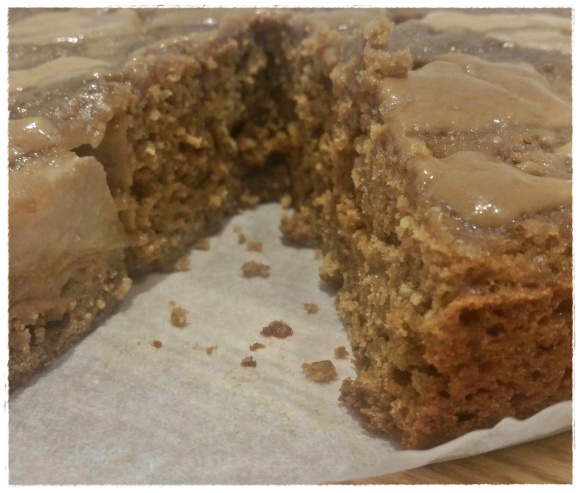
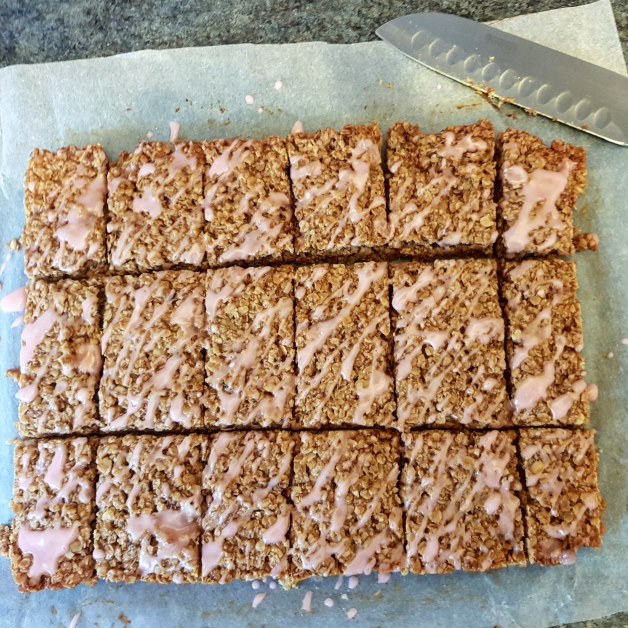
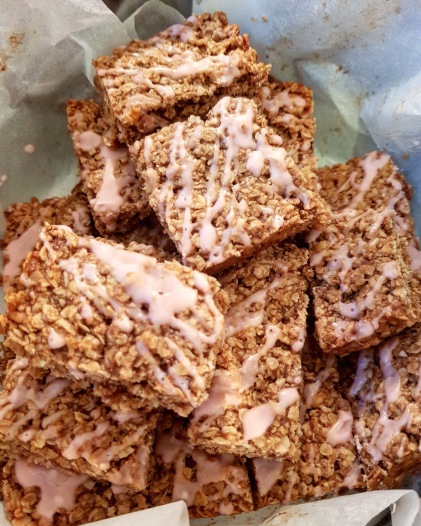
These flapjacks make a really satisfying snack and, surprisingly, aren’t too cloyingly sweet due to the reduced amount of sugar and syrup used. I think they’re the perfect balance of sweet, salty, crispy and chewy. The strawberry glace icing turns them into a bit more a treat but certainly isn’t essential so feel free to skip this part.

Oh, and this recipe is gluten-free (if gluten-free oats are used – check the packet) and can be made vegan very easily!

IMG_20190616_170622_237

INGREDIENTS – makes 15-18

For the flapjacks:

  • 40g/1.5 oz butter/margarine/vegan alternative such as soy spread
  • 85g/3 oz peanut butter (crunchy, smooth, any kind you fancy)
  • 3 tbsp jam of your choice
  • 130g/4.5 oz brown sugar
  • 1 tbsp golden syrup
  • 270g/9.5 oz oats

For the icing (optional):

  • 2 tbsp icing sugar
  • Few drops of strawberry extract
  • Water, to thicken

METHOD

For the flapjacks:

  1. Pre-heat the oven to 180 degrees C (or 160 fan) and line a rectangular baking tin with parchment paper.
  2. Place the butter, peanut butter and sugar together in a large heatproof bowl and melt together in the microwave on low heat until smooth.
  3. Add the oats and jam to the bowl and stir thoroughly.
  4. Pour the mixture into the prepared baking tin and place in the oven for around 20 minutes, or until the flapjacks are very slightly browned at the edges.
  5. Leave to cool on a wire rack before icing and slicing.

For the icing:

  1. Mix the icing sugar and strawberry extract together in a bowl and add water a little at a time until you have a runny consistency.
  2. Use a teaspoon to drizzle the icing over the top of the cooled flapjacks.
  3. Allow to set for a few minutes before slicing and devouring.

IMG_20190616_170812_096.jpg

Categories: flapjacks, Raw/Vegan, Traybakes | Tags: , , , , , , , , , , , , , , , | Leave a comment

Cheese & Marmite Muffins

These lovely comforting Cheese & Marmite Muffins came to life as a result of combining two recipes when I was full of cold and fancied making something savoury and warming.

Nigella Lawson’s genius Welsh Rarebit muffins (from Bites) are an all-time favourite of mine as their combination of melted cheese and Worcestershire sauce just oozes stodgy, umami deliciousness. However, I’ve been having Marmite cravings recently and also wanted to try a muffin recipe from a baking book my cousin recently gave to me where some of the flour was substituted for porridge oats. I’m mad about oats and will leap at any chance to use them in baking, so I decided to experiment and ended up combining the two methods.

I hesitate to use the word ‘healthy’ in the context of these muffins, but using low fat yogurt, skimmed milk and lighter cheddar cheese means they’re certainly less calorific than the gargantuan, sugar-filled monsters you find in coffee shops. Looking at similar recipes online, I ESTIMATE that these clock in at around the 200-250 calorie mark, but please do not take that as gospel!!

If you’re a Marmite hater this isn’t the bake for you but, if you’re a fan, I think you’ll find one of these fresh out the oven with a blob of butter sheer bliss…

Looking for other lighter savoury baking recipes? Check out my Low Fat Cornbread Muffins!

20190203_131202

INGREDIENTS – makes approx. 12

For the muffins:

  • 250g/9 oz plain flour
  • 100g/3.5 oz porridge oats
  • 120ml/4 fl oz plain low fat yogurt
  • 90ml/3 fl oz skimmed or semi-skimmed milk
  • 90g/3 oz lighter cheddar cheese, grated
  • 1 egg
  • 90ml/3 fl oz cooking oil (I used vegetable oil but any kind will do)
  • 1 tsp English mustard
  • 1 tbsp Marmite
  • Half tbsp light margarine
  • 1 tbsp baking powder

For the topping:

  • 1 tbsp Marmite
  • Half tbsp light margarine
  • 25g lighter cheddar cheese, grated

METHOD

For the muffins:

  1. Pre-heat the oven to 190 degrees C (or 170 fan), and line a muffin tin with 12 paper cases (you’ll need to use the larger ones rather than the small fairy cake variety).
  2. Mix the flour, oats, baking powder and cheese together in a large bowl and set aside.
  3. Add the yogurt, milk, egg, oil and mustard to a jug and beat thoroughly with a fork, then pour into the dry mixture.
  4. Add the Marmite and margarine to the same jug as before and melt together in the microwave on a low heat for around 30 seconds. Give it a stir and pour into the muffin mixture.
  5. GENTLY fold the mixture together using a wooden spoon or spatula until it is just combined (do NOT overmix!) The batter should be lumpy.
  6. Using a tablespoon, drop the mixture into the cake cases until each one is full (they won’t rise much in the oven), and bake for around 20 minutes.

20190203_123911.jpg

For the topping:

  1. Put the Marmite and margarine in the same jug again and melt together in the microwave as before.
  2. Remove the muffins from the oven and sprinkle over the grated cheese. Use a teaspoon to lightly drizzle the Marmite mixture over each muffin (roughly a scant teaspoon over each).
  3. Put the muffins back in the oven for around 5-10 minutes, until the cheese is well melted.
  4. When baked, place on a wire rack to cool (but not for too long as they’re gorgeous warm) and enjoy!

20190203_131237[9861]

Categories: Healthier, Savoury | Tags: , , , , , , , , , , , , , , , | Leave a comment

Chocolate Orange Cheesecake Brownie Cake

I’ve been meaning to blog this recipe for my Chocolate Orange Cheesecake Brownie Cake for a while so thought I’d better darn well do it before 2018 is out! Seriously, where has the time gone this year??

My good friend Mel has requested a chocolate orange cake for her last two birthdays (previous efforts include my chocolate orange bonfire cake) and this year was no exception. However, I was keen to move away from the usual sponge + frosting affair and try something different and, being time poor, my first thought was that you can’t really go wrong with brownies. I’d been wanting to give the magical sounding cheesecake hybrid variety a go for a while so thought this topping would be an equally delicious replacement for buttercream or ganache.

I ended up producing a kind of Frankenstein-style mash up of two recipes with various tweaks and the rich, gooey, creamy result worked really well as an alternative to a typical birthday cake. The bonus is that you effectively get two desserts in one while being super simple to make, especially if you don’t have the time to faff around with icing. Just a warning though – it’s much denser than a sponge so you’ll only need a small slice!

20181112_132619-1.jpg

INGREDIENTS – makes one cake of approx. 22cm/8.5 in diameter

For the brownie base:

  • 65g/2 oz plain flour
  • 175g/6 oz butter
  • 125g/4.5 oz caster sugar
  • 55g/2 oz brown sugar (either the dark or light variety, both work well)
  • 3 eggs
  • 1 Terry’s Chocolate Orange, chopped into small pieces
  • 1 tsp vanilla extract

For the cheesecake topping:

  • 150g/5 oz full-fat cream cheese
  • 60g/2 oz caster sugar
  • 1 egg
  • 1 tbsp orange juice
  • Approx. half a Terry’s Chocolate Orange
  • Orange sprinkles (optional)

METHOD

  1. Pre-heat the oven to 180 degrees C (or 160 fan) and line a round baking tin with parchment paper.
  2. Place the chocolate, sugars, vanilla and butter in a heatproof bowl and melt on the hob over a low heat or in the microwave in 30-second bursts until smooth.
  3. Allow to cool slightly then whisk in the eggs.
  4. Fold in the flour and pour into the prepared cake tin.
  5. In a separate bowl, beat the cream cheese, sugar, egg and orange juice together until smooth.
  6. Use a tablespoon to randomly dollop the cheesecake mixture on top of the brownie mixture, then use a skewer to make marble-effect swirls, as in the photo below.20181110_152213-1.jpg
  7. Place in the oven and bake for around 25-30 minutes, or until a crust forms on the edges of the brownie – remember, the inside should still be quite soft so don’t overbake!
  8. Leave to cool on a wire rack before removing from the tin and arranging Chocolate Orange segments on top of the cake (enjoy scoffing the other half!) Scatter over some orange sprinkles as a finishing touch if you like.The cake will keep for a few days in an airtight container but make sure you keep it in the fridge.

20181112_132740-1

Categories: Chocolate | Tags: , , , , , , , , , , , , | Leave a comment

Stroopwafel Cake

Well, I have certainly been on somewhat of a hiatus from my little blog of late, and with good reason!

I’ve lost count of the number of times I’ve posted blog entries on here where I say I’m on a health kick and trying to lose weight and, to be honest, each time the diet and exercise plans have ended up fizzling out despite my best intentions…

However, I’m pleased to say that this year I’m actually sticking to it and seeing results! I’ve been losing the weight fairly gradually as I can’t deal with depriving myself, but so far I’ve lost just 1.5 lbs shy of a stone since my 30th birthday in late January đŸ™‚ I’m tracking my calorie intake using the incredibly useful MyFitnessPal app and have upped my exercise in the form of long power walks around the many beauty spots near where I live, yoga and small group training sessions at the gym, which I’m enjoying a lot more than I thought possible!

This method has really motivated me to keep up the good work as the extra exercise allows me to indulge in naughty things in moderation while keeping under my daily calorie goal, so I never really feel deprived. The extra energy and strength I’m building up is awesome too!

Anyway, the one downside of this lifestyle change is that my baking efforts have been minimal since the new year. If I’m being honest, I don’t really miss eating cake that much (I’ve learned that chocolate is the one thing I really can’t do without!), but this week I’m off work and was getting cake making pangs, so I thought it was about time I dusted off my whisk.

Inspiration for this recipe came a couple of years ago when I went on a wonderful holiday to the Netherlands, home of the delicious stroopwafel. For anyone who doesn’t know, a stroopwafel is a chewy caramel-filled circular waffle that’s just big enough to sit happily on the top of your cup of tea, where the warm rising steam renders its centre even more delightfully gooey (although they’re also just as scrumptious minus the mug sauna). These goodies are a Dutch creation but you can buy them quite easily in the UK (they sell them in Sainsbury’s, Tiger and B&M among other places…)

One of the many edible souvenirs that I brought back with me was a packet stroopwafel cake mix, and it tasted so good it made me want to have a go at making my own version. It’s taken me a while to get round to it but the results were worth the wait – the melting pools of caramel and chewy, crunchy top are to die for.

20190201_135514-1[9819]

INGREDIENTS – makes 1 standard size loaf cake

  • 170g/6 oz self-raising flour
  • 140g/5 oz caster sugar
  • 30g/1 oz dark brown sugar
  • 3 eggs
  • 170g/6 oz butter
  • 1 tbsp vanilla extract
  • 4 stroopwafels, chopped into pieces no smaller than a pound coin (would recommend using scissors for this)
  • Edible gold stars, to decorate (optional)

METHOD

  1. Pre-heat the oven to 170 degrees C (or 150 fan) and line a loaf tin with parchment paper.
  2. Add the butter and sugars to a large mixing bowl and beat until pale, then whisk in the eggs.
  3. Fold in the flour, vanilla extract and half of the stroopwafel pieces, then transfer the mixture into the loaf tin.
  4. Place in the oven and bake for 20 minutes. Remove and scatter the remaining stroopwafel pieces over the top of the cake, then return to the oven for a further 10-15 minutes, or until a cocktail stick inserted into the sponge comes out clean.
  5. Transfer to a wire rack to cool before removing the cake from the tin. Finish with a scattering of edible gold stars if you like.
    Why not try a slice served warm with some cream or ice cream?

20190202_145102-1[9814]

Chewy, gooey, caramelly…what better reason to go Dutch?!


Categories: Loaf Cakes | Tags: , , , , , , , , , , , , , , , , | 2 Comments

Super Quick Butterscotch Macaroons

Bit of deja vu going on here but, as with my last post, I have Queen Nigella Lawson to once again thank for the inception of these irresistible Super Quick Butterscotch Macaroons.

As I mentioned previously, I whipped up a batch of her chocolate macaroons from Express for a gluten intolerant friend for Christmas and was impressed by how ridiculously quick and easy they were to make – only four ingredients and you don’t even have to beat the egg whites! And, as the icing on the proverbial cake, they are some of the best biscuits/cookies I’ve ever eaten.

A crispy shell with an addictively sweet, chewy centre, they are the less glamorous but less high maintenance sister of the fancy patisserie-style macaron. The naturally beautiful girl-next-door as opposed to the painstakingly made up Victoria’s Secret model, if you will.

I fancied giving the basic recipe another go but with a different flavour from the original cocoa, and thought I’d hedge my bets on some similarly-textured butterscotch Angel Delight as I’ve used it successfully in baking many times. And I’m pleased to say the results were fabulous!

You won’t find anything like these in the supermarket and as they can be done and dusted (and devoured) in about 20 minutes, there’s no excuse not to give them a go even if you’re short on timeÂ đŸ˜‰

I have to stress that the macaroons are divine eaten simply as they are, but if you feel like adding some adornment, a thin coating of white chocolate works well.
20180105_125542

INGREDIENTS – makes approx. 12-14

  • 2 large egg whites
  • 165g/5.5 oz icing sugar
  • 170g/6 oz ground almonds
  • 1 x 49g sachet of butterscotch Angel Delight
  • Half tsp vanilla extract

METHOD

  • Pre-heat the oven to 190 degrees C (or 170 fan) and line two rectangular baking trays with parchment paper.
  • Place all the ingredients in a large mixing bowl and stir together with a wooden spoon or spatula until a sticky dough forms.
  • Pull off chunks of dough slightly bigger than a walnut and roll into balls with your hands (you may find dipping your hands in a bowl of water helps if the stickiness is too much!), placing them (evenly spaced) on the baking trays as you go.
  • Gently flatten each ball slightly with your fingers, and then place them in the oven for about 10-12 minutes. It can be tricky to tell when they’re done as they will still be soft, but they should have a slight golden brown tinge around the edges and you should be able to move them from the trays without any dough being left on the parchment.
  • Transfer the macaroons to a wire rack using a fish slice to cool before devouring.

20180105_125949

Categories: Biscuits/Cookies | Tags: , , , , , , , , , , , , , , | Leave a comment

Vanilla Chai Polar Bear Cupcakes

I have been doing oodles of baking over Christmas, as I’m sure many of you have, but all my creations have involved using existing recipes and I hadn’t ventured into conjuring up any of my own until these Vanilla Chai Polar Bear Cupcakes.

My efforts for edible gifts this year included meringue cookies, chocolate macaroons, dairy-free fruitcakes, iced lebkuchen and my own failsafe stollen biscotti – all delicious and fun to pack up cosily in little starry cellophane bags.

I also finally got round to attempting proper bread – with actual yeast! – after writing it down as a new year’s resolution the last two years, and made a no-knead tear & share garlic wreath. It was super simple to put together and my family and I enjoyed liberally dunking it into a big oozy baked Camembert cheese for Boxing Day lunch (after a nutritious breakfast of Quality Street, naturally).

Anyway, I have managed to come up with a new recipe to blog, just in the nick of time before 2017 draws to a close. And I have my culinary idol, the wonderful Nigella Lawson, to thank for the inspiration.

I made a batch of her delicious chai muffins from her book Simply Nigella a few weeks ago, which are one of my (many) favourite recipes of hers. One of the key ingredients is milk infused with the gorgeously aromatic contents of spicy chai teabags, and the result is like a warm hug in cake form. They’re filling, subtly sweet, and the perfect tummy pleaser on a dreary winter morning.

These gave me the idea of trying something similar in cupcake form: a soft, spiced sponge with a light vanilla frosting. A liberal sprinkling of desiccated coconut and a few chocolate buttons completed the transformation into polar bears, as I wanted something fun to serve for a girly night in with my two best friends. By happy coincidence, the combination of the marshmallowy meringue topping and coconut shreds is reminiscent of those divinely gooey chocolate snowball cakes you can get in the supermarket.

I am currently nibbling the plain cake offcuts as I type, which have been sat in a margarine tub for 24 hours, and, if anything, they taste even better than when they first came out of the oven! I therefore think I’ll give this sponge another go without the frosting and decorations, as it’s certainly capable of standing on its own two feet unadorned as a wonderfully moist and fragrant cake in its own right.

IMG_20171228_184143_901

INGREDIENTS – makes approx. 9-10 large cupcakes

For the cakes:

  • 155g/5.5 oz self-raising flour
  • 40g/1.5 oz ground almonds
  • 170g/6 oz butter or margarine
  • 70g/2.5 oz brown sugar
  • 85g/3 oz caster sugar
  • 3 eggs
  • 4 tbsp milk (or almond milk if you prefer)
  • 2 x vanilla chai teabags (I used Pukka brand ones)
  • 1 tsp ground cinnamon
  • 1 tsp vanilla extract

For the frosting/decorations:

  • 2 egg whites
  • 85g/3 oz caster sugar
  • Half a tsp cream of tartar
  • 1 tsp vanilla extract
  • Half a tsp ground cinnamon
  • 5 tbsp (approx.) desiccated coconut
  • 18-20 white chocolate buttons
  • 9-10 milk or dark chocolate buttons
  • 18-20 milk or dark chocolate chips

METHOD

For cakes:

  1. Tear open the chai teabags and tip the contents into a heatproof jug or saucepan, then pour over the milk and stir briefly.
  2. Heat the milk and tea together either in the microwave on a medium heat for about two minutes, or over a medium heat on the hob, until it is warm and fragrant but not boiling. Leave to cool slightly.
  3. Pre-heat the oven to 180 degrees C (or 160 fan) and line a muffin tin with cupcake cases.
  4. Whisk the butter/margarine and sugars together in a large mixing bowl until pale, then whisk in the eggs and tea-infused milk mixture.
  5. Fold in the flour, ground almonds, cinnamon and vanilla extract until a batter of a soft dropping consistency has formed.
  6. Pour the mixture into the cake cases until they’re each about two thirds full, then pop in the oven and bake for around 15-20 minutes until a cocktail stick inserted into the sponges comes out clean.
  7. When baked, leave the cakes to cool on a wire rack. At this stage the they can be frozen for decorating at a later date if you wish.
  8. When cool, use a serrated knife to saw off any domed tops from the cakes so you have a flat surface to add the decorations (don’t bin the offcuts – put them in a sealed container and munch them later!)

For the frosting/decorations:

NOTE: Only add the frosting a maximum of a couple of hours before serving as it doesn’t keep well.

  1. Place the desiccated coconut in a wide-rimmed bowl and set aside.
  2. Place the egg whites into a clean bowl and whisk until white peaks form.
  3. Add the cream of tartar, cinnamon and vanilla extract, then add the sugar gradually while continuing to whisk until you have a stiff, smooth mixture that holds its shape and stays put when you turn the bowl upsidedown.
  4. Using a palette knife, generously and evenly spread the mixture over the top of each cupcake.

    20171228_175608-1

  5. Turn each cake upsidedown and dunk the tops in the desiccated coconut so they’re evenly coated.
  6. Add two white chocolate buttons, two chocolate chips and one milk/dark chocolate button to each cake to create a bear face, as in the photos.

    20171228_180536

Categories: cupcakes, Festive, Icing | Tags: , , , , , , , , , , , , , , , , , , , , , | Leave a comment

Pear Gingerbread Upsidedown Cake

Yay, Autumn is here again! And, of course, the dawn of this season means baking with luscious scrumped fruit, sticky syrup/treacle and oodles of heaven-scented winter spices. It just wouldn’t be Autumn otherwise. And this lovely Pear Gingerbread Upsidedown Cake utilises all three of this holy culinary trinity.

Isn’t it funny how you can bake a seemingly failsafe recipe that you’ve made countless times before and it can turn out a disaster, and you can write something off as an epic dog’s dinner of a cake fail only for it to turn out beautifully? Unfortunately, normally the former is the case for me, but this week I experienced a prime example of the latter.

I was making some banana and caramel cupcakes for my work’s Macmillan Coffee Morning and thought I’d make use of some scrumped pears while I had the oven on. I had a flick through some of my trusty recipe books and came across an enticing apricot upsidedown number in Cakes & Slices that didn’t seem to require too much effort, for which I could easily substitute the suggested fruit for my windfall pears.

Part-way through making it I realised I didn’t have enough butter and substituted some of it for milk, and I also replaced the syrup with treacle out of necessity in my haste to get the damn thing finished. I melted the wet ingredients together as instructed before folding in the dry, and the result looked terrible!

It was wet and lumpy, and the baking powder I added in the hope of giving it a better rise (in light of the lack of eggs) let off an ominous fizz. When I poured the dodgy-looking concoction over the pear slices I barely had enough to cover them. By this point, I was convinced that this monstrosity would have to go down in the ‘disaster’ file, but thought I may as well cook it.

However, I needn’t have worried as, to my surprise, it rose beautifully and tasted wonderful! The ratio of pear to sponge was just right, and the cake was deliciously moist without being overly sticky. I shared slices with various people and they all loved it.

I had some leftover caramel from my Macmillan Coffee Morning cupcakes which is why I drizzled some over the top, but it’s certainly not essential.

20170929_131625-1

INGREDIENTS – makes one sponge of approx. 22cm/8.5 ins diameter

  • 2 medium pears, peeled, cored and chopped into fairly thin, neat slices
  • 175g/6 oz butter
  • 140g/5 oz brown sugar + a little extra for sprinkling
  • 85g/3 oz treacle
  • 185g/6.5 oz self-raising flour
  • 2 tsp ground ginger
  • 1 tsp mixed spice
  • Half a tsp baking powder
  • Drizzle of maple or golden syrup
  • Drizzle of Carnation caramel (optional)

METHOD

  1. Pre-heat the oven to 180 degrees C (or 160 fan) and line a round cake tin with parchment paper.
  2. Sprinkle about half a tablespoon of brown sugar over the bottom of the tin, drizzle over some maple/golden syrup, then neatly arrange the pear slices in a circle on top.
  3. Place the butter, sugar and treacle in a heatproof bowl then melt together in the microwave on a medium heat in blasts of 1 minute.
  4. Stir well and then fold in the flour, ginger, mixed spice and baking powder – don’t worry that the batter looks lumpy and runny!
  5. Pour the batter evenly over the pears, then place the tin in the oven for about 25-30 minutes, or until a skewer inserted into the sponge comes out mostly clean.
  6. Remove the cake from the oven and place on a wire rack. When cool, turn the cake out so that the pears are at the top.
  7. Drizzle some Carnation caramel over the cake, if you like (if the caramel is too stiff, heat it for about 30 seconds in the microwave on LOW heat in a heatproof bowl and give it a good stir).
  8. Enjoy cold, or warm with some cream or ice cream. Yum!

20170929_131642-1

Categories: Layer Cakes | Tags: , , , , , , , , , , , , , , , , | Leave a comment

Cookies & Cream Cake

I’m back! Last month I finally moved into the lovely maisonette in Milton Keynes that I put an offer on back in February which has been extremely exciting, but also means I’ve been a) super busy with house things and b) without broadband for an achingly long period! Anyway, I’m now all set up and able to access the World Wide Web once again, so I thought it was about time I posted the recipe for this luscious Cookies & Cream Cake. So, without further ado, here we go…

A large number of my friends and family have birthdays in the summer, and the 22nd June saw my dear step-grandad, John, turn the grand old age of 90! I’ve made him a cake the last few years and wanted this one to be particularly special due to it being a milestone occasion.

I got the idea for this cake from the wonderful Hummingbird Bakery cookbook, Home Sweet Home, but adapted it in a few ways, most notably using Dream Topping in place of the buttercream.

I fancied trying something different and I have to admit I have a bit of a weakness for this particular type of faux cream myself, despite the dodgy 1970s dinner party connotations it seems to be lumbered with! It works perfectly in this cake and the overall taste reminded me of that oh-so-American activity of dipping cookies in milk.

I would definitely make this wondrous beast again. It’s ridiculously easy to create but the result is a feast for the eyes and, hence, ideal for a celebration, as well as being appealing to all age groups. I mean, whether you’re nine or ninety, who could resist a homemade triple-layer chocolate chip cake adorned with a mountain of cookie bits?!

IMG_20170618_113843_449

INGREDIENTS – makes 3 shallow sponge layers of approx. 20cm/8 in diameter

For the cake:

  • 280g/10 oz self-raising flour
  • 280g/10 oz butter
  • 255g/9 oz caster sugar
  • 5 eggs
  • 2 tsp vanilla extract
  • 50g/2 oz milk or dark chocolate chips

For the filling/topping:

  • 1 x standard sachet Dream Topping, prepared with milk according to pack instructions
  • 1 tsp vanilla extract
  • 1 packet shop-bought chocolate chip cookies (from the biscuit aisle of the supermarket; not the chewy bakery ones), e.g. Maryland

METHOD

For the cake:

  • Pre-heat the oven to 180 degrees C (or 160 fan) and line three round baking tins with parchment paper.
  • Whisk the butter and sugar together in a large mixing bowl until pale, then whisk in the eggs.
  • Fold in the flour and vanilla extract until a batter of a soft dropping consistency has formed.
  • Pour the mixture into the prepared cake tins, then scatter the chocolate chips over the top.

20170614_184637

  • Pop the tins into the oven and bake for around 15-20 minutes until a cocktail stick inserted into the sponges comes out clean.
  • When baked, transfer the cakes onto a wire rack and remove from the tins when cool. At this stage, the sponges can be frozen for decorating at a later date if you wish.

For the filling/topping:

Note: This part should be done just before serving the cake, otherwise the cookies will go soft.

  1. Mix up the Dream Topping according to the packet’s instructions, and stir in the vanilla extract. Divide equally into two bowls.
  2. Bash the cookies up in a zip-lock bag using a rolling pin. Do this quite roughly – you want chunks rather than crumbs.
  3. Stir half of the crushed cookies into one bowl of the Dream Topping and then spread half of the mixture onto one of the cooled sponge layers. Sandwich another layer on top and repeat.
  4. Place the final sponge layer on top of the other two and spread with the other bowl of smooth Dream Topping. Scatter the remaining crushed cookies on top of the cake and serve.

20170618_112843-1

Categories: Icing, Layer Cakes | Tags: , , , , , , , , , , , , , | Leave a comment

Caramel Coffee Cake

I should probably start by saying that one of my pet hates is promotional blog posts that fawn over products that have been sent to the blogger in return for free advertising so apologies if this is a bit hypocritical, but I must say that this particular type of coffee really made this Caramel Coffee Cake special. And I promise I’ve not been given any incentive to promote it!

The product in question is Beanies caramel flavour instant coffee. My mum bought a jar of it from Aldi a few weeks ago and I was captivated by the absolutely heavenly aroma wafting from the cup as it brewed.

beanies-coffee-creamy-caramel-flavour-instant-coffee-50g-37317-p

Now, I actually cannot stand the taste of coffee, but bizarrely I love it in cake form and knew I had to try and bake with this angelic smelling stuff! And a 50th birthday for a java-loving colleague at work was the perfect excuse to try.

The recipe is extremely simple – pretty much just a slightly adapted Victoria sponge and standard buttercream – but the caramel coffee really takes the flavour to another level of deliciousness.

Screenshot_2017-06-04-11-51-06-1

INGREDIENTS – makes 3 shallow or 2 deep sponge layers of 20cm/8 in diameter

For the cake:

  • 225g/8 oz self-raising flour
  • 140g/5 oz caster/granulated sugar
  • 55g/2 oz brown sugar
  • 225g/8 oz butter/margarine
  • 4 eggs
  • 1 tbsp Beanies caramel coffee granules dissolved in 1.5 tbsp boiling water

For the buttercream icing/topping:

  • 55g/2 oz butter
  • 140g/5 oz icing sugar
  • 0.5 tbsp Beanies caramel coffee granules dissolved in 1 tbsp boiling water
  • Handful of mini salted caramel fudge pieces, or other fudge/toffee type sweets chopped into small pieces
  • 50g/1.5 oz dark chocolate, chopped into small pieces

METHOD

For the cake:

  1. Pre-heat the oven to 180 degrees C (or 160 fan) and line two or three round baking tins with parchment paper.
  2. Whisk the butter/margarine and sugars together in a large mixing bowl until pale, then whisk in the eggs.
  3. Fold in the flour and coffee until a batter of a soft dropping consistency has formed.
  4. Pour the mixture into the prepared cake tins, then pop in the oven and bake for around 15-20 minutes until a cocktail stick inserted into the sponges comes out clean.
  5. When baked, transfer the cakes onto a wire rack and remove from the tins when cool. At this stage, the sponges can be frozen for decorating at a later date if you wish.

For the buttercream/topping:

  1. Place the butter and coffee in a bowl and gradually beat in the icing sugar until smooth and spreadable (if it’s too runny, add a bit more icing sugar until you have the desired consistency).
  2. Spread half of the buttercream on top of one of the cooled sponges (or one third if using three layers), then place the other sponge on top and spread with the remaining buttercream (or divide it between the remaining two sponges if using three layers).
  3. Sprinkle the chopped dark chocolate and fudge pieces over the cake before serving.
Categories: Icing, Layer Cakes | Tags: , , , , , , , , , , , , , , , | Leave a comment

Pineapple & White Chocolate Pavlova

Following the success of my first ever homemade meringues back in October last year, I’ve been keen to have a go at a full-blown pavlova. A sweet, snowy mountain adorned with smooth white cream and colourful fresh fruit, I’ve always thought pavlovas make a spectacular dessert, as well as being a nice lighter alternative to cake.

I thought if my attempt turned out like the delicious marshmallowy-on-the-inside-crisp-on-the-outside individual little clouds I made previously I’d be happy, but I was worried that this monster version would be more temperamental, and cook unevenly or shatter into sad little bits of chalk dust when baked. Luckily, I needn’t have had such concerns as it came out beautifully.

Although the topping combination was my idea, I can’t take credit for the meringue base here. My kitchen-whizz mum suggested I use her failsafe pavlova recipe from her trusty old copy of The Love of Cooking by Sonia Allison (from 1972!), and it proves that the oldies are certainly goodies as it worked perfectly. It’s definitely going to be be my go-to recipe in future!

20170311_203249-1

Now here I must confess that I’m not a massive fan of berries, which are a staple of the quintessential pavlova. I love anything strawberry, raspberry or blueberry flavoured, but I just don’t enjoy the texture of the fruits themselves. However, I needed something that would cut through the sweetness of both the meringue and white chocolate, so I decided to use refreshingly sharp pineapple instead and I think it worked really well.

The finished article went down an absolute storm with my family, and I’ve definitely been bitten by the homemade meringue bug, so I’ll certainly be making more pavs in the future!

20170218_180430-1

INGREDIENTS – serves approx. 6 people

For the meringue base:

  • 4 egg whites
  • 225g/8 oz caster sugar
  • Quarter tsp cream of tartar
  • 2 tsp cornflour
  • 1 tsp vinegar (any kind will do)

For the topping:

  • 1 x 36g sachet Dream Topping + milk as needed by the packet instructions (or 250ml/0.5 pint double cream)
  • 1 x 432g can pineapple chunks or slices in juice, drained
  • 50g/1.5 oz white chocolate, chopped into chunks
  • A sprinkling of white and pink edible pearls (optional)

METHOD

For the meringue base:

  1. Pre-heat the oven to 130 degrees C (or 110 fan) and line a large flat baking tray with parchment paper.
  2. Place the egg whites in a very clean mixing bowl and whisk with the cream of tartar until white and frothy.
  3. Continue to whisk while adding the sugar a few tablespoons at a time until stiff, glossy peaks form – this will take a good few minutes (you should be able to hold the bowl of mixture over your head without it spilling out!)IMG_rd1c9n
  4. Gently fold in the cornflour and vinegar with a spatula (and don’t panic at the odd acidic smell like I did – this will disappear once it’s cooked, I promise!)
  5. Dollop the mixture in a rough circle on the baking parchment, ensuring it’s in a thick layer so you can’t see the paper through it at any point.
  6. Place in the oven and bake for around 1-1.5 hours, until a crisp shell has formed and the meringue is very slightly golden on the top but mostly white.
  7. When cooked, remove from the oven and leave to cool.

For the topping:

  1. Prepare the Dream Topping (or cream) according to the packet’s instructions – it should be quite thick and not runny – and then pile it on top of the meringue base.
  2. If using pineapple slices, cut them into small chunks and scatter on top of the Dream Topping, followed by the white chocolate chunks.
  3. Finish with a sprinkling of a few pretty pink and white pearls if you fancy, and serve immediately.
Categories: Other Treats | Tags: , , , , , , , , , , , , , , , , , | Leave a comment

Blog at WordPress.com.